Colorful & Glam Holiday Kitchen Upgrades

I took a look at my kitchen the other day and realized it needed a facelift. The counters were filled with all our junk, various appliances, dishes, baby items… you name it, the counter is covered in it! The issue with our kitchen was the same as everywhere else in our home- I didn’t love the items we had displayed in there, and therefore it didn’t matter that everything was covered with junk. What I mean by that is… when you’ve random stuff on your counter, it’s SO easy for the random stuff that should be there to get mixed up with clutter and suddenly you can’t see your countertops. Also, if there’s more stuff than there are places to put things, you end up in the same little pickle!

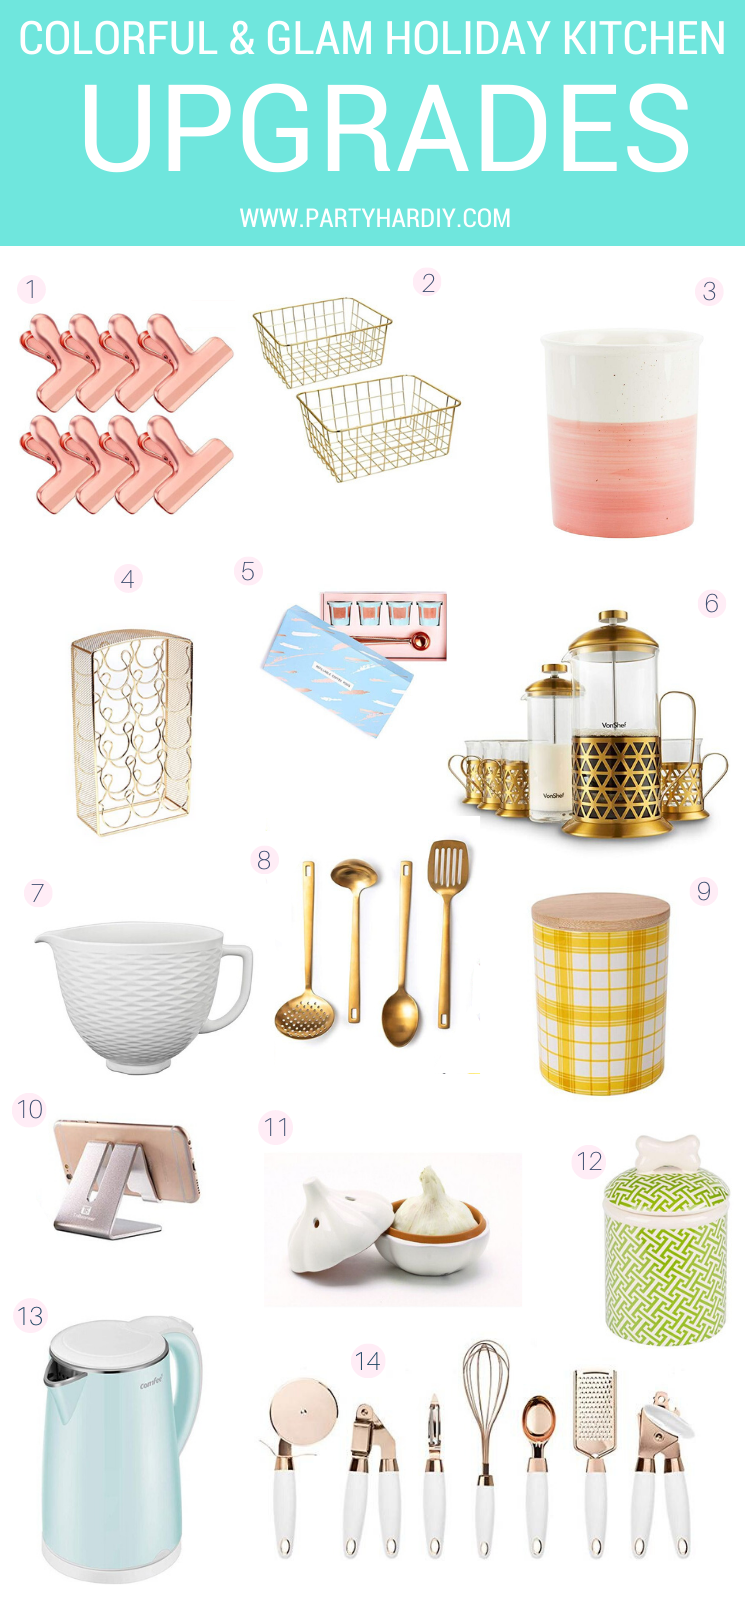
During the holidays, this problem gets even worse. Between the bake sales and guests coming over, it feels like the counters always get covered in items that don’t ned to be there! To combat this issue that we all face, I’ve rounded up 14 gorgeous, functional kitchen items that will elevate your whole kitchen and have you WANTING to keep it clean. Because when your kitchen accessories are a show stopper, you need to make sure everyone sees them!

*This post contains affiliate links

Between the bake sales and guests coming over, it feels like the counters always get covered in items that don’t ned to be there! To combat this issue that we all face, I’ve rounded up 14 gorgeous, functional kitchen items that will elevate your who…


1. Chip Clips- Ah, the item that started this whole post! My original chip clips were an assortment of adorable, cheap plastic ice cream cones, bows, animals… essentially, whatever someone found at a register and gave me because they thought of me! And of course, a few that I bought impulsively as well. But when we ended up losing and breaking most of these clips, my husband asked me to order a new set on Amazon. I was originally planning to get a plastic set again (because that’s what I’m used to!) and then I saw these beauties. They felt too fancy for my stale chips but you know what? My chips deserve to be fancy too.

2. Wire Bread Basket- I think this basket is so cute because it’s gold and gorgeous. However, the wire design ensures that you actually SEE your bread and therefore are more likely to eat it. I’m one of those “out of sight, out of mind” type of people so even something like bread can get forgotten! Right now, our bread is just tossed on the counter but prior to that we somehow acquired a black basket that had our bread in it. Neither was a very pretty solution! Now I’m antsy for a new basket!

3. Utensil Cup- I have a cute utensil holder on my counter that’s actually a large canister (minus the lid) but I love the idea of this cool, simple white and coral one. It feels so glam and upscale for a fraction of the cost! It adds such a subtle pop of color.

4. Keurig Cup Holder- In my kitchen, the Keurig just feels like an eyesore. We have a large black one that isn’t even made anymore. We need an adaptor just to use regular k-cups! We have a drawer-style cup holder which accentuates the dark hole that it creates. While I may dream about replacing my old keurig, I figured getting a nice k-cup holder to go next to it could be fun! I love this one because if you organize your k-cups in color order, you’ll have a glam little rainbow on your counter!

5. Re-usable K-Cups- If you want to reduce your kitchen clutter, save the environment, AND make your kitchen glam in the process, try switching to these pretties! I love the gold color and the fact that you don’t need to fill up a landfill with k-cups. (I should note- I don’t drink coffee and therefore don’t use a Keurig. But my husband does!) You can pop these in a cabinet or drawer since they’re so tiny which would save some much-needed counter space.

6. French Press Coffee Maker- If you prefer to get a little fancier (and more eco friendly) with your coffee, you can grab this french press! I love it’s gorgeous gold finishes and I think it would look amazing on your counter or stove. It also comes with a set of cups that matches which makes it perfect for guests during the holidays!

7. Ceramic Mixer Bowl- give your mixer an upgrade with this gorgeous bowl! Mine has a clear glass bowl and I know a lot of them have metal bows. Since they’re big and always sit on the counter, they could use a nice and spiffy bowl to catch everyone’s attention! 

8. Gold Serving Utensils-My bamboo serving utensils are literally falling apart (they’re breaking apart into pieces!) so I’ve been debating getting a new set. These gold ones are gorgeous! I can only imagine how pretty they’d make my countertop look as they glimmer in the light. I don’t like to cook, but these might change my mind!

9. Canister- I love using canisters in my kitchen for hiding the less-than-pretty stuff that needs to be accessible. Whether you fill it with rice, coffee, tea bags or sweeteners, this canister will perk up your kitchen while hiding your eyesores! I also love to place these in cabinets so that those look nice too.

10. Phone Stand- between recipes, kitchen timers, and text updates from family, we need to keep our phones handy all holiday season! This holder will keep your phone in place and safe while you do everything you need in the kitchen. No more crying over spilled milk- your phone is up and off the counter so it’s safe!

11. Garlic Keeper- before we got a garlic container, it always sat in the fruit bowl looking funny. This container fits your garlic perfectly and still looks adorable. If you keep a lot of garlic at home (like we do!) try this larger size.

12. Pet Canisters- Few things are as hideous as pet items. Between cardboard boxes of treats and giant bags for food, these items are totally necessary, yet very ugly. Since they need to be accessible, they often end up on the counter taking up space and being their ugly selves. So, I recently switched to canisters for our excess pet food and everything looks prettier now! You definitely don’t want to go for anything clear, except maybe for cute dog bone treats. I love how colorful but glam this canister is. I think I need one for Lexie’s treats now!

13. Electric Tea Kettle- ok while we are on the topic of morning drinks, let’s talk about tea! I love tea and have several cups a day. I have a stovetop kettle which looked cute in the store and became ruined within a month of regular use. I guess they can’t withstand the heat and turn black! I love the idea of a countertop version, and this one automatically turns off when it’s done instead of whistling! Paired with a tea bag storage box you’ll be serving your guests tea easily with less mess! 

14. Utensils- if you’re anything like me, all your kitchen tools are random items you acquired over the years. Upgrade to a gorgeous matching set that will make everyone jealous! This set comes in a variety of handle colors, like navy, mint and pink. It’s sure to match any kitchen! It’s also very reasonably priced so you don’t even need tot talk yourself into it!

With a few small updates, your kitchen and countertops will look amazing once again. I find that with less on the counter and having things there with a purpose, I’m able to keep it clean much more easily. And also, I WANT to keep it clean! I love to show off the gorgeous items I find, rather than my extensive collection of junk I tend to keep.

What do you think of these items? Will you be ordering some? Any tips for keeping a counter clean or items you love? Let me know in the comments below! 

Mess-Free Baby Painting (Perfect Baby Gift!)

Get ready for the easiest gift your baby can make. It’s absolutely perfect- minimal mess, beloved by all, and your baby is HAPPY to do it. In fact, depending on their age, they won’t even know they’re doing anything at all! Let’s backtrack a little bit. Wayyyyy back in February, I needed a Valentine’s Day gift idea for my husband. I wanted it to be something from the baby, and something that he would cherish for years to come. Plus, I knew it had to be simple because we had JUST gotten our puppy, and Hailey was only 4.5 months old. I was overwhelmed but I wanted to make something special for my husband. That’s how this gift came about! I’ve seen lots of these painting projects on Pinterest, but never one with a baby as young as Hailey was! And that’s why I added the extra element of putting it on the floor (in a trash bag!) and letting her jump and leap on it in her bouncer. It’s so easy to do that you’ll be buying paint and canvases by the truckload. I promise!

*This post contains affiliate links

Looking for a gift that your baby can make? Check out how to create this mess-free painting that your little one can make using their hands, feet, or their bouncer! It’s the perfect mother’s day gift too! Click to see how easy it is. #babysensorypla…

You will need:

Canvas panels 11x14 (here)
Paints (similar here)
Glad Press’n Seal (here)
Large clear trash bag (here)
Newspapers/fliers
Photo Frame (similar here)

Directions:

Measure and cut your Press’n Seal to size. I ended up using two long sheets since it wasn’t wide enough to do one long one. You want to have enough overlap so that paint doesn’t ooze out anywhere! I used the Press’n Seal instead of regular saran wrap because it stuck to the canvas nicely and it wasn’t a total mess to unwrap from the roll. Usually saran wrap seems to get all tangled up- this made it easy, AND the seams stuck together nicely!

Looking for a gift that your baby can make? Check out how to create this mess-free painting that your little one can make using their hands, feet, or their bouncer! It’s the perfect mother’s day gift too! Click to see how easy it is. #babysensorypla…

Add your paint around the canvas in little globs. Don’t use too much paint or it’ll take forever to dry. Try to use a nice mix of colors that blend well. You can also use metallic paints for added dimension and shine.

Looking for a gift that your baby can make? Check out how to create this mess-free painting that your little one can make using their hands, feet, or their bouncer! It’s the perfect mother’s day gift too! Click to see how easy it is. #babysensorypla…

Carefully place the saran wrap over the canvas and seal it closed. For this step, you want to make sure that you don’t smush it shut, but just gently fold the saran wrap and seal the edges as tight as you can. Remember, we want the baby to create the art- not you!

Looking for a gift that your baby can make? Check out how to create this mess-free painting that your little one can make using their hands, feet, or their bouncer! It’s the perfect mother’s day gift too! Click to see how easy it is. #babysensorypla…

Ta-da! See? The artwork is fully intact after I sealed it in the Press’n Seal. That leaves the smushing to Hailey.

Looking for a gift that your baby can make? Check out how to create this mess-free painting that your little one can make using their hands, feet, or their bouncer! It’s the perfect mother’s day gift too! Click to see how easy it is. #babysensorypla…

Now for the very last “prep step”- place the saran wrapped canvas into a large clear trash bag. A black bag would work in a pinch, but with clear you can see whats happening. If it’s a larger bag like mine was, you can fold it over for added protection and, mostly, to get it out of your way.

Looking for a gift that your baby can make? Check out how to create this mess-free painting that your little one can make using their hands, feet, or their bouncer! It’s the perfect mother’s day gift too! Click to see how easy it is. #babysensorypla…

Place the canvas under baby and let him/her jump around, crawl, or play like usual. Guide the canvas around so that all parts of it get spread out. I used the bouncer which ensured that worst case, only her feet would get dirty. Luckily nothing got dirty :) When it got down to the very end, I spread the excess paint into the bare corners of the canvas so that it would go all the way to the edges. This also helps to avoid giant globs of paint next to bald spots!

Looking for a gift that your baby can make? Check out how to create this mess-free painting that your little one can make using their hands, feet, or their bouncer! It’s the perfect mother’s day gift too! Click to see how easy it is. #babysensorypla…

Take the canvas out of the trash bag, and unwrap it carefully. I recommend having a trash bag handy to toss out the Press’n Seal, because it’ll be covered in paint and so will your hands. This is the messiest part of the entire project- well, the only messy part of this project! Don’t say I didn’t warn ya ;) There are no pictures of this step for obvious reasons.

Lay the canvas on the newspapers to dry. If your paint was thick it may take a few hours or even a day, so you’ll want to make this gift ahead of time. If you need it the same day, just use less paint (a lot less!) which will dry faster. But, to make this canvas a true work of art I highly recommend making it about 2 days before and this way it’ll be perfect- and dry!

I gave this gift to my mom and my MIL for mother’s day and they LOVED it!

Looking for a gift that your baby can make? Check out how to create this mess-free painting that your little one can make using their hands, feet, or their bouncer! It’s the perfect mother’s day gift too! Click to see how easy it is. #babysensorypla…

The gift recipient is sure to love this gift that came directly from your little one! It’s such a great keepsake for moms, dads, grandmas, aunties… everyone! Seriously, everyone will want one of these for their home. It’s truly the greatest gift a baby can give, besides just being their awesome, poopy self!

DIY Confetti Gift Tags

If you're anything like me you've left gift wrapping (and shopping!) to the last minute. Well, don't you worry- I've got just the thing for you! These gift tags are so easy to make, and they're fun and interactive!

These Confetti Christmas Gift Tags are just what you need for your gifts! Click for the full how-to. #diygifttags #giftwrapideas #diychristmascrafts

They're colorful, adorable, and festive! You can find the full directions on Giggles Galore.

These Confetti Christmas Gift Tags are just what you need for your gifts! Click for the full how-to. #diygifttags #giftwrapideas #diychristmascrafts

So head over to Giggles Galore, grab your supplies, pop on a Christmas movie, and let's start making them!

DIY Holographic Ornament Tags

Every year at Christmas, I always think back to Christmas when I was a kid. There was something magical about the holiday season back then. I distinctly remember Christmas feeling different. There was an anticipation in the air, like anything could happen. The magic of Santa, the warmth of your home, the mystery surrounding the gifts you would receive… it was exhilarating. This year, I wanted to make something that commemorate the amazing childhood Christmases that I had. The iridescent effect on these ornaments is super 90’s, while also being modern. Holographic items are coming back! These are relatively cheap to make in bulk, so you can make them for all your gift tags, to decorate a tree, or to create a Christmas banner. Give them to all your friends who love the 90’s as much as you do!

The iridescent effect on these ornaments is super 90’s, while also being modern. Holographic items are coming back! Give them to all your friends who love the 90’s as much as you do! Click for the DIY. #diychristmasornaments #diygifttags#diychristma…

You will need:

Colored cardstock (similar here)
2.5 inch circle punch (similar here)
Holographic paper (similar here)
Scissors (here)
Embroidery floss (similar here)
Glue Stick
Glue gun

Directions:

The iridescent effect on these ornaments is super 90’s, while also being modern. Holographic items are coming back! Give them to all your friends who love the 90’s as much as you do! Click for the DIY. #diychristmasornaments #diygifttags#diychristma…

1.     Cut out circles with your circle punch.

2.     Cut a trapezoid shape out of your holographic paper and a white or light colored backdrop. You’ll need one for each ornament you make.

3.     Cut a “shine” shape out of the holographic paper (not the backdrop paper). I made an L shape with a curve to finish off the triangle.

4.     Using your glue stick, glue the large edge of the trapezoid onto the top of your ornament. Add glue to the holographic trapezoid, and glue it on top. Finally, add glue to your shine and put it with the flat edge facing down.

5.     Using your glue gun, secure your hanging ribbon or embroidery floss. I made mine short and cute, but you can make it any length you need!

6.     Hang on your tree, a gift, or make a garland and you’re ready to go!

The iridescent effect on these ornaments is super 90’s, while also being modern. Holographic items are coming back! Give them to all your friends who love the 90’s as much as you do! Click for the DIY. #diychristmasornaments #diygifttags#diychristma…

You can add names to the front or the back of your tag if you wish, or you can add a simple monogram using a sticker. I kept the front of mine plain because I thought they looked so cute! I love tilting mine back and forth to see the iridescent effect!

The iridescent effect on these ornaments is super 90’s, while also being modern. Holographic items are coming back! Give them to all your friends who love the 90’s as much as you do! Click for the DIY. #diychristmasornaments #diygifttags#diychristma…

How do you plan to use your holographic ornaments? Let me know in the comments below!