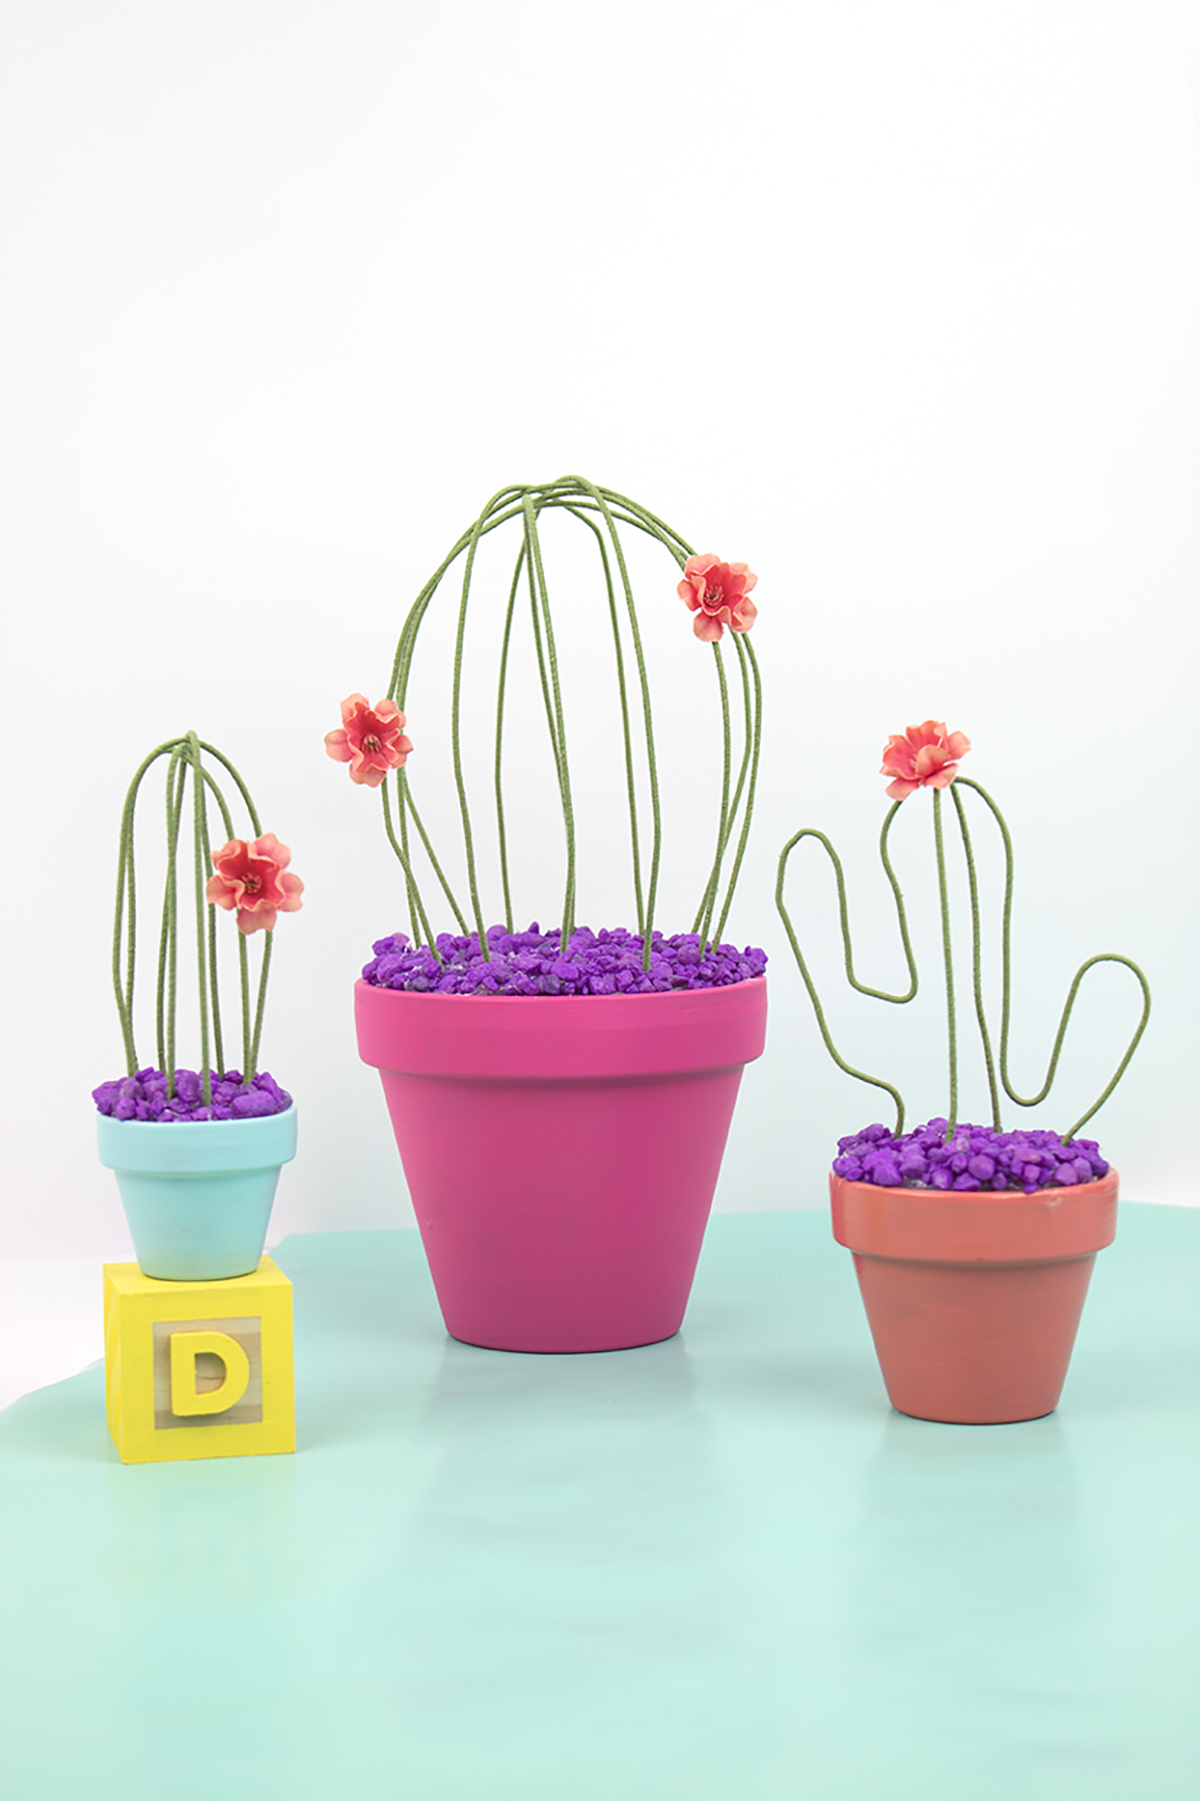
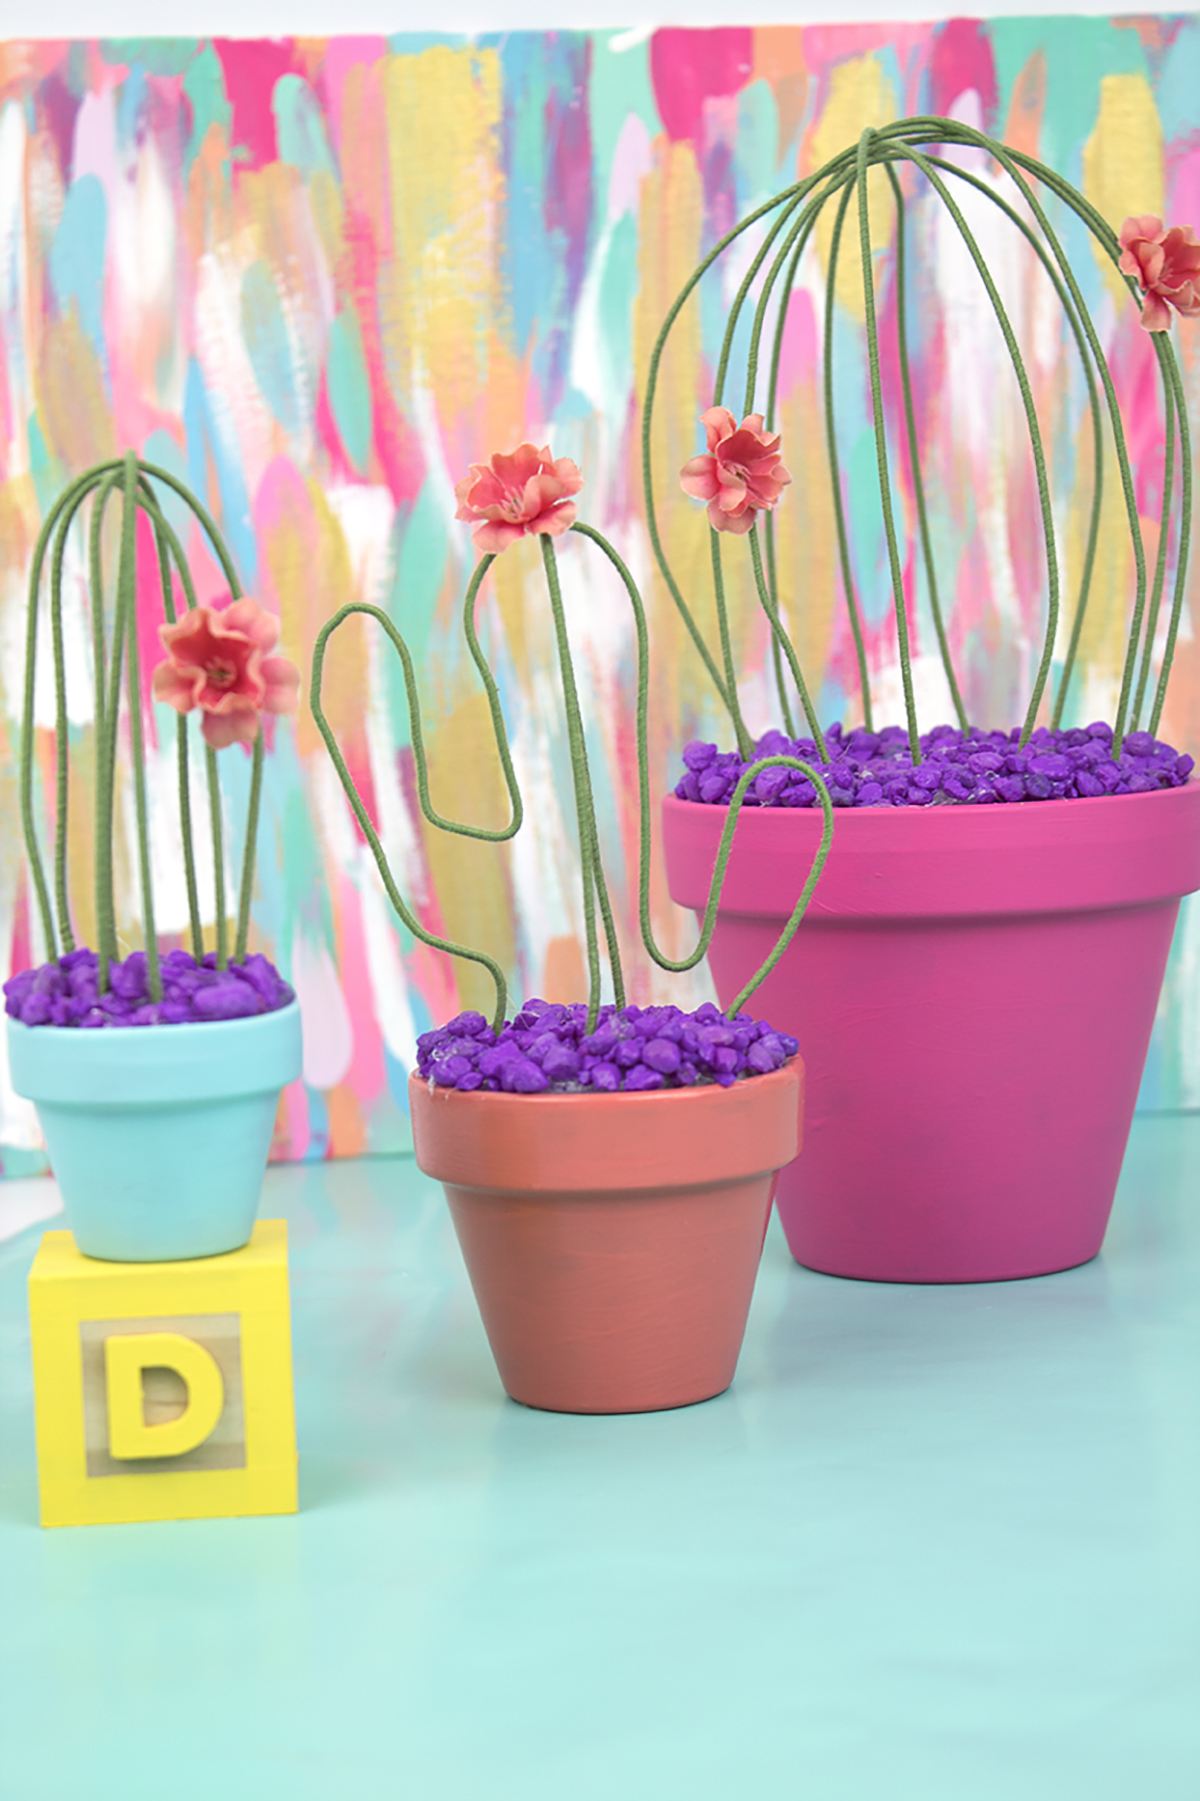
Wire Cactus Potted Plant

Although I am creating life within me, I am absolutely terrible at keeping plants alive. I even got succulents because I thought they were supposed to be easy to care for. Um... nope. They all dried up and died! In an effort to save the plants, I’ve decided I’d better stick to fake plants from now on. So, I decided to make these little beauties! They’re actually really simple to make, so its pretty funny that I started working on them about a year ago (!!!) and never got around to finishing them. Since one of my 29 goals for this year is to finish what I started, it seems like an appropriate task to cross of my to do list! After all, it’s been on there for so long. So grab your supplies, and maybe a friend, and let’s get crafting! 

Do you somehow kill all your plants like I do? In an effort to save the plants, I’ve decided I’d better stick to fake plants from now on. So, I decided to make these little beauties! This wire cactus is perfect for your home. Click for the full…

You will need:

Wire (similar here)
Styrofoam Cones (similar here)
Acrylic paint (similar here)
Ceramic pots (from the local craft store)
Aquarium rocks (here)
Small flowers (similar here)
Glue gun (similar here)
Wire cutters (here)
Long knife or small saw (similar here)

Directions:

Do you somehow kill all your plants like I do? In an effort to save the plants, I’ve decided I’d better stick to fake plants from now on. So, I decided to make these little beauties! This wire cactus is perfect for your home. Click for the full…
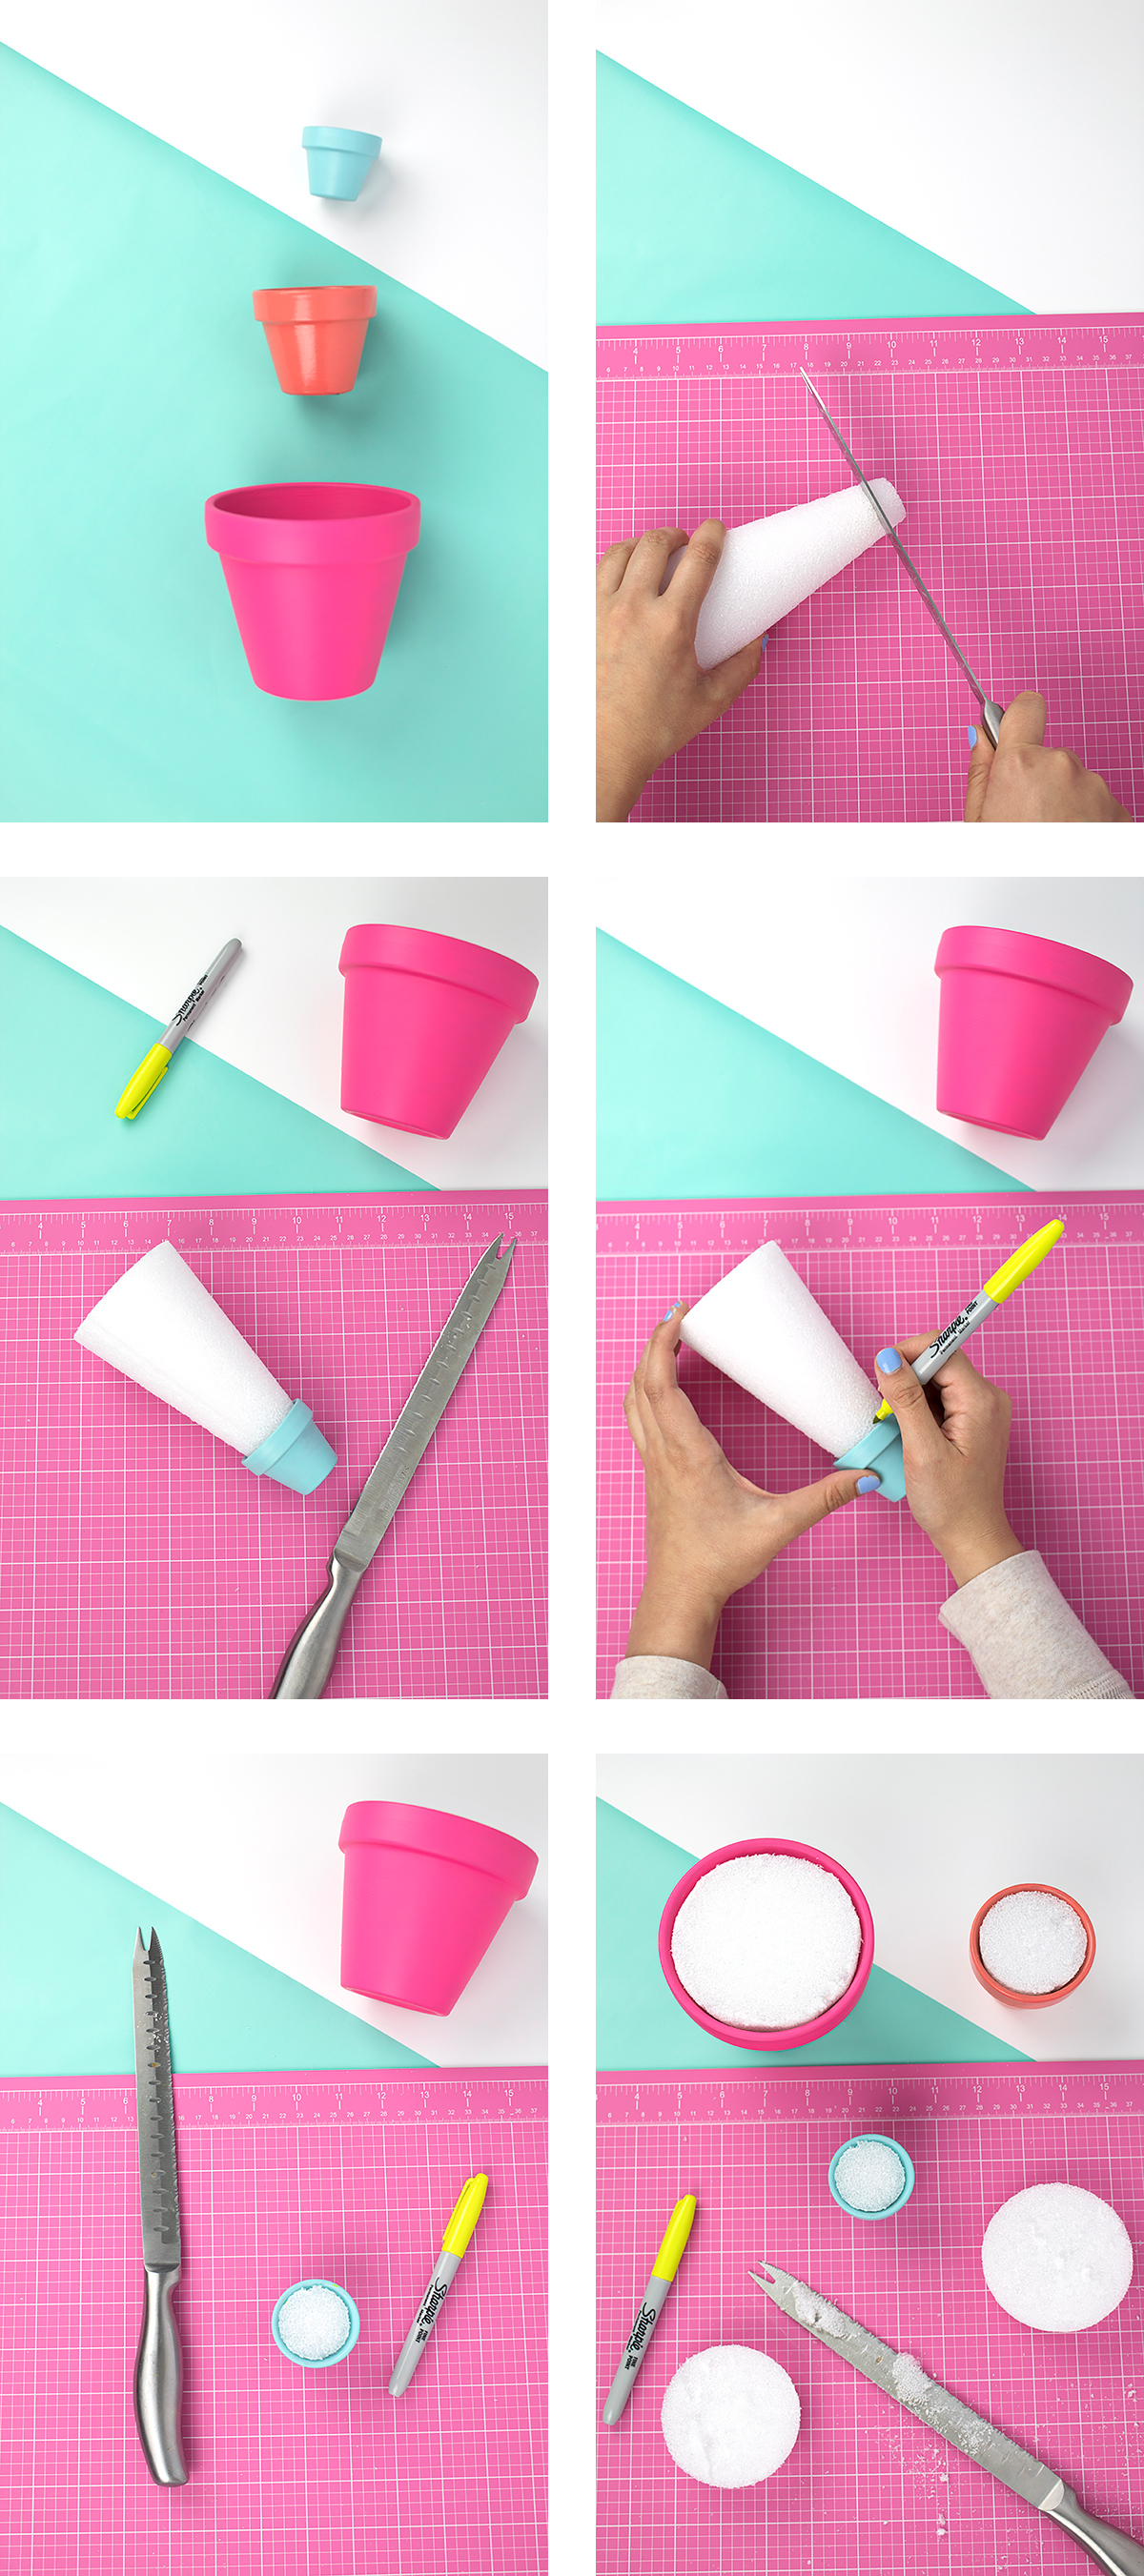
  1. Paint your ceramic pots in your choice of color and let dry. 
  2. Take your styrofoam cone and place it inside your pot, starting with the smallest one. Mark where you need to cut. 
  3. Using your knife or saw and a cutting mat, carefully cut the styrofoam cone in a straight line. Test that it fits, and adjust if necessary. Repeat for all 3 pots.

Directions: Small Cactus Plant

Do you somehow kill all your plants like I do? In an effort to save the plants, I’ve decided I’d better stick to fake plants from now on. So, I decided to make these little beauties! This wire cactus is perfect for your home. Click for the full…
  1. Take your wire and fold it in half. Cut the wire. Repeat so you have 4 parts. 
  2. Fold your half wire loosely into a U shape and place into the styrofoam. Take another piece and do the same, crossing over the first piece of wire. 
  3. Repeat for the remaining pieces. Adjust if necessary. 

Directions: Medium Cactus Plant

Do you somehow kill all your plants like I do? In an effort to save the plants, I’ve decided I’d better stick to fake plants from now on. So, I decided to make these little beauties! This wire cactus is perfect for your home. Click for the full…
  1. Take a long piece of wire and fold it in half. 
  2. Turn the wire so the curve is at the top. Bend the wire up then down to create cactus arms. 
  3. Take a new piece of wire. Fold it in half, and measure so that it covers the arm cactus. Trim. 
  4. Place the arm cactus into the styrofoam, then add the loop you made to fit. 

Directions: Adding the Rocks

Do you somehow kill all your plants like I do? In an effort to save the plants, I’ve decided I’d better stick to fake plants from now on. So, I decided to make these little beauties! This wire cactus is perfect for your home. Click for the full…

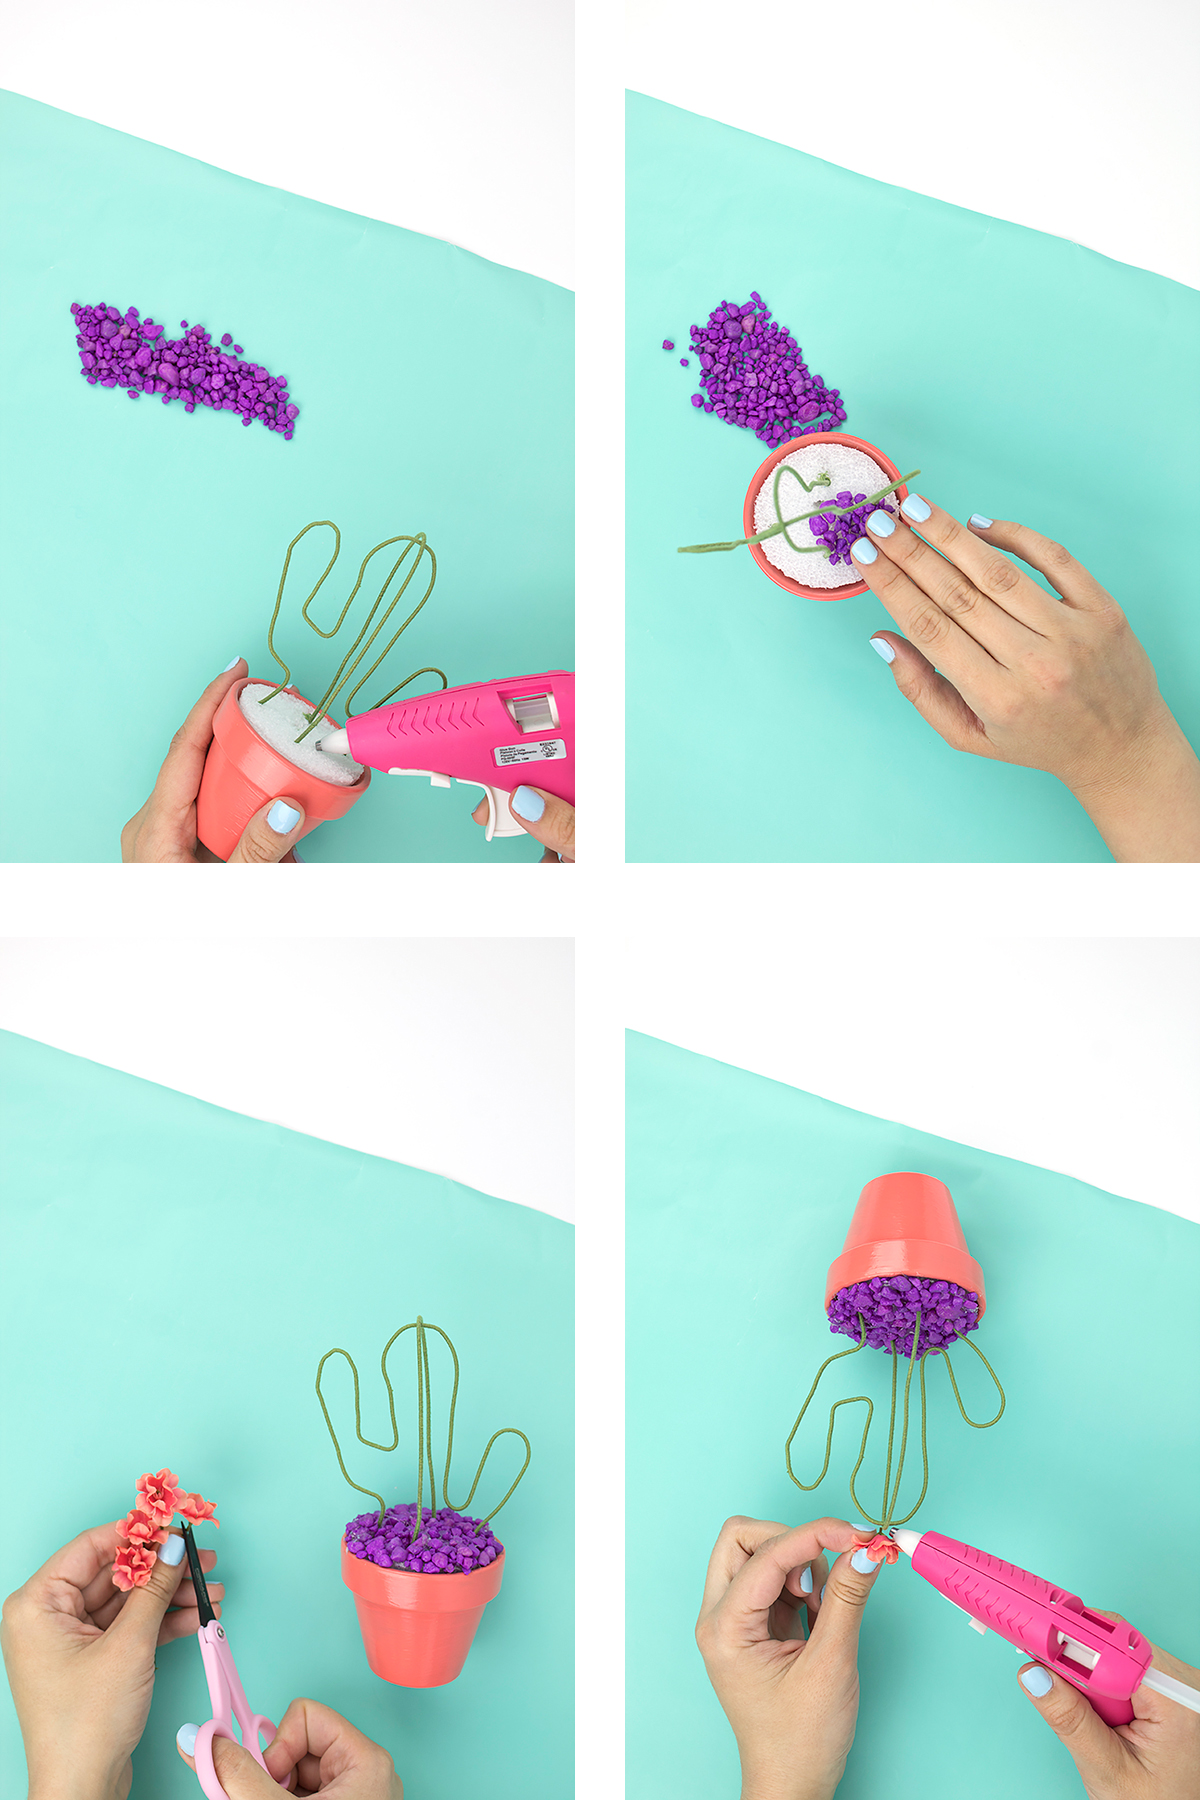
Once you are happy with the placement of your wires, you’re ready to add the rocks! 

  1. Using your glue gun, add a small patch of hot glue in the center of your cactus. 
  2. Cover your glue with a hefty handful of rocks. Press them into the glue gently. 
  3. Give it a moment, then tilt the plant to get rid of any excess rocks that are not glued on. Repeat until your styrofoam is covered. 
  4. Note: for the large cactus, I had to remove one side to create a hole big enough for my hand. Just make sure you remember to put it back before you cover the whole thing up :)
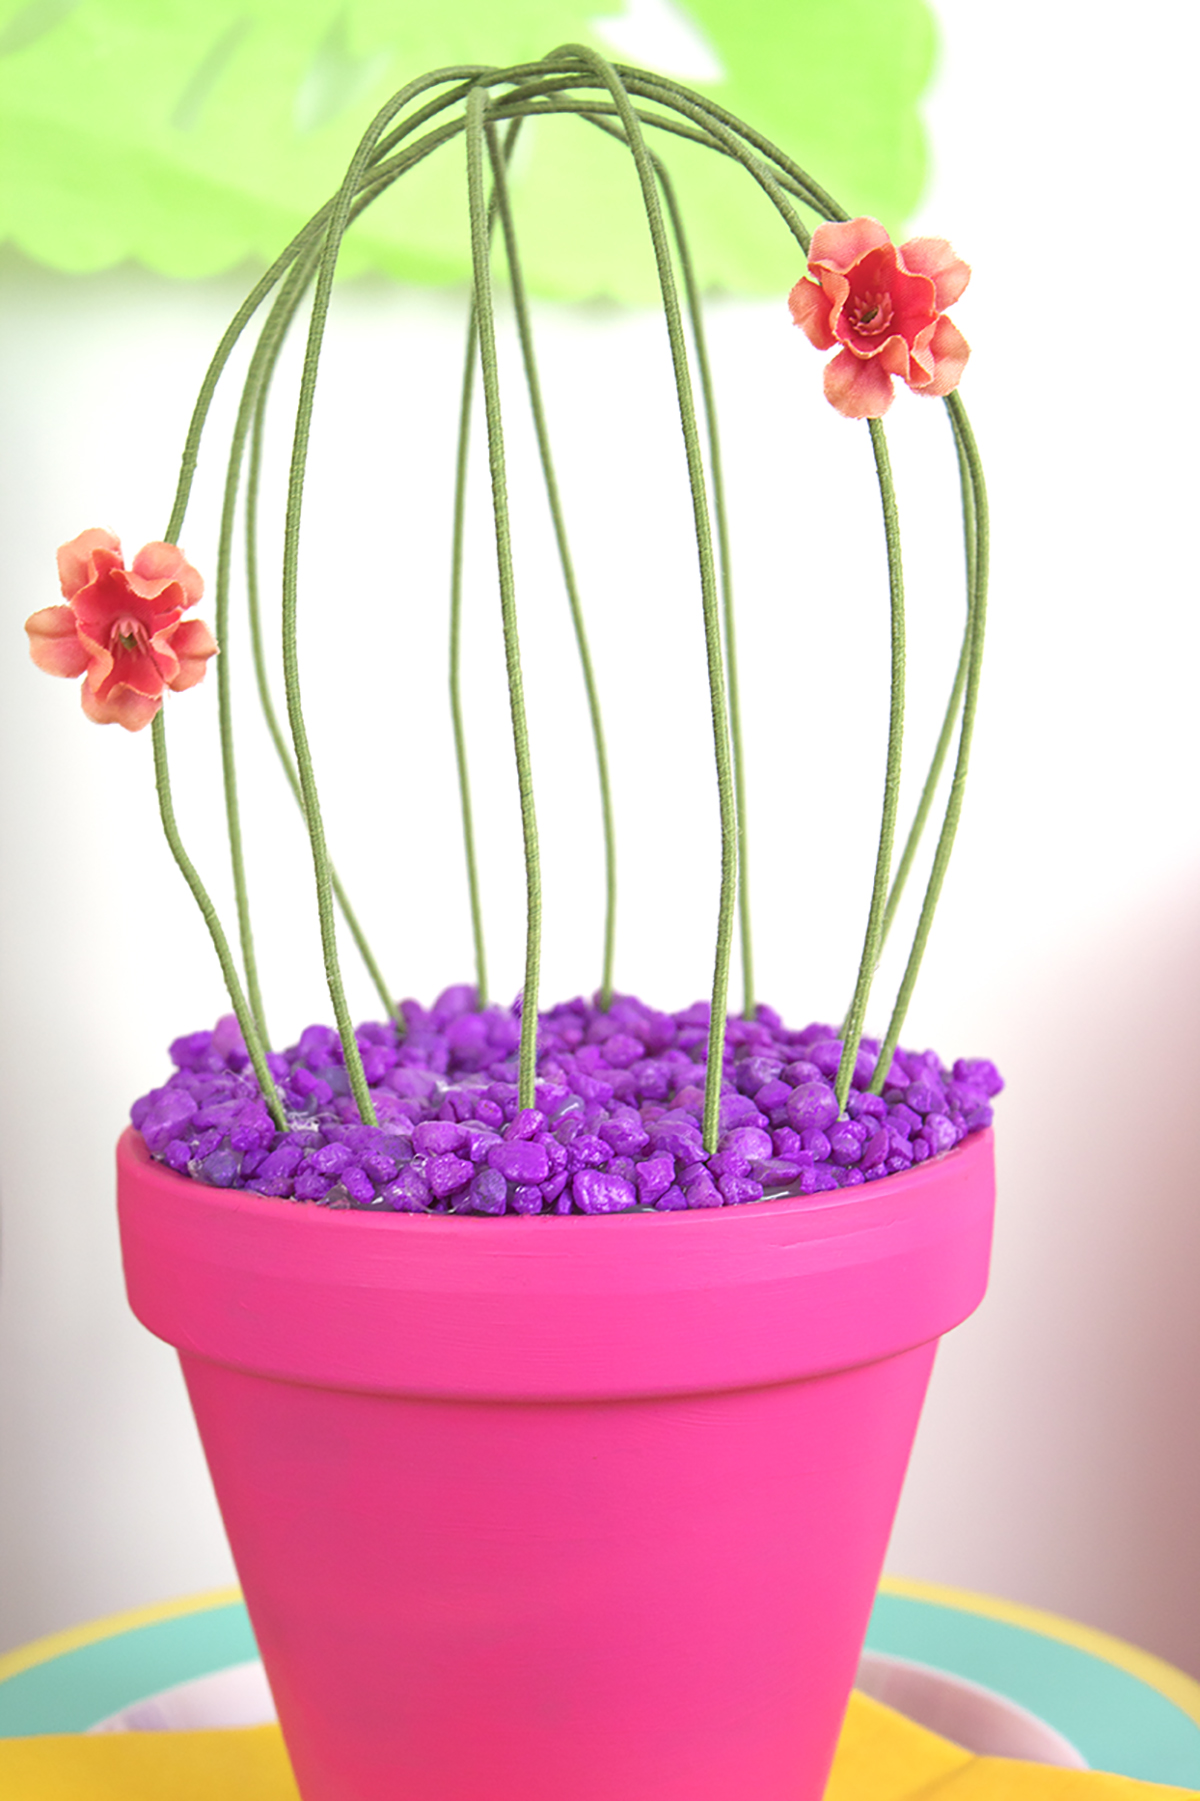
  5. Add a few small flowers on your wire to dress up your cactus. 
Do you somehow kill all your plants like I do? In an effort to save the plants, I’ve decided I’d better stick to fake plants from now on. So, I decided to make these little beauties! This wire cactus is perfect for your home. Click for the full…

Artwork can be found here and blocks DIY can be found here.

Do you somehow kill all your plants like I do? In an effort to save the plants, I’ve decided I’d better stick to fake plants from now on. So, I decided to make these little beauties! This wire cactus is perfect for your home. Click for the full…

Love it! Here are some photos of the cacti in action at the Cinco de Mama party.

Do you somehow kill all your plants like I do? In an effort to save the plants, I’ve decided I’d better stick to fake plants from now on. So, I decided to make these little beauties! This wire cactus is perfect for your home. Click for the full…

This plant is perfect for those of us who don't have a green thumb. You can make them as big or as small as you'd like, in any color you want. You could probably even use pipe cleaners if you wanted to! 

So, what do you think of this wire cactus? Perfect for your home, or do you prefer real plants? Let me know in the comments below!

Happy Home: Colorful Bar Decor

Earlier this week, I showed you how to make easy and affordable book art. Today, I wanted to show you how I styled my bar! We've had this piece of furniture since we lived at our small apartment, so it held all our drinking glasses and acted as an entry table. Now that we have a larger home, it's only the bar. It's been a bit neglected, so I wanted to spruce it up after I added our artwork. 

*This post contains affiliate links

Add a pop of color to your bar decor! Click to see how I styled mine for everyday use.

We bought our bar at Home Goods, but I found similar ones herehere and here. I wanted to set up my bar so that it would feature all my favorite items, while still being really colorful and simple to use. You don't really want to cover it in junk that needs to be removed every time you want to make a drink, right? 

Add a pop of color to your bar decor! Click to see how I styled mine for everyday use.

I started by using my zebra tray for a drink station. I added some cute cactus glasses and my adorable confetti shaker. I love paper straws, since they are more colorful and better for the environment. I added some of my faves for easy access, and stored them in a tall shot glass/champagne flute. I put the cups on my cute glitter coasters and added painted animal and disco ball drink stirrers. I also featured my adorable Life is the Bubbles champagne flute that's handmade and oh so cute!

Add a pop of color to your bar decor! Click to see how I styled mine for everyday use.

Since there was a random empty spot in the middle, I needed something with height that didn't block the light switch. I decided to add some fun and colorful books. I don't really read these books too often (if at all) so I thought they would look nice featured on the bar instead of stuffed on my bookshelf for a change. I also added my painted sketch book that I use a lot to sketch blog post ideas, home decor ideas, etc. It added some color and pizzazz to the whole thing.

Add a pop of color to your bar decor! Click to see how I styled mine for everyday use.

In the corner, I featured some of my favorite liquors (or are they liqueurs?) and my favorite drinking glass, a pink ombre wine glass (similar). I had two but one sadly broke, so it's extra special to me now haha. Some Polar seltzers as mixers help guests to serve themselves, while fake flowers add some elegance without any upkeep.

Add a pop of color to your bar decor! Click to see how I styled mine for everyday use.

I placed these items on an extra placemat I had from my dining table, and a C (for Cardona) statue thingy that I usually put on my entry table. I thought it looked really elegant amongst all the colorful bar items. For a finishing touch, I added my pineapple garland to add a bit of whimsy to the space.

Add a pop of color to your bar decor! Click to see how I styled mine for everyday use.

To fill in the gaps, I gathered some random decor items from my home. I had these fake potted plants from an Easter DIY so I added them in for some color. I love these candles that I got from Ikea so I added those as well. Some appropriately themed napkins added a finishing touch and an extra pop of color.

Add a pop of color to your bar decor! Click to see how I styled mine for everyday use.

If you want to have a bar in your home for parties but don't have room for a permanent piece of furniture, I highly recommend this foldable bar cart. It's really compact, sturdy and it works indoor and out! It's really versatile and I love mine. It's also a great add-on for bigger parties.

Do you have bar cart at home? How do you style it? Let me know in the comments below!

DIY Affordable Book Art

As I mentioned in my last post, I've got a serious lack of artwork in my home! I wanted to find some cute and colorful cocktail-related images for above my bar, but everything was either cheesy or expensive. Also, the space is a weird size- there's a light fixture above and a light switch below, so I only had about 2 feet in between for art. I had a book of cocktails that I rarely used, which had some GORGEOUS photos inside. That's when it hit me- why hide the images in the book, when I could display them proudly on the wall?! I went to Michael's to pick up some cute and simple white frames with a mat so the images would take up enough space while also "popping" against the frame. I'm sooo happy with the result that I decided to show you guys exactly how I did it.

Got a spot that needs some artwork? Why not save some money and use some artwork from your books?! It's affordable and easy as can be. Click for the full how-to.

The best part is that you can use any type of book or magazine that you have. My suggestions? HGTV books and magazines for cool and colorful homes, Cooking Magazines or Recipe Books with tasty recipes for the kitchen, and Artwork Books and Magazines for the rest of the home. Even National Geographic would be great with its artistic animal photos!

*This post contains affiliate links

You will need: 

Frame (from Michaels, similar here)
Books (here)
 

Directions:

Got a spot that needs some artwork? Why not save some money and use some artwork from your books?! It's affordable and easy as can be. Click for the full how-to.
  1. Flip through your book or magazine to find your favorite images. Tear them out as close to the spine as you can.
  2. Remove the back of your frame and take out the placeholder image and the mat.
  3. My mat was double layered white and gray, so I carefully pulled off the gray one from underneath to leave only the white one. It worked perfectly!
  4. Position your artwork within the mat, and tape in place if needed.
  5. Place the mat and artwork into the frame, and close up the back. Make sure there is no dust or hairs on the inside of the glass before you do!
Got a spot that needs some artwork? Why not save some money and use some artwork from your books?! It's affordable and easy as can be. Click for the full how-to.

I mean... how cute does this artwork look?! This is such an affordable way to add some artwork to your home, especially if you have gorgeous books that you occasionally look at but don't use. This way, everyone can see the beauty within- right there on the walls! I also styled my bar with some really cute, colorful stuff. That blog post is coming later this week, so stay tuned!

Are you planning to create your own book art for your home? Let me know what you plan to use in the comments below!

Striped Happy Halloween Sign

There's less than 2 weeks until Halloween, guys! This is not a drill!!

For some people, Halloween is a dark, spooky time of year where you get to proudly display your goriest items and scare the daylights out of people. For me, it's a time to be "spooky" by decorating with black, orange, green, purple and pink, with a touch of teal, because why not?  That's right, I'm that group that enjoys the cutesy side of Halloween- eating candy, dressing up in cute (and slightly sexy) costumes, and carving pumpkins. If you fall into that second group with me, you're going to LOVE this one!

Looking for a slightly creepy, slightly cute way to decorate for Halloween? You've got to see this striped sign! Click for the full DIY. #halloweencrafts #halloweenart #diyhalloween

I created this Striped Happy Halloween Sign for Giggles Galore and it's one of the easiest projects so far!  All you need for this DIY is a canvas, blue painter's tape, some black paint, and gold letters. It really pops in an entryway, and brings some fun, light-hearted humor to your home!

Head on over to Giggles Galore to see the full post! And, if your canvas needs a friend, try these EEK canvases too!

Looking for a slightly creepy, slightly cute way to decorate for Halloween? You've got to see this striped sign! Click for the full DIY. #halloweencrafts #halloweenart #diyhalloween

I hope you enjoyed this easy canvas DIY! Now, time for my question of the day that no one answers- what's your favorite part about Halloween? Is it dressing up, eating candy, scaring people, or staying home and hiding from everyone? Don't be shy! Let me know in the comments below.

Colorful Fall Pumpkin Wreath

Hey everyone! I'm back from my wedding and honeymoon, and suddenly it's fall. I mean, it feels like summer but the trees are changing colors, the kids are back in school, and I'm already working on my Halloween costume. 

In order to celebrate this weird Summer-Fall hybrid, I crafted a colorful pumpkin wreath to bridge the gap between the seasons. It's got a few of my favorite things- bright colors, pumpkins, and POM POMS!! It's a little kooky, but all the best people are ;)

You can find the full blog post over on Giggles Galore, so be sure to head over there and take a look!

In order to celebrate this weird Summer-Fall hybrid, I crafted a colorful pumpkin wreath to bridge the gap between the seasons. It's got a few of my favorite things- bright colors, pumpkins, and POM POMS!! It's a little kooky, but all the best peopl…

I used the spray painted pumpkins from my Glam Friendsgiving Party as inspiration for this wreath. I loved having some fun pumpkins around my house last year, so I wanted to create something that would show them off to everyone that passed by.

In order to celebrate this weird Summer-Fall hybrid, I crafted a colorful pumpkin wreath to bridge the gap between the seasons. It's got a few of my favorite things- bright colors, pumpkins, and POM POMS!! It's a little kooky, but all the best peopl…

I love how gorgeous and bright these pumpkins are! While I love traditional holiday colors, I also think it's really fun to break the mold and try to capture the spirit of the season with a completely different color palette.

In order to celebrate this weird Summer-Fall hybrid, I crafted a colorful pumpkin wreath to bridge the gap between the seasons. It's got a few of my favorite things- bright colors, pumpkins, and POM POMS!! It's a little kooky, but all the best peopl…

Be sure to head on over to Giggles Galore for the full tutorial!