Abstract Painted Gift Tags

Back when I was a kid, I thought it was so cool to have a summer birthday. You didn’t have to go to school, the weather was hot, and something like a pool party or going to an amusement park was an option. So, while my mom did make strawberry cupcakes for all my classmates on my birthday, just being at school kinda sucked. Now that we’re all adults, it doesn't really matter as much. We all probably have to work on our birthdays anyway (cue the crying) so it's now an even playing field. For that next birthday king or queen, how about a handmade gift tag for their present? It’s incredibly fun and easy to make- anyone can do it!

*This post contains affiliate links.

For that next birthday king or queen, how about a handmade gift tag for their present? It’s incredibly fun and easy to make- anyone can do it! If you’re a fan of abstract painting, you’ll love this easy DIY project. Click for the full instructions a…

You will need:

Colored cardstock (similar here)
Paper punch (similar here)
Embroidery floss (similar here)
Acrylic paint (similar here)
Glue gun (similar here)
Scissors (similar here)

Directions:

For that next birthday king or queen, how about a handmade gift tag for their present? It’s incredibly fun and easy to make- anyone can do it! If you’re a fan of abstract painting, you’ll love this easy DIY project. Click for the full instructions a…

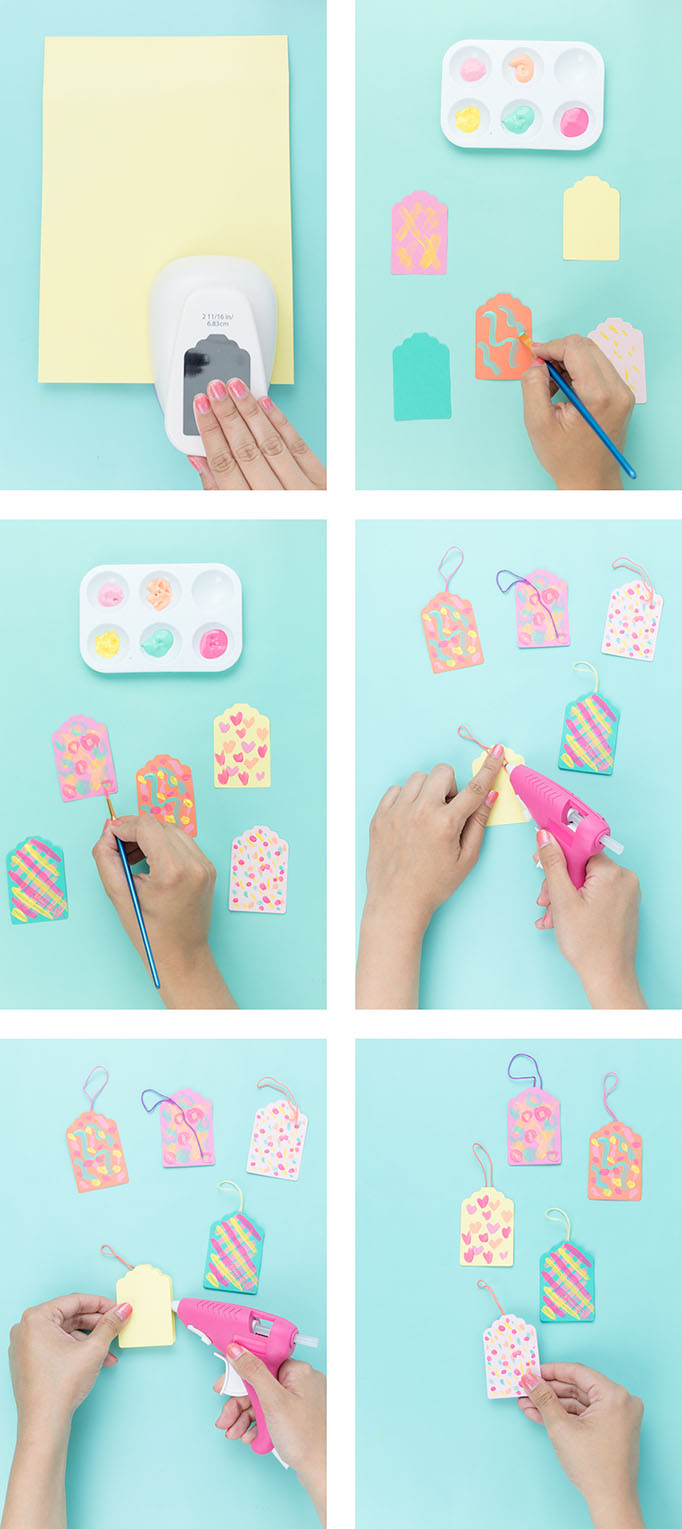
1. Cut out your tags from the card stock in your choice of colors. You'll need 2 pieces of cardstock for each tag you're making. I used the same color for both sides.

2. Paint abstract designs using your choice of paint colors on one of the cardstock tags. For the designs, I kept it simple with xoxo, lines, dots, etc. You can be as simple or as complex as you want.

3. While the paint dries, cut a piece of embroidery floss for the tag.

4. Glue the embroidery floss on the back of the tag, then glue on the blank tag to create a seamless background.

For that next birthday king or queen, how about a handmade gift tag for their present? It’s incredibly fun and easy to make- anyone can do it! If you’re a fan of abstract painting, you’ll love this easy DIY project. Click for the full instructions a…

That's it- you're done! Now add a to: and from: so your recipient knows who to thank for their awesome new present. Hang it on their gift, and get ready to see their face light up. Everyone likes a present!

I always love adding a homemade touch to my gifts because it really makes them more personal, especially in a world where everyone just gets each other gift cards! So, what do you think about these DIY gift tags? SO simple, right?!

DIY Confetti Gift Tags

If you're anything like me you've left gift wrapping (and shopping!) to the last minute. Well, don't you worry- I've got just the thing for you! These gift tags are so easy to make, and they're fun and interactive!

These Confetti Christmas Gift Tags are just what you need for your gifts! Click for the full how-to. #diygifttags #giftwrapideas #diychristmascrafts

They're colorful, adorable, and festive! You can find the full directions on Giggles Galore.

These Confetti Christmas Gift Tags are just what you need for your gifts! Click for the full how-to. #diygifttags #giftwrapideas #diychristmascrafts

So head over to Giggles Galore, grab your supplies, pop on a Christmas movie, and let's start making them!

DIY Holographic Ornament Tags

Every year at Christmas, I always think back to Christmas when I was a kid. There was something magical about the holiday season back then. I distinctly remember Christmas feeling different. There was an anticipation in the air, like anything could happen. The magic of Santa, the warmth of your home, the mystery surrounding the gifts you would receive… it was exhilarating. This year, I wanted to make something that commemorate the amazing childhood Christmases that I had. The iridescent effect on these ornaments is super 90’s, while also being modern. Holographic items are coming back! These are relatively cheap to make in bulk, so you can make them for all your gift tags, to decorate a tree, or to create a Christmas banner. Give them to all your friends who love the 90’s as much as you do!

The iridescent effect on these ornaments is super 90’s, while also being modern. Holographic items are coming back! Give them to all your friends who love the 90’s as much as you do! Click for the DIY. #diychristmasornaments #diygifttags#diychristma…

You will need:

Colored cardstock (similar here)
2.5 inch circle punch (similar here)
Holographic paper (similar here)
Scissors (here)
Embroidery floss (similar here)
Glue Stick
Glue gun

Directions:

The iridescent effect on these ornaments is super 90’s, while also being modern. Holographic items are coming back! Give them to all your friends who love the 90’s as much as you do! Click for the DIY. #diychristmasornaments #diygifttags#diychristma…

1.     Cut out circles with your circle punch.

2.     Cut a trapezoid shape out of your holographic paper and a white or light colored backdrop. You’ll need one for each ornament you make.

3.     Cut a “shine” shape out of the holographic paper (not the backdrop paper). I made an L shape with a curve to finish off the triangle.

4.     Using your glue stick, glue the large edge of the trapezoid onto the top of your ornament. Add glue to the holographic trapezoid, and glue it on top. Finally, add glue to your shine and put it with the flat edge facing down.

5.     Using your glue gun, secure your hanging ribbon or embroidery floss. I made mine short and cute, but you can make it any length you need!

6.     Hang on your tree, a gift, or make a garland and you’re ready to go!

The iridescent effect on these ornaments is super 90’s, while also being modern. Holographic items are coming back! Give them to all your friends who love the 90’s as much as you do! Click for the DIY. #diychristmasornaments #diygifttags#diychristma…

You can add names to the front or the back of your tag if you wish, or you can add a simple monogram using a sticker. I kept the front of mine plain because I thought they looked so cute! I love tilting mine back and forth to see the iridescent effect!

The iridescent effect on these ornaments is super 90’s, while also being modern. Holographic items are coming back! Give them to all your friends who love the 90’s as much as you do! Click for the DIY. #diychristmasornaments #diygifttags#diychristma…

How do you plan to use your holographic ornaments? Let me know in the comments below!