DIY Metallic Painted T-Shirt

For my first project on My Magic Mess, I painted a t-shirt. I wasn't 100% happy with the project but it's easy to do and still pretty cute. So, I figured why not do a blog post about it?! This is a project that anyone can do, which I think is the best part. It's the perfect way to give an old t-shirt a new look! I think we all have a few old ones lying around that could use an update.

Metallic Tshirt-3.jpg

You will need:

T-Shirt (similar here)
Paintbrush (similar here)
Metallic Paint (here)
Cardboard
Iron or Dryer

Directions:

1. Put a piece of cardboard inside your shirt to protect it.

2. Paint the collar of your shirt using 2 coats of paint. I started in the back then moved to the front.

3. Let dry for 24 hours, then heat set it using an iron or the dryer.

Metallic Tshirt-6.jpg

This project is so easy to do that literally anyone can do it! If you find that you can't keep the edge straight, then keep going. Otherwise, you can make the line "messy" intentionally and it'll still be cute. What do you think about this easy project? Will you be making one?! Let me know in the comments below!

DIY Colorful Leaf Runner

My table is a constant dump zone at my house. Pretty much any flat surface becomes a place to put things down “just for a minute” aka a month. Because of this, I decided that my flat surfaces didn’t need to be clear, but they did need to not have clutter. The best way for me to do this was to decorate them! Since everything for fall has pretty much the same orange and brown color scheme, I figured I’d make my own table runner this year. Would you believe I made it with some leaves I got from the Dollar Tree?! Yep, just $3 for 3 packs of these bad boys, plus some acrylic paints that I had on hand. I say it all the time, but my favorite way to do crafts is by popping on a seasonal movie after everyone has gone to sleep and getting to crafting! This time, I watched The Object of My Affection (streaming on Hulu and HBO Go) with a glass of wine. In case you’ve never seen it, it’s The One Where Rachel Falls in Love With Phoebe’s Second Gay Ex-Husband, Mike. Just kidding- kinda. This project was a great way to get in the spirit, but I also think this would be fun to make while watching all the Friends Thanksgiving episodes in a row! You all know I’m a huge Friends fanatic, and I love to watch the holiday episodes.

The final result is a pretty (but not stuffy) table runner that you can use in your decor every year. I don’t recommend putting food on or near it, since it’ll probably stain the leaves. But, it’s perfect to use leading up to Thanksgiving dinner on your table, buffet or entry table!

Since everything for fall has pretty much the same orange and brown color scheme, I figured I’d make my own table runner this year to go with my colorful thanksgiving decor. Would you believe I made it with some leaves I got from the dollar store?! …

You will need:

Approx 300 leaves (from Dollar Tree or similar here)
Fabric glue (here)
Tulle roll (from Dollar Tree or similar here)
Wax paper (here)
Acrylic paint (similar here)
Scissors (similar here)

Since everything for fall has pretty much the same orange and brown color scheme, I figured I’d make my own table runner this year to go with my colorful thanksgiving decor. Would you believe I made it with some leaves I got from the dollar store?! …

Directions:

  1. Paint your leaves in your choice of colors. I used Martha Stewart paints because they’re nice and thick. The colors I used were Pumpkin, Mermaid Teal, Strawberry, Pink Raspberry, Mango and Moonstone Purple. I used lighter colored paints for lighter leaves, and moved up with the colors from there. I did 2 coats for the purple because it was light.

    • Note: I tried a few different methods for painting the leaves. The fastest method is to take a large box (like an amazon box!) unfold it, and place it across your table. Lay out your leaves in sections, and paint each section in your choice of colors. This allows for less thinking (just keep painting until you run out of leaves in your section) and also goes faster because you don’t have to stop to make more space or shuffle things around.

  2. Once your leaves have dried, assemble them on your tulle or fabric. You want to come up with a general plan for them, and then start gluing as you go! I used fabric glue so that it was still flexible to fold up and store away easily. Put down your wax paper as a buffer to protect your surfaces.

    • *Note #1: don’t use Fabri-Tac on varnished furniture.

  3. To get the same look I had, you’ll want to glue your leaves facing outwards along the edge of your tulle. Do this for the full perimeter. I didn’t cut my tulle (yet) because I wanted to make sure I had enough leaves!

    • *Note #2: Fabri-Tac took my nail polish off and kinda melted it. Be careful when using it with a manicure! I was wearing regular polish, not gel.

  4. Put a row of leaves going in between the leaves you just glued down, alternating the colors. I didn’t follow a pattern so that it looked natural.

  5. Put a leaf in the middle, alternating the direction. I wasn’t too cautious about bald spots or gaps because it added to the “tossed leaf” look. If you dislike that, you can pile them on but be sure you have enough leaves!

  6. After you glue down your leaves, peel it off the wax paper so it doesn’t get stuck on when it dries. I let mine dry laying flat, glue side up.

Since everything for fall has pretty much the same orange and brown color scheme, I figured I’d make my own table runner this year to go with my colorful thanksgiving decor. Would you believe I made it with some leaves I got from the dollar store?! …

That’s all folks! The most time consuming part of this project is painting the leaves. If you want to save time, you could always spray paint them instead! Personally, I find painting to be somewhat therapeutic which is why I always go for acrylic paint. Spray paint would also go on with better coverage, if you’re interested in more vibrant colors!

What do you think of this project? Will you be making it for your Thanksgiving decor? Where will you put it? Let me know in the comments below!

Abstract Painted Gift Tags

Back when I was a kid, I thought it was so cool to have a summer birthday. You didn’t have to go to school, the weather was hot, and something like a pool party or going to an amusement park was an option. So, while my mom did make strawberry cupcakes for all my classmates on my birthday, just being at school kinda sucked. Now that we’re all adults, it doesn't really matter as much. We all probably have to work on our birthdays anyway (cue the crying) so it's now an even playing field. For that next birthday king or queen, how about a handmade gift tag for their present? It’s incredibly fun and easy to make- anyone can do it!

*This post contains affiliate links.

For that next birthday king or queen, how about a handmade gift tag for their present? It’s incredibly fun and easy to make- anyone can do it! If you’re a fan of abstract painting, you’ll love this easy DIY project. Click for the full instructions a…

You will need:

Colored cardstock (similar here)
Paper punch (similar here)
Embroidery floss (similar here)
Acrylic paint (similar here)
Glue gun (similar here)
Scissors (similar here)

Directions:

For that next birthday king or queen, how about a handmade gift tag for their present? It’s incredibly fun and easy to make- anyone can do it! If you’re a fan of abstract painting, you’ll love this easy DIY project. Click for the full instructions a…

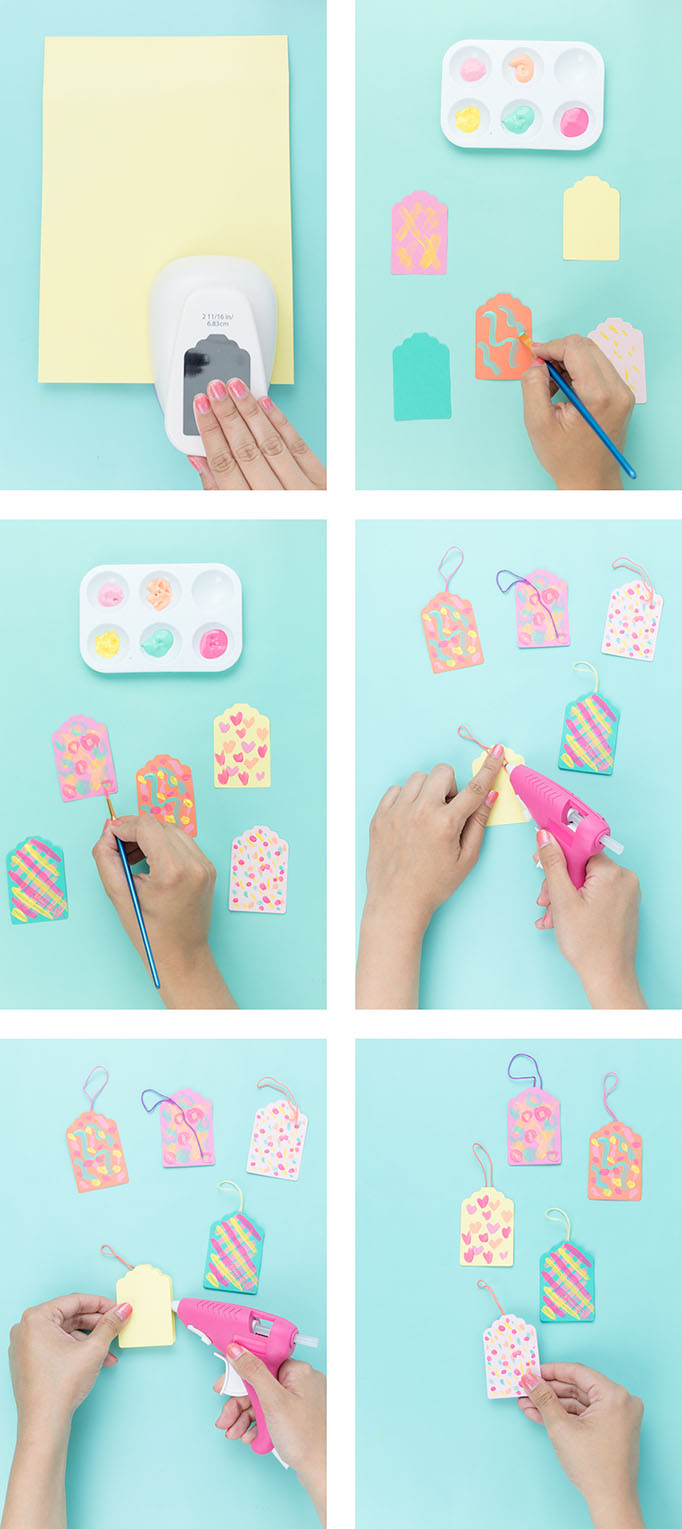
1. Cut out your tags from the card stock in your choice of colors. You'll need 2 pieces of cardstock for each tag you're making. I used the same color for both sides.

2. Paint abstract designs using your choice of paint colors on one of the cardstock tags. For the designs, I kept it simple with xoxo, lines, dots, etc. You can be as simple or as complex as you want.

3. While the paint dries, cut a piece of embroidery floss for the tag.

4. Glue the embroidery floss on the back of the tag, then glue on the blank tag to create a seamless background.

For that next birthday king or queen, how about a handmade gift tag for their present? It’s incredibly fun and easy to make- anyone can do it! If you’re a fan of abstract painting, you’ll love this easy DIY project. Click for the full instructions a…

That's it- you're done! Now add a to: and from: so your recipient knows who to thank for their awesome new present. Hang it on their gift, and get ready to see their face light up. Everyone likes a present!

I always love adding a homemade touch to my gifts because it really makes them more personal, especially in a world where everyone just gets each other gift cards! So, what do you think about these DIY gift tags? SO simple, right?!

Mess-Free Baby Painting (Perfect Baby Gift!)

Get ready for the easiest gift your baby can make. It’s absolutely perfect- minimal mess, beloved by all, and your baby is HAPPY to do it. In fact, depending on their age, they won’t even know they’re doing anything at all! Let’s backtrack a little bit. Wayyyyy back in February, I needed a Valentine’s Day gift idea for my husband. I wanted it to be something from the baby, and something that he would cherish for years to come. Plus, I knew it had to be simple because we had JUST gotten our puppy, and Hailey was only 4.5 months old. I was overwhelmed but I wanted to make something special for my husband. That’s how this gift came about! I’ve seen lots of these painting projects on Pinterest, but never one with a baby as young as Hailey was! And that’s why I added the extra element of putting it on the floor (in a trash bag!) and letting her jump and leap on it in her bouncer. It’s so easy to do that you’ll be buying paint and canvases by the truckload. I promise!

*This post contains affiliate links

Looking for a gift that your baby can make? Check out how to create this mess-free painting that your little one can make using their hands, feet, or their bouncer! It’s the perfect mother’s day gift too! Click to see how easy it is. #babysensorypla…

You will need:

Canvas panels 11x14 (here)
Paints (similar here)
Glad Press’n Seal (here)
Large clear trash bag (here)
Newspapers/fliers
Photo Frame (similar here)

Directions:

Measure and cut your Press’n Seal to size. I ended up using two long sheets since it wasn’t wide enough to do one long one. You want to have enough overlap so that paint doesn’t ooze out anywhere! I used the Press’n Seal instead of regular saran wrap because it stuck to the canvas nicely and it wasn’t a total mess to unwrap from the roll. Usually saran wrap seems to get all tangled up- this made it easy, AND the seams stuck together nicely!

Looking for a gift that your baby can make? Check out how to create this mess-free painting that your little one can make using their hands, feet, or their bouncer! It’s the perfect mother’s day gift too! Click to see how easy it is. #babysensorypla…

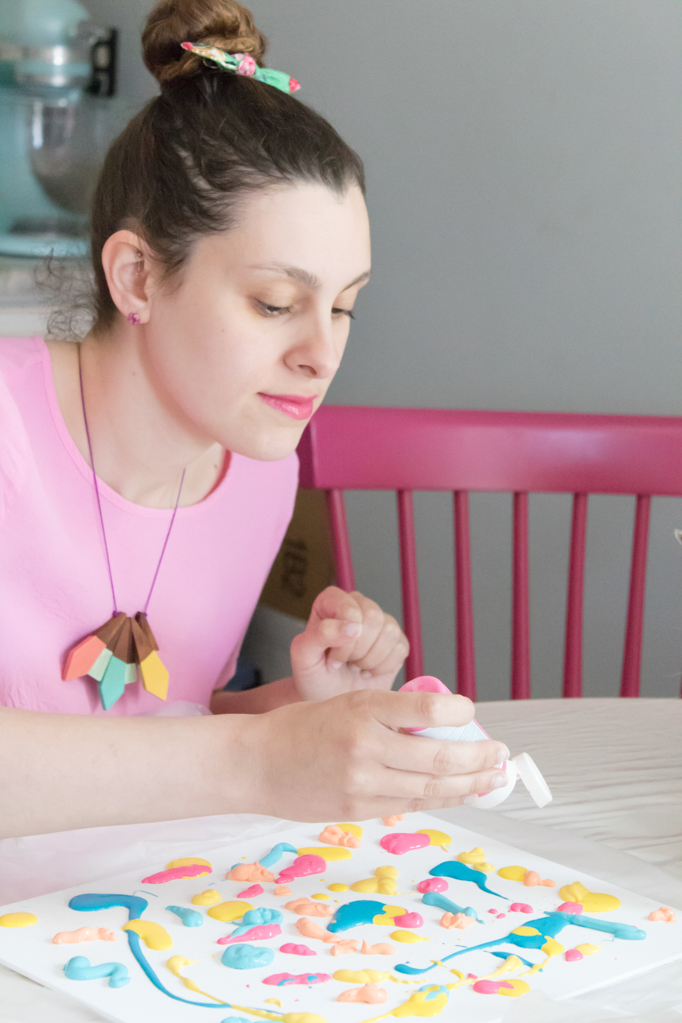
Add your paint around the canvas in little globs. Don’t use too much paint or it’ll take forever to dry. Try to use a nice mix of colors that blend well. You can also use metallic paints for added dimension and shine.

Looking for a gift that your baby can make? Check out how to create this mess-free painting that your little one can make using their hands, feet, or their bouncer! It’s the perfect mother’s day gift too! Click to see how easy it is. #babysensorypla…

Carefully place the saran wrap over the canvas and seal it closed. For this step, you want to make sure that you don’t smush it shut, but just gently fold the saran wrap and seal the edges as tight as you can. Remember, we want the baby to create the art- not you!

Looking for a gift that your baby can make? Check out how to create this mess-free painting that your little one can make using their hands, feet, or their bouncer! It’s the perfect mother’s day gift too! Click to see how easy it is. #babysensorypla…

Ta-da! See? The artwork is fully intact after I sealed it in the Press’n Seal. That leaves the smushing to Hailey.

Looking for a gift that your baby can make? Check out how to create this mess-free painting that your little one can make using their hands, feet, or their bouncer! It’s the perfect mother’s day gift too! Click to see how easy it is. #babysensorypla…

Now for the very last “prep step”- place the saran wrapped canvas into a large clear trash bag. A black bag would work in a pinch, but with clear you can see whats happening. If it’s a larger bag like mine was, you can fold it over for added protection and, mostly, to get it out of your way.

Looking for a gift that your baby can make? Check out how to create this mess-free painting that your little one can make using their hands, feet, or their bouncer! It’s the perfect mother’s day gift too! Click to see how easy it is. #babysensorypla…

Place the canvas under baby and let him/her jump around, crawl, or play like usual. Guide the canvas around so that all parts of it get spread out. I used the bouncer which ensured that worst case, only her feet would get dirty. Luckily nothing got dirty :) When it got down to the very end, I spread the excess paint into the bare corners of the canvas so that it would go all the way to the edges. This also helps to avoid giant globs of paint next to bald spots!

Looking for a gift that your baby can make? Check out how to create this mess-free painting that your little one can make using their hands, feet, or their bouncer! It’s the perfect mother’s day gift too! Click to see how easy it is. #babysensorypla…

Take the canvas out of the trash bag, and unwrap it carefully. I recommend having a trash bag handy to toss out the Press’n Seal, because it’ll be covered in paint and so will your hands. This is the messiest part of the entire project- well, the only messy part of this project! Don’t say I didn’t warn ya ;) There are no pictures of this step for obvious reasons.

Lay the canvas on the newspapers to dry. If your paint was thick it may take a few hours or even a day, so you’ll want to make this gift ahead of time. If you need it the same day, just use less paint (a lot less!) which will dry faster. But, to make this canvas a true work of art I highly recommend making it about 2 days before and this way it’ll be perfect- and dry!

I gave this gift to my mom and my MIL for mother’s day and they LOVED it!

Looking for a gift that your baby can make? Check out how to create this mess-free painting that your little one can make using their hands, feet, or their bouncer! It’s the perfect mother’s day gift too! Click to see how easy it is. #babysensorypla…

The gift recipient is sure to love this gift that came directly from your little one! It’s such a great keepsake for moms, dads, grandmas, aunties… everyone! Seriously, everyone will want one of these for their home. It’s truly the greatest gift a baby can give, besides just being their awesome, poopy self!

DIY Paper Roll Pencil Cup

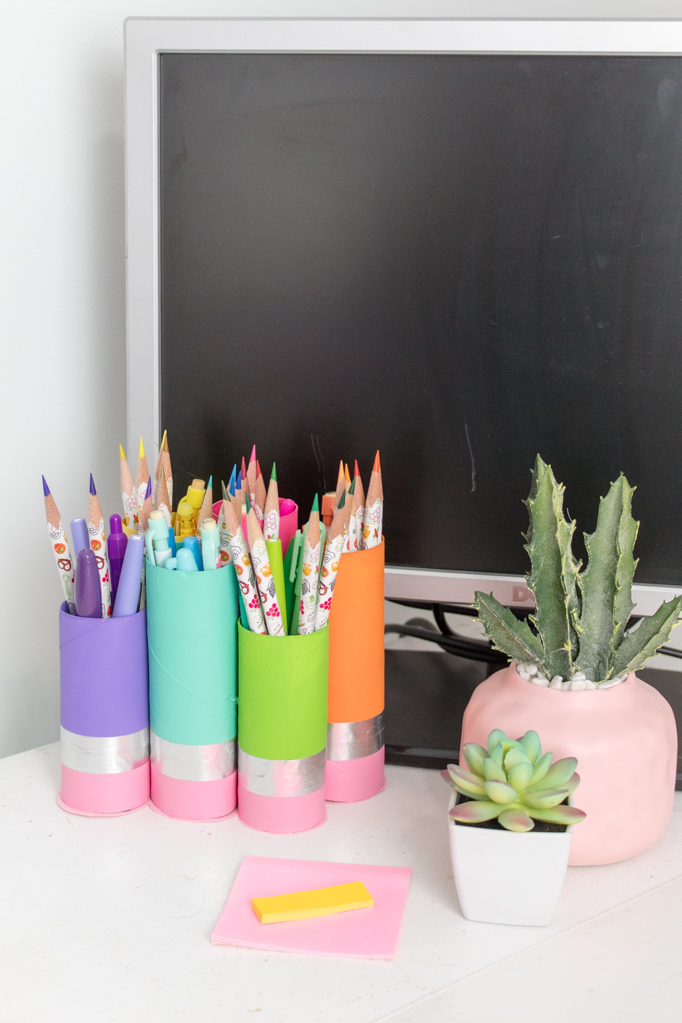
Can you believe that the summer is almost over, and back to school shopping has begun?! I mean, I’m not going back to school but any excuse for shopping is one I’ll take. Since everyone else has back to school on the brain, I whipped up the perfect project for families and teachers alike- this colorful pencil cup, using the humble paper roll! That’s right, we have a true trash-to-treasure treat for you today (say that 5 times fast!). You just need a few basic supplies that you probably have on hand.

Looking for a great back to school craft, or a perfect new teacher gift? How about a pencil cup made with something totally free- the paper roll?! This project is so easy to make and extremely affordable. Click to find out how to make it and where g…

My favorite part of back to school shopping was always getting brand new stationery. I was always picking out my favorite notebooks, folders and pens for the new school year. I always loved getting this fresh new gear. It’s a love I still have to this day, as I purchase unnecessary notebooks and markers. They take over most of my desk space, as I need a marker or pen in every single color for every single possible use. Thin markers, thick ones, pencils, pens… even erasable markers for my notes! I even have a giant puoch of markers that I keep with me at all times.

Looking for a great back to school craft, or a perfect new teacher gift? How about a pencil cup made with something totally free- the paper roll?! This project is so easy to make and extremely affordable. Click to find out how to make it and where g…

These would also make a great teacher gift when filled with some new supplies for the school year- pencils for the kids and markers for the teacher to grade papers with! I’m sure teachers have more than enough mugs and apple shaped things, plus everyone loves something homemade and useful. It would look so cute on a teacher’s desk.

Looking for a great back to school craft, or a perfect new teacher gift? How about a pencil cup made with something totally free- the paper roll?! This project is so easy to make and extremely affordable. Click to find out how to make it and where g…

The full DIY is over on the Giggles Galore blog, so head on over to take a look!