ORC Fall 21 REVEAL- Attic Playroom & Movie Theater
/It’s here - reveal day! Well, technically, reveal day was on Thursday. I got an email from One Room Challenge that if we needed a few more days to finish up that we should use them, and it came at just the right time. I definitely needed a couple of extra days, and I really think it made all the difference! This room has been a labor of love.
*All sources are listed at the bottom. If anything is missing, let me know and I’ll add it! This post contains affiliate links.

As you may remember, this room was previously my office space. It never quite felt right, so when I thought about how to fix up the house it just made sense for this room to become a family space instead of being just for me. I was always trying to get people to hang out up there with me, so I guess that was sort of a sign that I wanted to create a space that the whole family could enjoy.

I think the biggest change for this room is the new floors! I have been (impatiently) waiting to replace this floor since we purchased the house five or six years ago. I was giddy on Halloween as we ripped up the old carpet. We replaced the carpet with this Beaumont Eco Resilient Flooring. So far, it’s been holding up great to our various kids and pets. Did I mention that for some reason Hailey decided to pee on it one day? Yea… she did. It cleaned up perfectly! I think these floors are my favorite design element of my whole house, hah! This was the first real renovations we did on this house (and any house I’ve ever lived in!) so it was really exciting to make the decision and see my vision come to life. My husband installed the floors himself (with a little bit of help from me- I’m mostly the designer in this duo) and it took him 3 tries to get it right! It’s beyond perfect though. I love these floors.

Let’s talk about this amazing sofa that I got from Bob’s Furniture. I wanted to replace the old grey futon that we had for our makeshift den, which honestly reminded me of the seat of a car. First, we were thinking a sleeper so that it would be a good guest space. Then, since it’s a movie theater room, I thought it would be great to have recliners. I wanted somewhere that we can get comfy and watch a movie and truly relax. Finally, we landed on these two loveseat sleepers (a left and right side) which means that we have a large sleeper bed for when guests come over, as well as four chaise lounges! Although the shape of the sofa is pretty traditional (I was going for something a little more Art Deco up here) the sofa really is perfect for the space. I love that the chaise goes back in and folds down, which means that the sofa takes up less space when we’re not using the foot rests. It’s perfect that we get to host guests up here too. This sofa is the Playroom model in blue (perfect name!), and the configuration was recommended by the sales rep. It was available to be delivered super fast- we took some time because we were getting the floors done, but I think it could’ve been here within a week!


Now let’s talk rugs. Picking out rugs caused me so much stress. I wanted a washable rug that was large, affordable, and matched my style. I was pretty much set on this Target Opalhouse outdoor rug from the start, but it didn’t seem like it would hold up well to two kids, two cats, and a dog. I decided to put it up here anyway and I loved the way it looked. I kind of threw logic out the window, and within a few days a cat had already scratched it and ruined a large part of it. So, this rug will probably be going outdoors where it belongs and I’ll find a new rug for the space.
As for the playroom rug, I ended up using the yellow rug from the original playroom downstairs and placed a smaller rug on top that my sister had given to me. I love the layered look since it ties in all the main colors of the room, even though the combo of leopard print and boho is atypical. I also keep a play mat for Travis handy, since he loves tummy time and I want to make sure he’s on something fairly clean. These rugs get furry with all out pets and he’s been known to grab tufts of lint/fur from the floor and put it in his mouth. Kids, amiright?
Most of the artwork in here was things I already had. I tend to buy things I like without really knowing where they will go, so I have a stash of items that I love that are homeless… within my home. Hah! Most of this artwork came from the playroom downstairs (like all the animal prints) and then I added a vintage Carters ad that I had gotten from the thrift store. I LOVED it and intended to put it in the kids shared room, but it didn’t quite have a spot. I passed by it when grabbing things and realized it would be perfect up here, appropriately next to the baby care center.


The large Yes You Can! sign is from Home Goods. I had gotten it for my craft space up here to cover the AC unit. I’m so glad that it works so perfectly for the playroom too! I attached it with 3M velcro strips for now, but I plan to put it on more permanently with the cable hidden. I hate the eyesores of the house (like old AC units- ugh) and my goal is to try and hide them or disguise them.

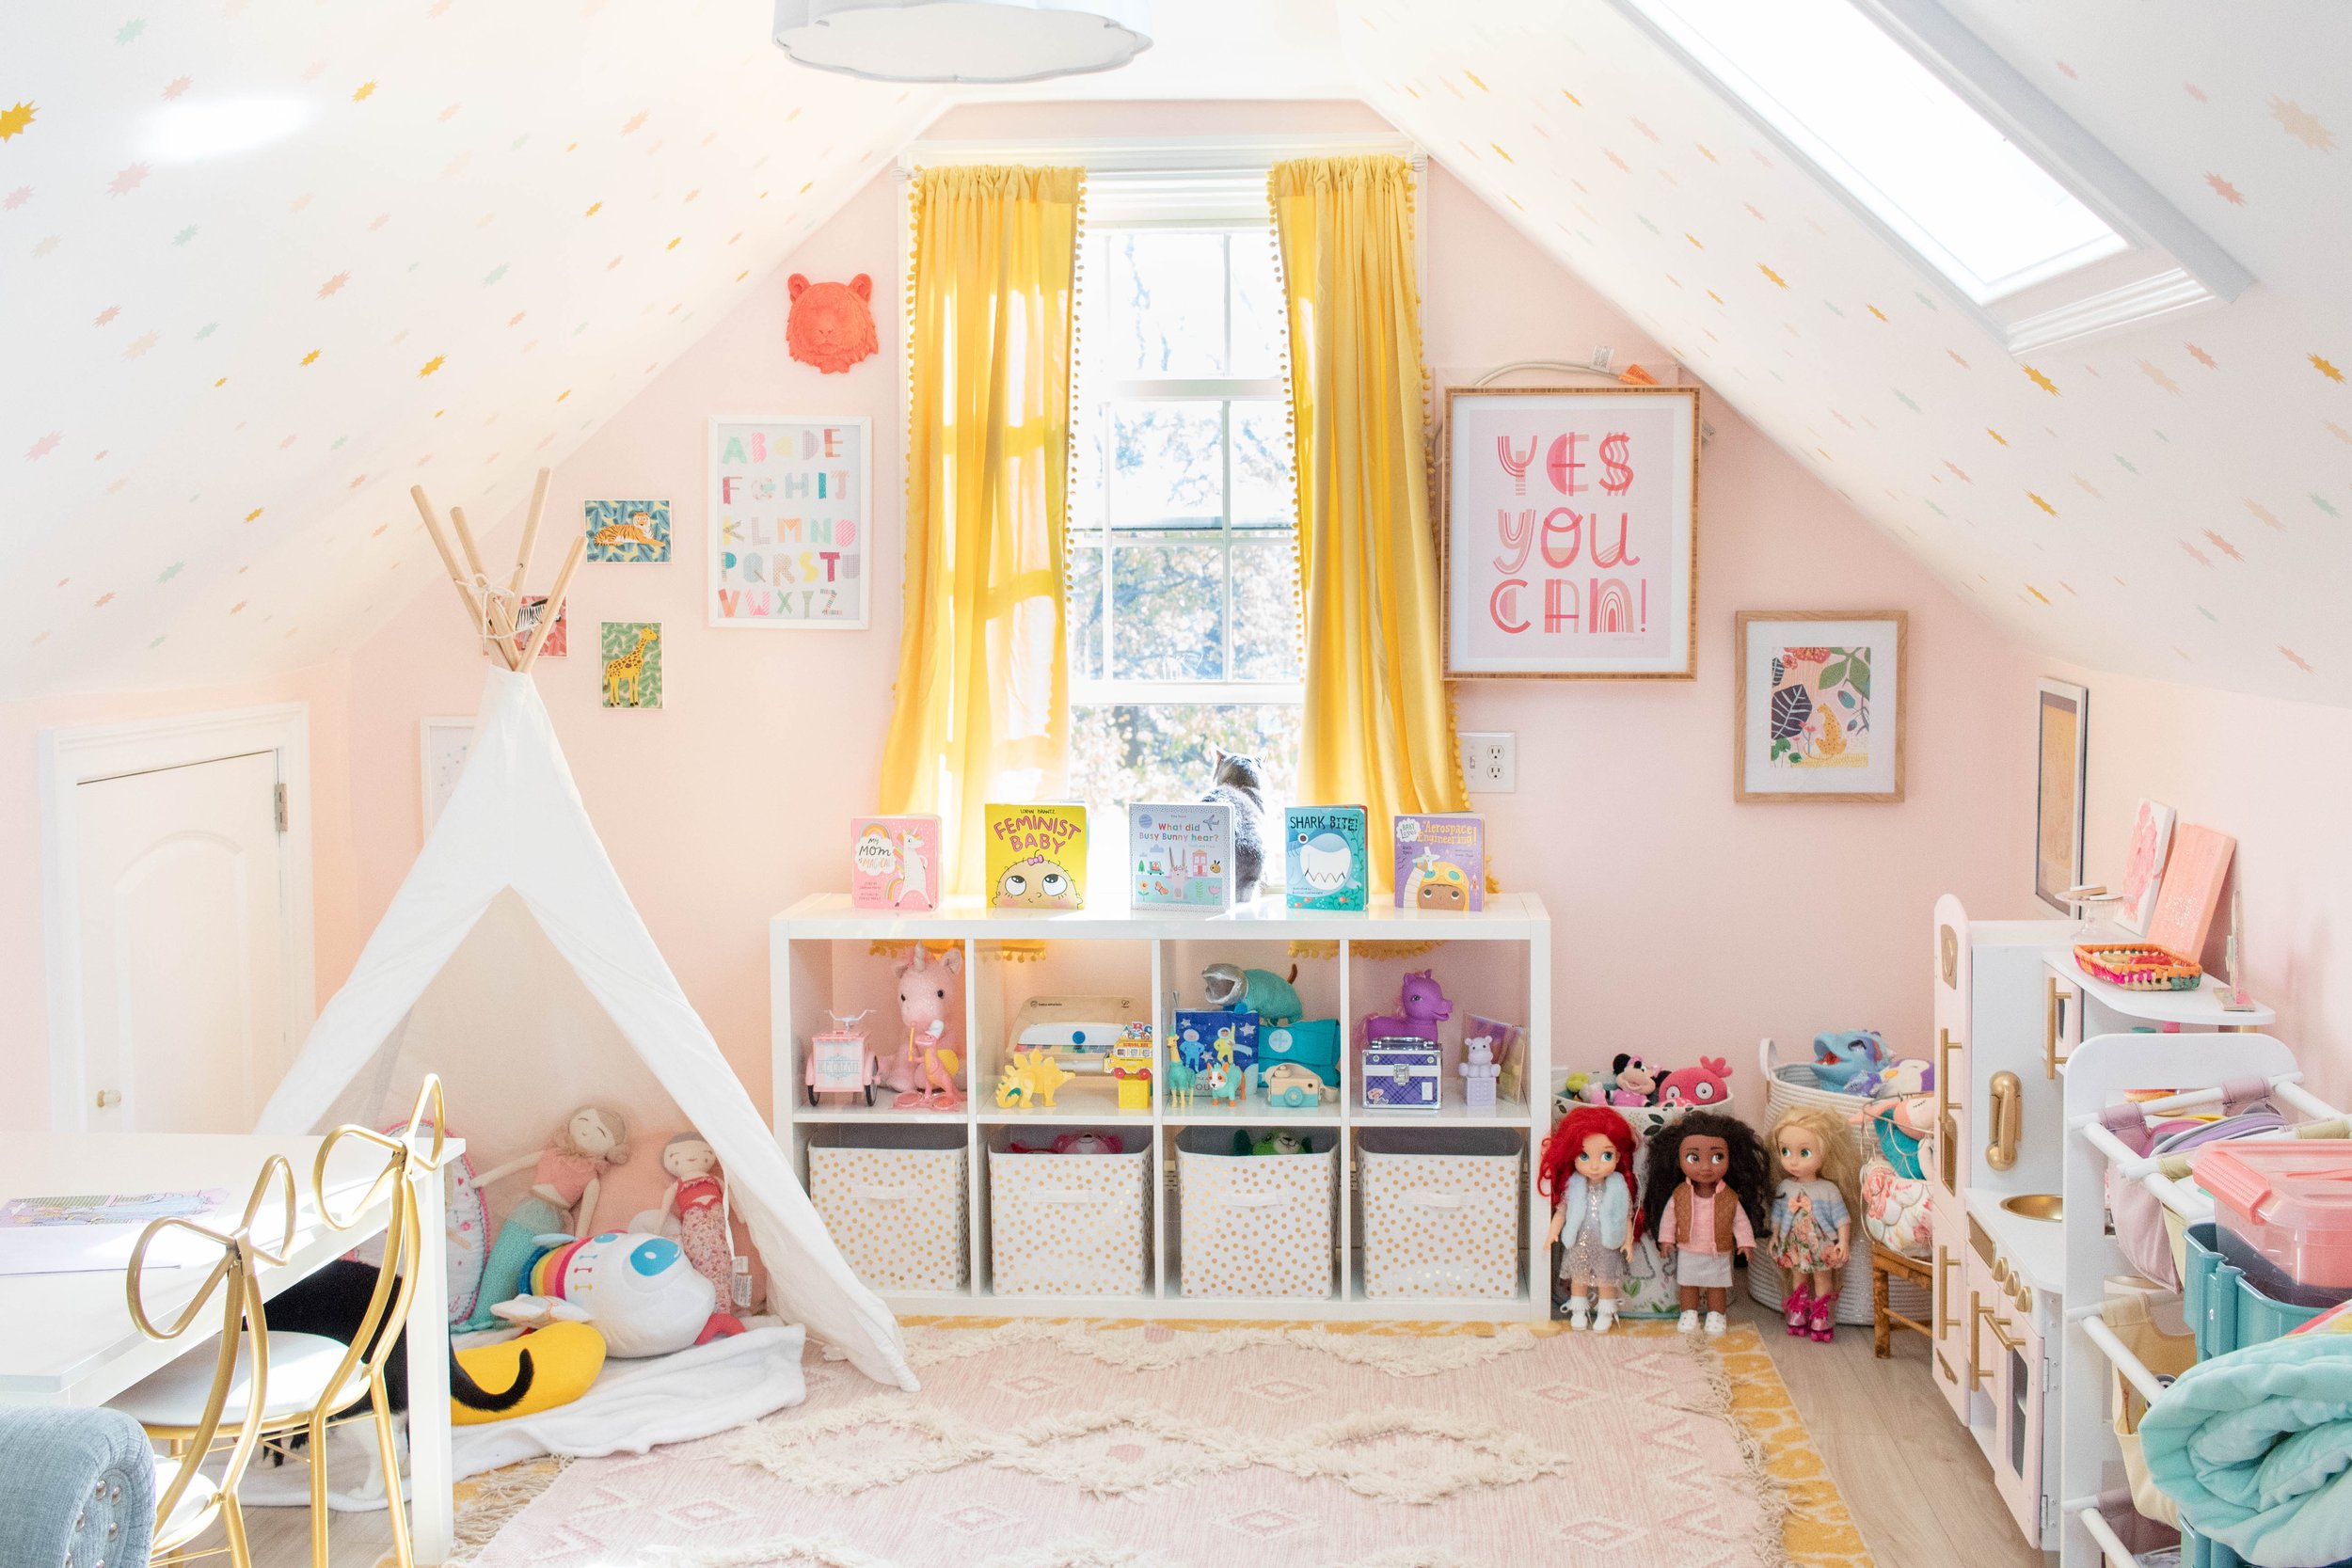
The original playroom downstairs was always a mess of toys, so I decided that this one would have limited toys and a toy rotation. I have a few bins in this Ikea cube unit and picked out a few toys and sorted them by color. While I love how clean this looks, I’ll probably be more practical in the future and display toys with their relevant parts and pieces instead of by color. I’ve also got 2 baskets of toys for Travis. I didn’t know what to place on top of the cube units, so I took a cue from the library and placed some upright books. This allows Hailey to grab books on her own, while ensuring that the top of the cube unit doesn’t become a dump zone. Next to all of this, we’ve got her tent & reading nook filled with cute pillows.

And Hailey’s favorite toy- her play kitchen! This was another FB marketplace find for only $15 and it was practically brand new! I gave it a makeover with white and pink chalk paint, plus some gold spray paint. I also plan to add some cane accents and a backsplash but that’s a project for another day!

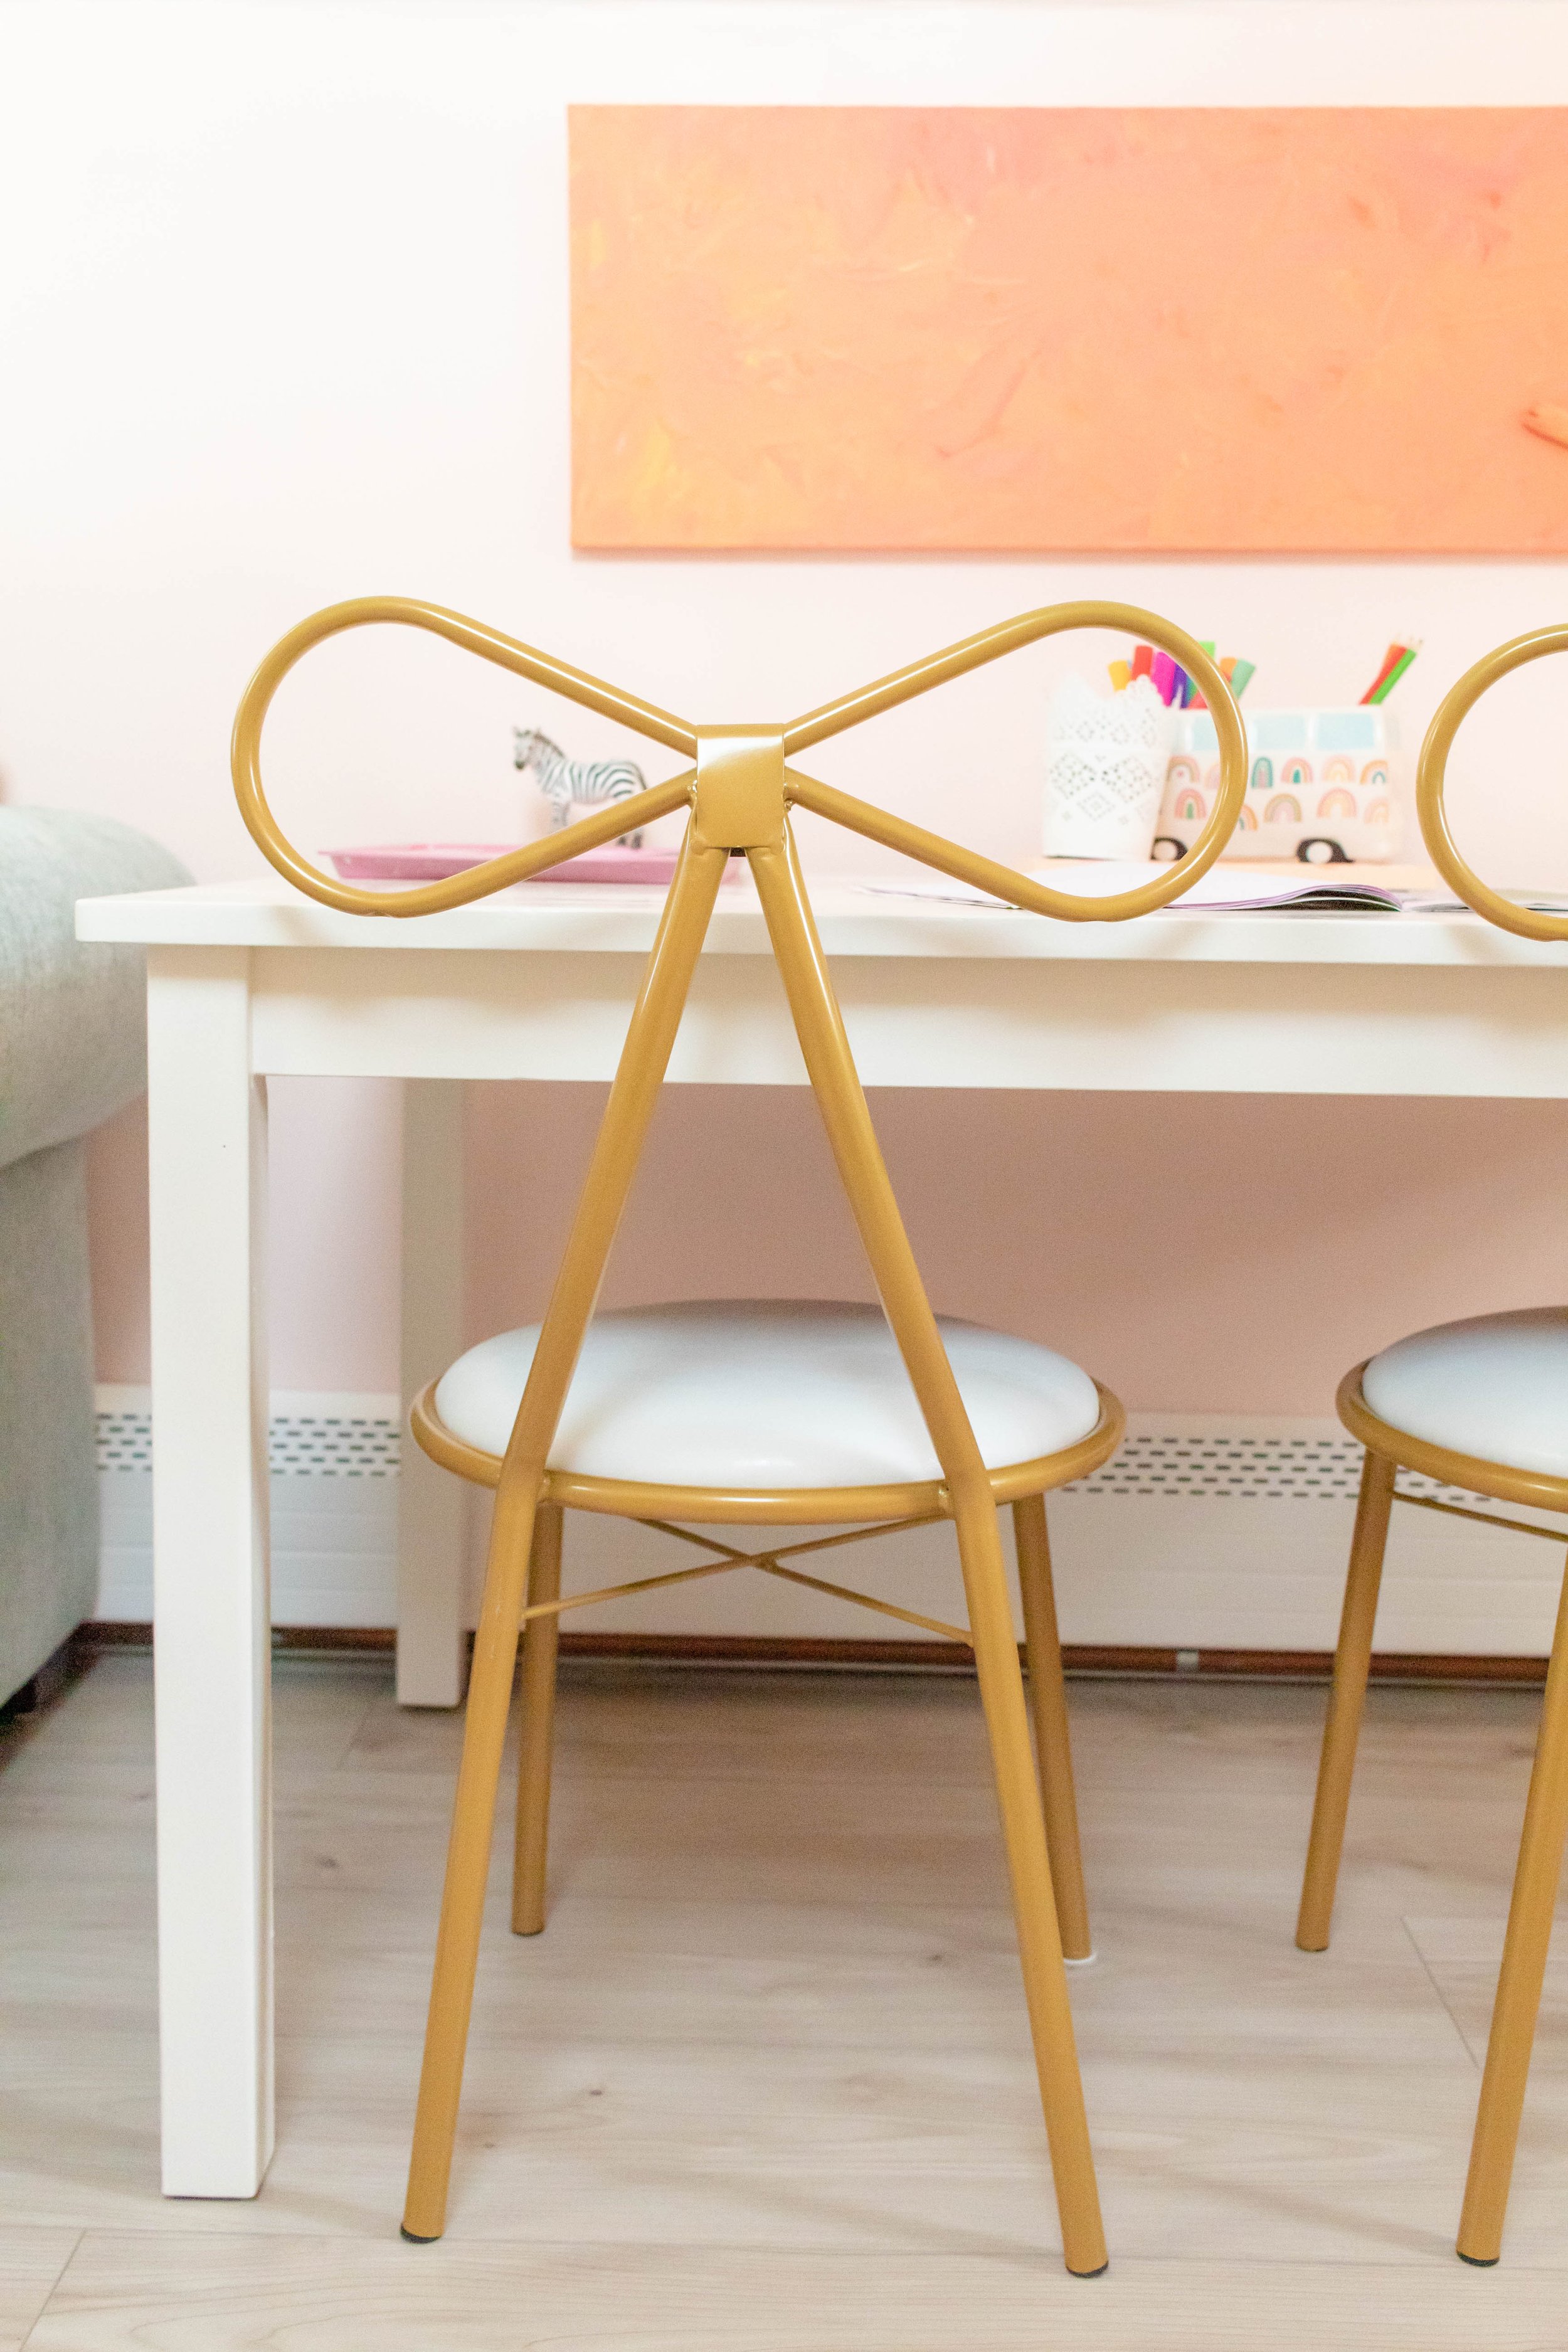
I knew I wanted to have an art table up here, since Hailey and I love to do crafts together. I wanted this pottery barn table but I felt hesitant spending so much on a kids’ table that would probably get destroyed. So, I went to FB Marketplace and found both tables that I wanted (in brown) for only $40! Can you believe it?! One can of Sherwin Williams Pro Classic in Creamy and I was able to give these a new look (plus my tv stand) with plenty to spare for future projects. I hung Hailey’s painting that we made together above the table. I loved the way she placed down her paintbrush when she finished, so I made it part of the artwork permanently. The “tray” is one of my paintings, while the zebra tray is a DIY that I did way back. These bow chairs were the perfect addition. I literally could not put them into the cart fast enough at Home Goods! They ended up being a little too tall, so my husband cut them down to size and they’re perfect now. The don’t even wobble. I don’t know how he does it.

I’ve always loved the idea of a home theater, but I definitely don’t love the colors they usually have. Black and red? No thanks! So I decided on this pastel Art Deco theme. There are a few elements that I didn’t quite get to finish in time for the reveal, but I am so excited with how it came out so far!
Now, let’s talk stars! One difficult design element up here is the sloped ceilings. I never knew what to do with them because they always looked so bare. I knew I wanted to do a half painted wall up here (though I did want to do a scallop shape too!) so I needed something for the upper part of the wall. When I saw the post that Laura made for A Beautiful Mess, a lightbulb went off. It was perfect! I spent entirely too long trying to find a shape that was similar and colors that matched, then had to figure out the sizing and cut it on my Cricut. But the end result is amazing and one of my favorite parts up here. The best part is that it cost less than $50 and I still have plenty of vinyl left over!

I handpainted the accent wall using Frog Tape and a sample of paint I had left over from the kids’ room mural (more on that soon!) The yellow stripes are varying widths while the white ones are all the width of the tape, which helps it to look whimsical but consistent. I also wanted it to be imperfect so I only did one coat and eyeballed the lines to try and get them straight. In the end I think it looks perfectly vintage! I added these amazing movie-themed sign language flash cards that I framed with a mat. We have a deaf family member so as soon as I saw them, I knew they were meant to be in this space. The play sign is a “play” on words (no pun intended- seriously) since this is a PLAYroom but you also PLAY a movie. Pretty clever, eh? The arrows I’ve had for a long time- I think they were from Target for Valentine’s Day. I’m glad they now have a permanent spot!


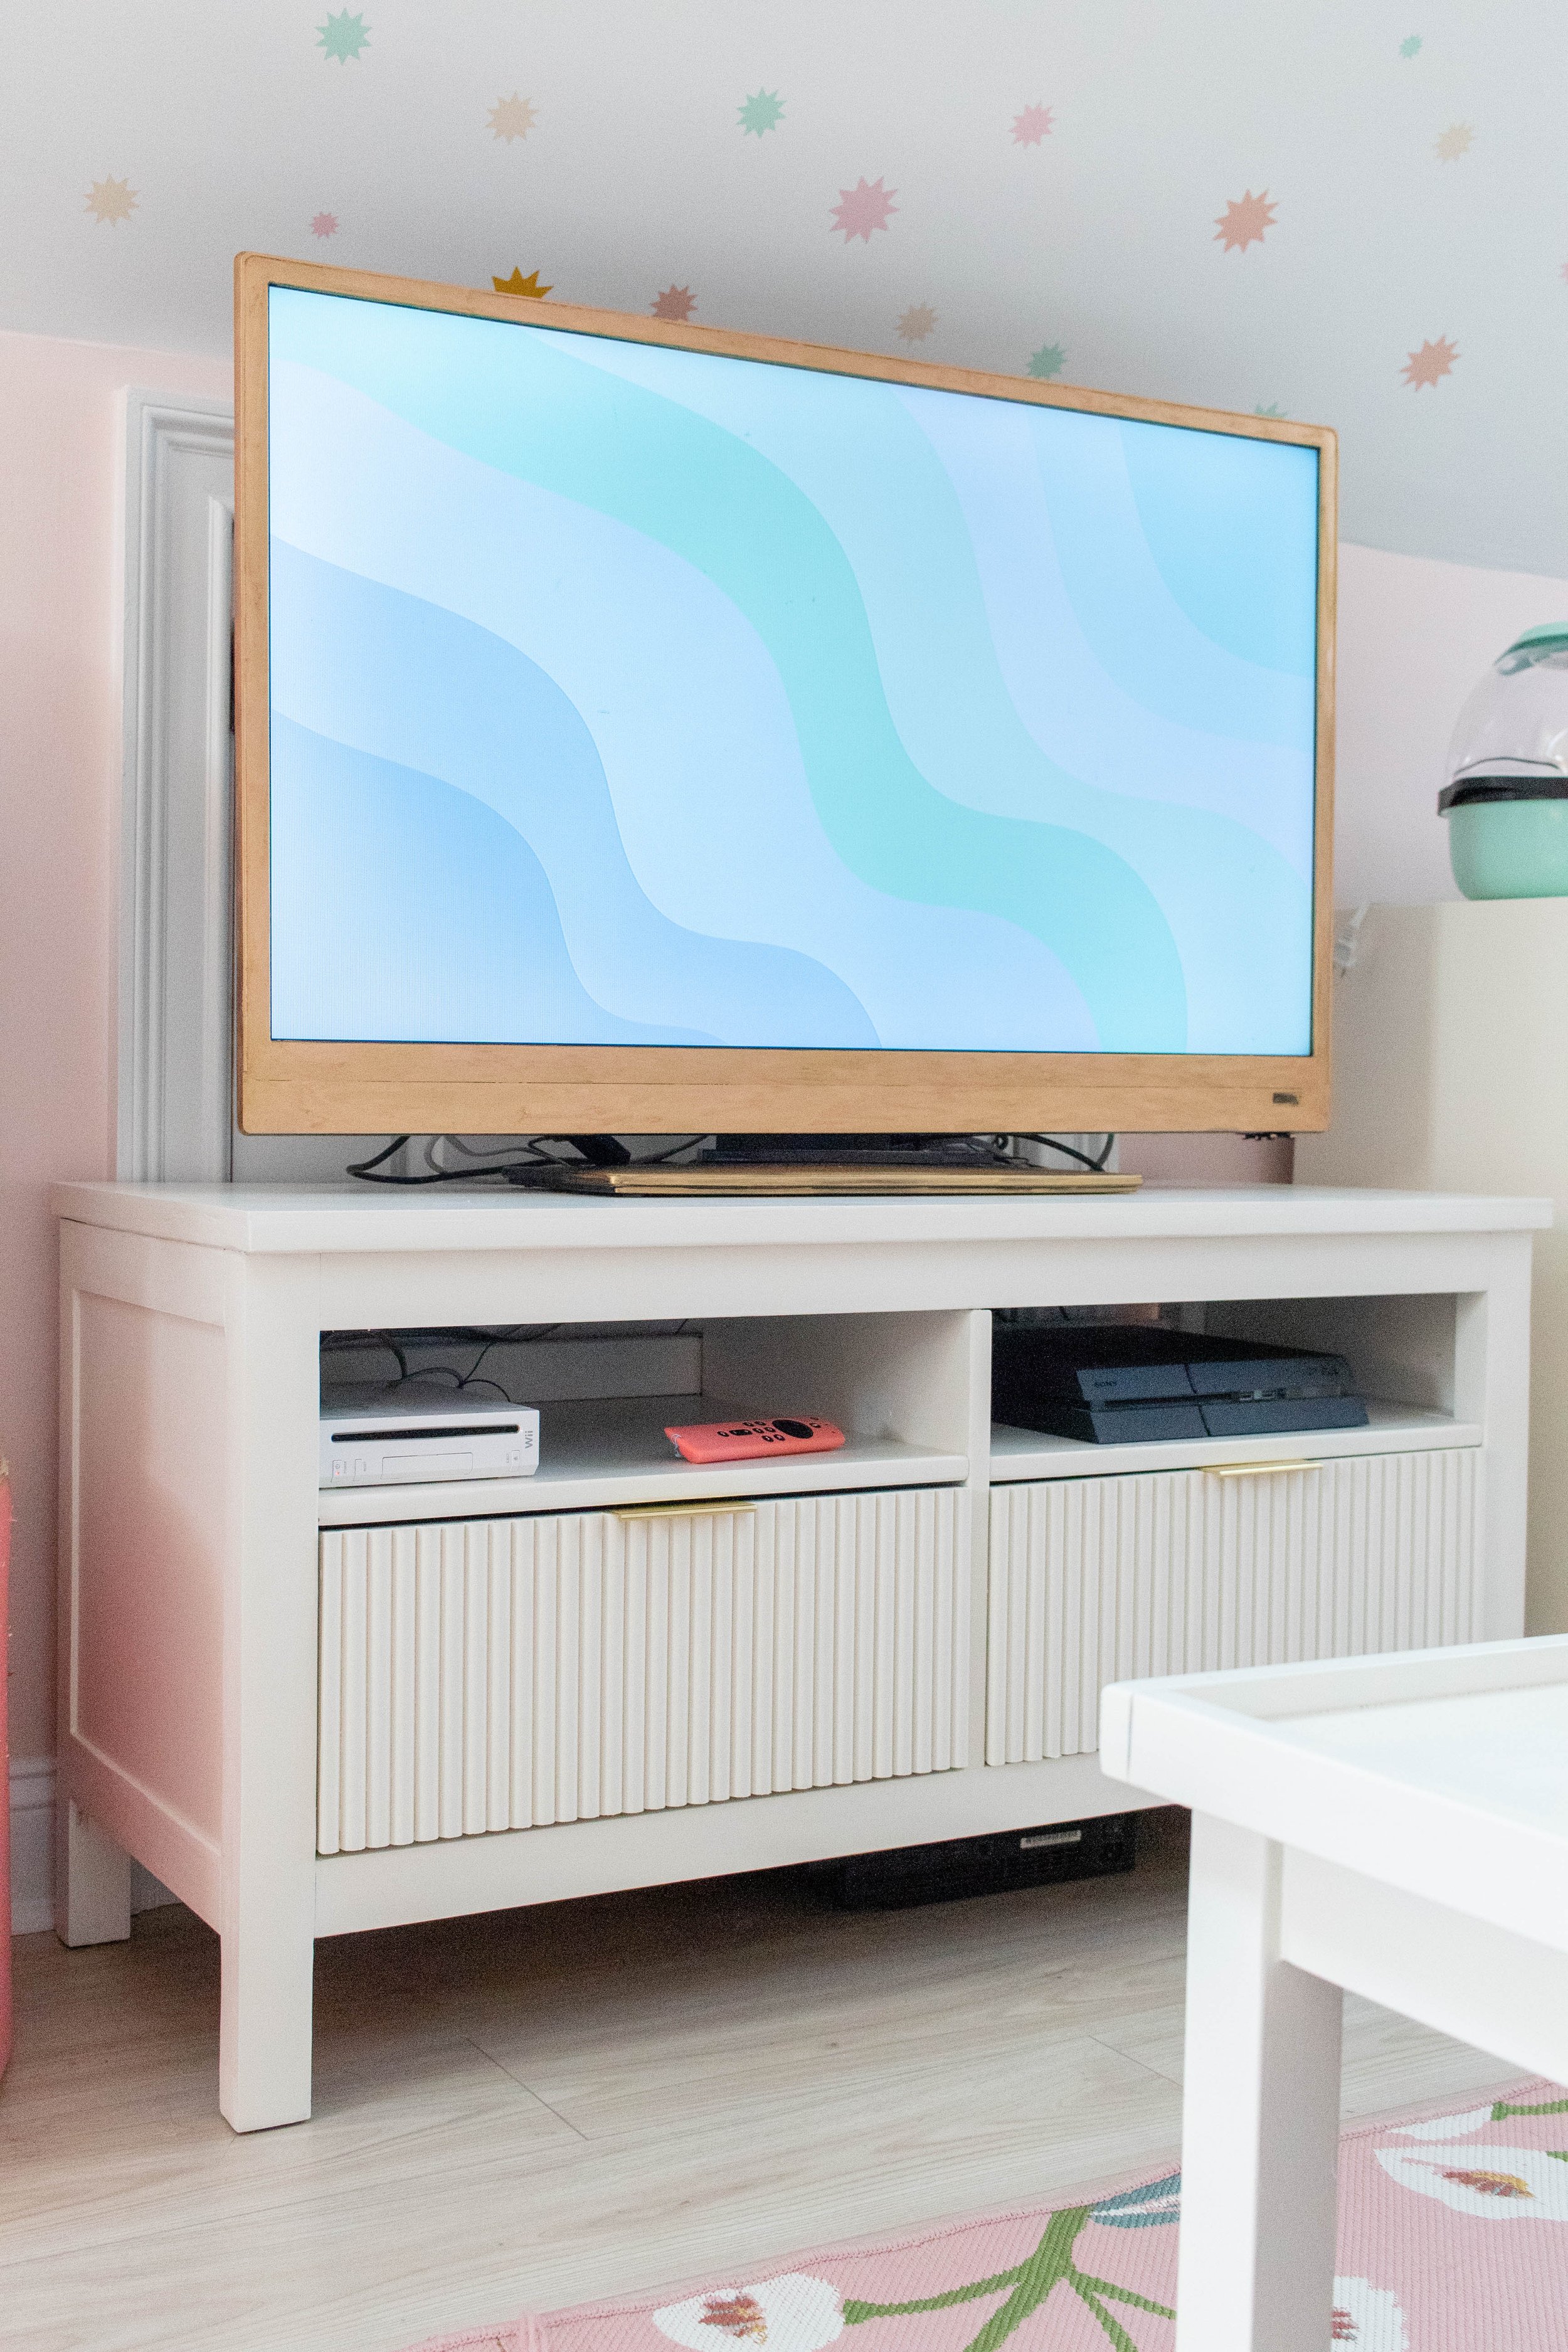
The tv unit was purchased in our apartment probably 8 years ago. It came with us to the house and sat in our den for a while, then kinda ended up homeless, then came up to my attic craft room. It was black so I ended up adding wallpaper to the drawers, then sanded it down to wood, then we painted it white. I had my husband add the half-rounds to the drawer fronts which then got a fresh coat of Creamy by Sherwin Williams to match the rest of the unit. The pulls look so modern and minimal which allows the half rounds to take center stage. I gave the tv a makeover using Tasha’s tutorial and mine definitely did not come out as well as hers did. Rub n Buff is harder to work with than I thought! I added artwork as a screensaver and now the tv is a Frame TV’s ugly cousin.
I knew I wanted a mini fridge up here for snacks and drinks, so I got this gorgeous retro-inspired one! It also comes in blue which would have been more fun, but I thought this cream one would work better for the space. I had to get some seltzers- rainbow colored La Croix, of course! A popcorn maker, gumball machine containers, and cute bowls add the finishing touches.

The lesson I learned in all of this is that we think that people’s rooms are “done “after doing a challenge like this, or any kind of renovations. The truth is that all spaces are a work in progress. There are many things that I love about the space, and a few things that I probably will still tweak as time goes on and we use the space in a new way and adapt. I think that was my favorite lesson of all. I tend to be such a perfectionist and spend so much time looking for just the right thing, and the truth is that sometimes the right thing comes along when you least expect it. So, I love that I have a little bit of room to play with what’s up here and to switch around some of the items that don’t work out for us in the end.

That concludes the tour! Be sure to follow me on instagram while I share more DIY projects for this space and more budget-friendly home renos and reveals!
Sources:
Playroom:
Cube Unit- Ikea
Cubes- Amazon
Tent- Amazon
Curtains- Amazon
Pillows: Mermaids- Home Goods, Circle- Walmart, Ice Cream- Target, Rocket, Moon & Mouse- Amazon
Yellow Rug- Target Opalhouse,
Pink Rug- NuLoom
Baskets- Home Goods
Kitchen- KidCraft with a makeover; Hardware- Amazon
Rainbow Baskets- DIY project
Heart Ottoman- Oh Joy! For Target (discontinued)
Tulip Basket- Target
Sequin Pillow- KailoChic
Table- Pottery Barn (Purchased second hand on FB Marketplace)
Bow Chairs- Home Goods
Zebra Tray- DIY Project
Camper Pen Cup- Home Goods
Decals- handmade with the Cricut (vinyl from Hobby Lobby)
Art:
Alphabet- DIY
Tiger Head- Amazon then spray painted
Tiger/Zebra/Giraffe - DIY
Disney Castle- Etsy
Yes You Can- Home Goods
Cheetah- Hobby Lobby
Babies- Carter vintage ad (thrifted)
Movie Room
Couch- Bob’s Playroom
Rug- Opalhouse by Target
Coffee Table- Pottery Barn (Purchased second hand on FB Marketplace)
TV Unit- Ikea Hemnes
Mini Fridge- Best Buy
Media/Snack Cabinet- Home Goods
Popcorn Machine- Dash SmartStore
Gumball Containers- Hobby Lobby
Bowls- Striped Popcorn, Pink & Stars- Target
Blanket- Home Goods (Novogratz brand)
Pillowcovers- Amazon Blue and Orange
Shell Pillows- Target
Art:
Play Sign- Hobby Lobby
Frames- Target
Sign Language Art- Vintage flash cards from Maliasmark on Etsy
Light Fixtures- Target (discontinued) & Amazon
Flooring- Floor & Decor
See the other participants here: www.oneroomchallenge.com/orc-blog