Toddler Matching Game- Shapes & Numbers
/Now that we’re quarantined and can’t leave the house, we’ve been looking for activities to keep Hailey busy. She’s been getting a LOT of screen time, so I wanted to make something for her that was fun, easy and educational. Also, bonus points for something that didn’t contain 3,000 pieces for her to throw on the floor and for me to pick up! That’s when I came up with the idea for this felt educational mat- a toddler matching game, if you will. I knew we could teach Hailey her numbers and shapes, but she could also play with it on her own while we cooked or just relaxed. It was perfect timing when Cricut sent me their new Cricut Joy machine, which I’ve been eyeing since they released it! Whether you’ve got a small hobby room or even just a craft cart in the corner, this machine is perfect for you! And, there are SO many projects that you can make with it. If you’ve been on the fence about getting the Cricut Joy, here is the universe telling you- it’s time. Get it now, and see how many amazing things you can make! You won’t regret it.
*This post contains affiliate links.

You will need:
Free Template (here)
Cricut Joy (here or get the bundle here)
Cricut EasyPress 2 (here)
Cricut Smart Iron-On Vinyl (here, I used white)
Cricut Joy StandardGrip Mat (here)
Cricut Starter Tool Set (here)
Cricut EasyPress Mat 12 x 12 (here)
Felt pieces for the shapes (similar here)
Thick Felt (Stiff or Double Thick)
Felt glue (here)
Velcro (here)
Glitter paper (similar here)
Ruler or T-Square (similar here)
Tailor’s chalk (similar here)
Directions:
This project has a lot of small steps, but is simple to make. So, I split each part up into smaller pieces so that it’s less overwhelming of a blog post.

Prepping To Make Your Toddler Matching Game:
Open the template on Cricut Design Space. The template is free to use and can be found here.
Cut your paper template using cardstock. I took one page and cut it in half, and ran each one through the Cricut Joy on the StandardGrip Mat. This paper template is for the felt matching shapes.
Load your vinyl into the Cricut Joy. I used Cricut Smart Iron-On Vinyl (here, I used white), which means I didn’t need a cutting mat.
A couple of notes when cutting vinyl: When using an Iron On, always go shiny side down. And, remember that you want to cut the numbers backwards so that they are mirrored. I’ve already done this on the template, so you don’t need to worry about it!
Weed your vinyl using your weeding tool, then carefully cut out the shapes individually. You’ll want to leave the protective (shiny) layer on so that you can iron it.

To Make The Toddler Matching Game Mat:
Arrange the vinyl shapes on your felt. Try to keep them centered on the mat and lined up.
Once you’ve arranged your shapes, use a ruler to make sure they’re straight. I did this by placing a T-square under the first shape and then lining up the rest of them along the ruler’s edge.
Set up your Cricut EasyPress 2 to the appropriate settings. You can use their handy Heat Guide but for this project, you’ll use 280 degrees for 30 seconds with light pressure.
Put your felt on the Cricut EasyPress Mat, and use your Cricut EasyPress 2 to iron on the vinyl.
Once your vinyl has cooled, carefully peel off the protective (shiny) layer.

To Make The Shapes For Your Toddler Matching Game:
Pick out your felt colors. I used 4 colors and figured out which shape should get which color by using pom poms. This ensured that each color wasn’t too close together.
Take your cardstock shape templates that you had cut out and arrange them on the corresponding felt colors. Make sure that you have plenty of space around each shape so that you can cut it out afterwards.
Slip your vinyl numbers under the template and ensure (once again!) that you have enough room for each shape.
Use your Cricut EasyPress 2 again to iron your numbers. Note: You can also use the EasyPress Mini for this! Especially if you’re using scrap pieces of felt, where the larger EasyPress would just be too big. Let cool and carefully peel. You’ll now be left with a sheet of felt with a few numbers on it.
Place your shape templates back on the vinyl to ensure that your number is centered in the shape. Trace around your shapes with chalk. Then, cut them out.
To Make The Envelope For Your Toddler Matching Game:
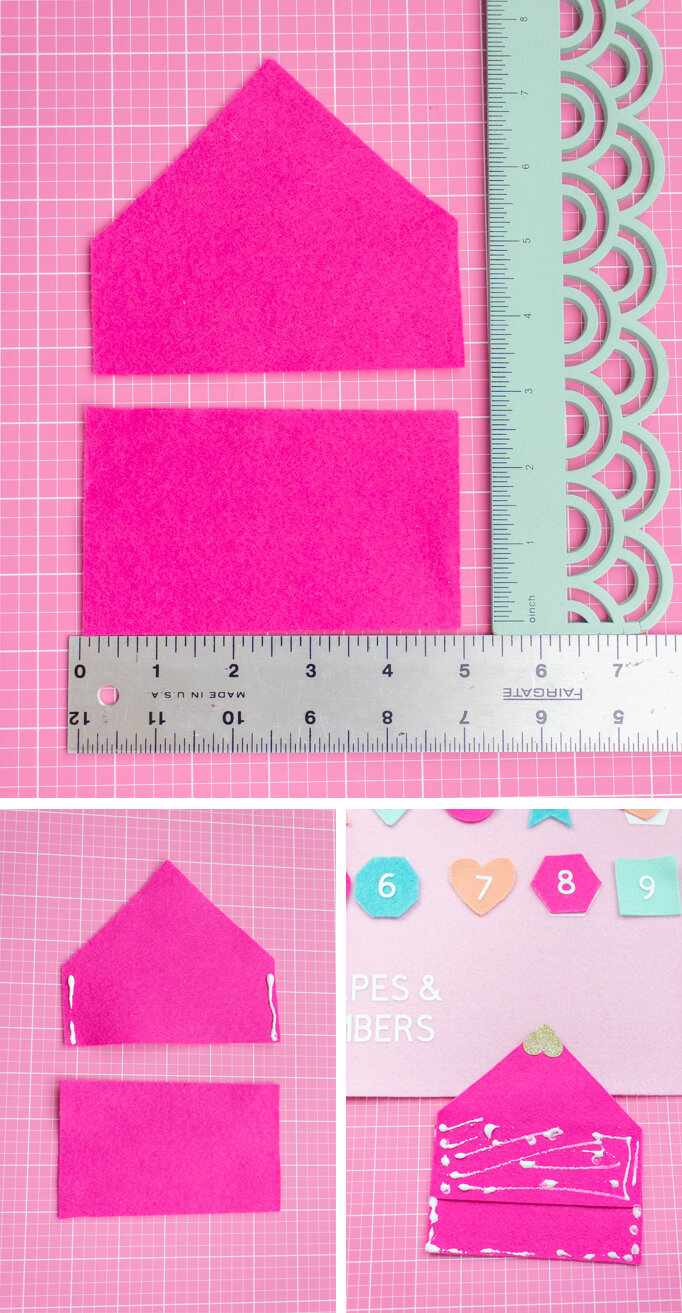
Cut out your envelope pieces from felt. I used a rectangle that was 5 x 2.5 (aka, smaller rectangle) and then a second piece that was approx 5 x 7.5 (aka, the house side).
Take your larger 5 x 7.5 felt rectangle. Fold the two top corners into the center to meet at a point and then cut at the folds. This will create your point at the top while still keeping it nicely centered. Hence, the nickname “the house side”!
Take your “house side” of felt and put felt glue along the two side edges. Then, place your 5 x 2.5 smaller rectangle on top. See the pics for reference on how to make the envelope since it’s a bit funky!
Turn your envelope over and put glue on your envelope as shown in the picture. Then, press it down on your felt mat and wait for it to dry.
For the heart, I used my heart punch but you could just as easily cut one using the Cricut Joy with the Light Grip Mat.
Glue your heart onto the tip of your envelope point. Then, add a piece of velcro to seal it.

I’m happy to say that Hailey LOVED playing with this matching game! She hasn’t quite gotten the hang of matching the shapes and numbers, but she loves to play with the felt shapes and put them on top of the vinyl on the mat. She’s gone back to it every day, and has even put down her iPad to fiddle with this! It makes a momma so happy.


Although this project has a few steps, it’s really fun to make and quite simple. It keeps Hailey busy and it’s pretty to look at! And, it all tucks away nicely into the envelope to make clean-up a breeze. I leave this out on the coffee table to she can have easy access when she gets bored. I can’t wait to make more projects like this using my Cricut Joy!
Starting today through 4/25, Cricut is launching their Spring Cleaning Flash Sale, featuring 40% off select materials and accessories, and Explore Air 2 Machines at their lowest price ever of $179.99! In addition, snag a Maker Machine for $329 or a BrightPad for $49!
Explore Air 2 Machines at Their Lowest Price Ever - As Low as $179.99! Valid through 4/25
Maker Machines Starting at $329! Valid through 4/25
Save 40% off Select Materials! Valid through 4/25
Save up to 75% off Materials & Accessories Clearance! Valid through 4/25
Cricut.com is offering Free Economy Shipping on orders $99+ with code SHIPAPR or APRSHIP, and Cricut Access Members receive free shipping on orders through 4/30. Head over to their website and load up your cart girlfriend- let’s get crafting!