Lisa Frank Tie-Dye Waffle Sundae

Lisa Frank is making a comeback, and it's everything our cutesy technicolor dreams were made of. I can still remember being a kid/pre-teen and going to Eckerd (remember that store?!) and browsing their back to school section, hunting for the absolute perfect Lisa Frank school supplies.  Folder with two kissing fish? Check. Lisa Frank stickers to cover absolutely everything I own? For sure. Binder with cool teenage aliens? DUH. Lisa Frank was such an important part of my childhood. I loved the creativity and the color of her products. So, when it came time to collaborate with Holly from ClubCrafted on a 90's inspired ice cream post, I just had to do something Lisa Frank! It's got tie-dye, ice cream, sprinkles, unicorns and candy. What more could you ask for?!

You've got to try this recipe for a Lisa Frank Tie-Dye Waffle Sundae! It’s perfect for a 90’s theme slumber party or a fun breakfast for the kiddos! #tiedye #lisafrank #icecreamsundae

You will need:

Waffle Maker (I have this one)
Neon food coloring (here)
4 spoons and bowls (here)
Waffle batter (I used the Classic Waffle Recipe on page 9)
Whisk and Spatula (similar here and here)
Ice cream (I used Friendly's black raspberry)
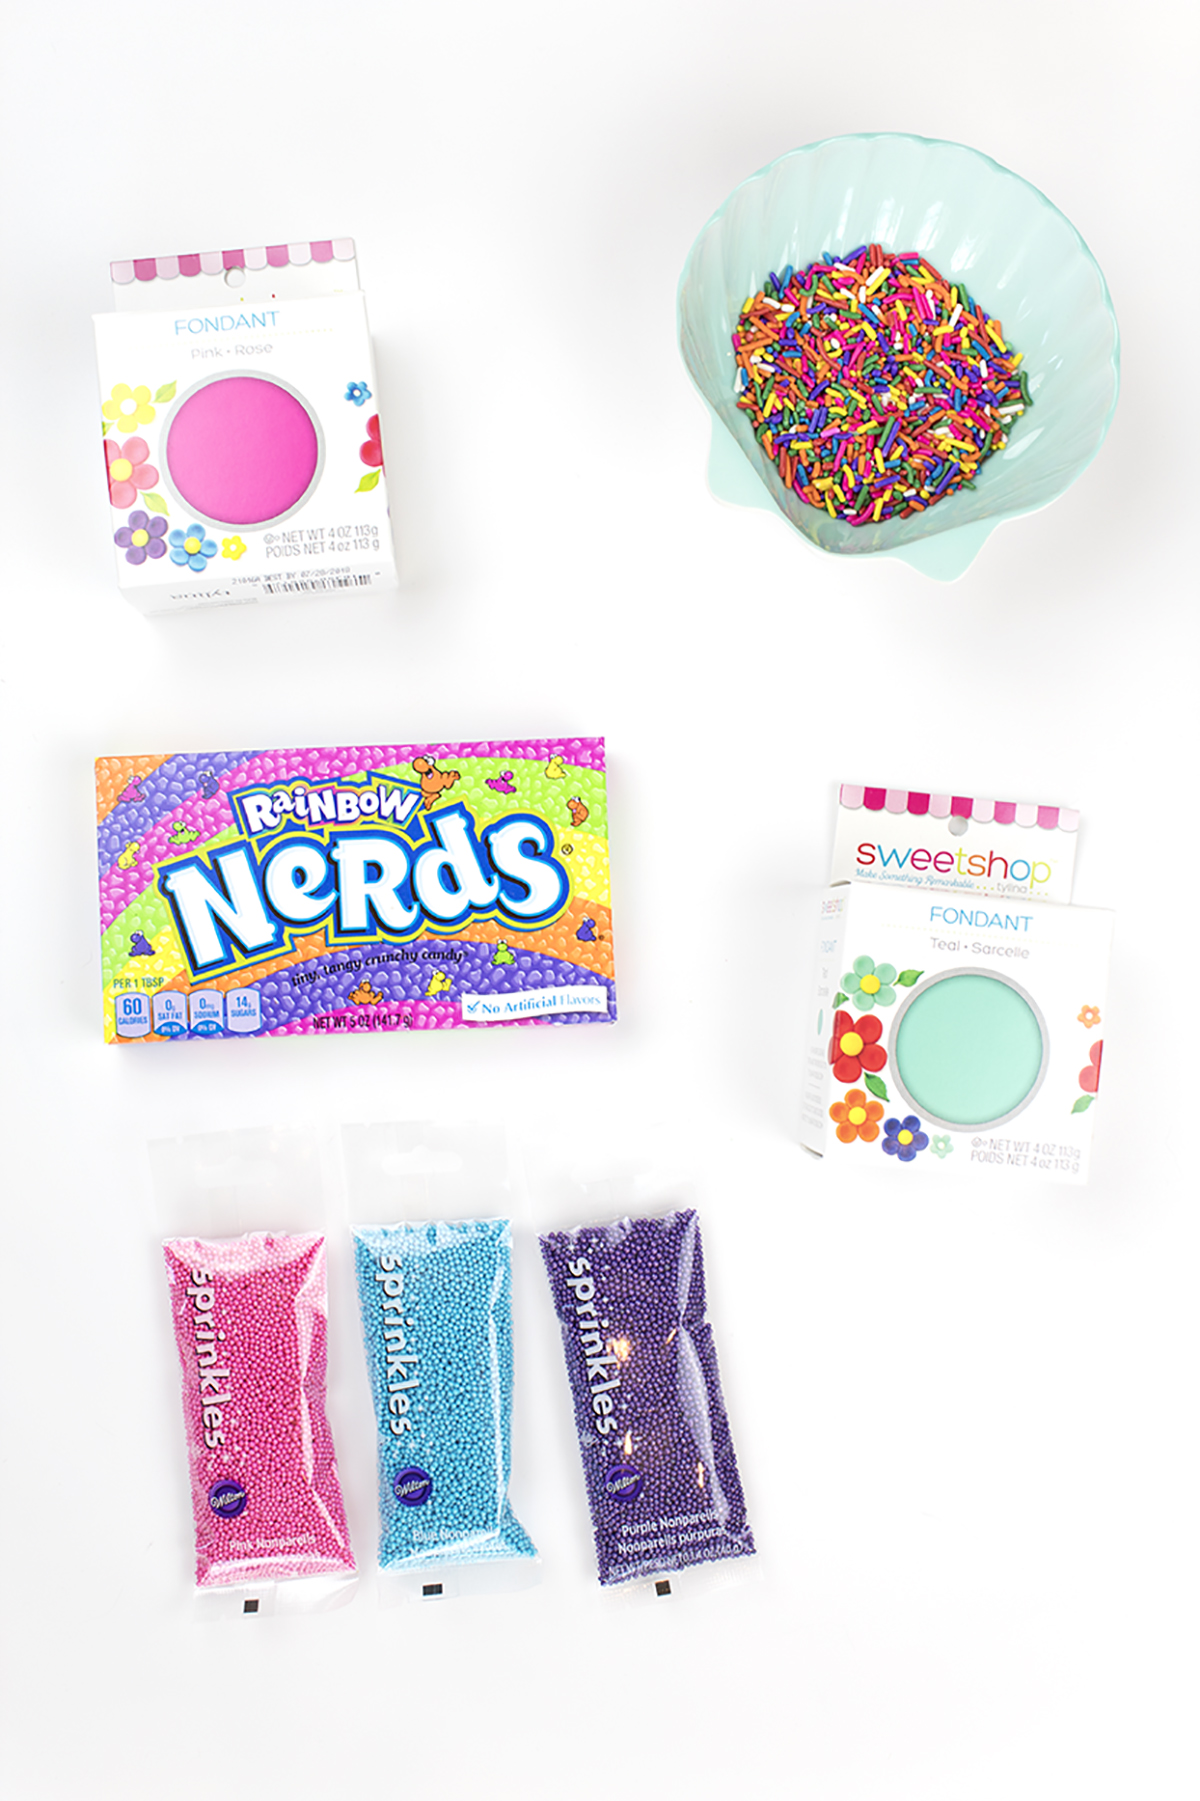
Fondant (I purchased Sweet Shop brand from Michael's)
Sprinkles and toppings

Directions:

How to make a tie-dye waffle:

1. Create your favorite waffle batter. Separate the waffle mix evenly into 4 bowls. Mix in your food coloring until it hits the right shade. I kept mine bright!

You've got to try this recipe for a Lisa Frank Tie-Dye Waffle Sundae!

2. Once your waffle iron has heated up, drop small globs of batter onto your waffle iron. Mix up the order of colors, but work quickly so that you don't burn half the waffle while the other half is raw.

You've got to try this recipe for a Lisa Frank Tie-Dye Waffle Sundae!

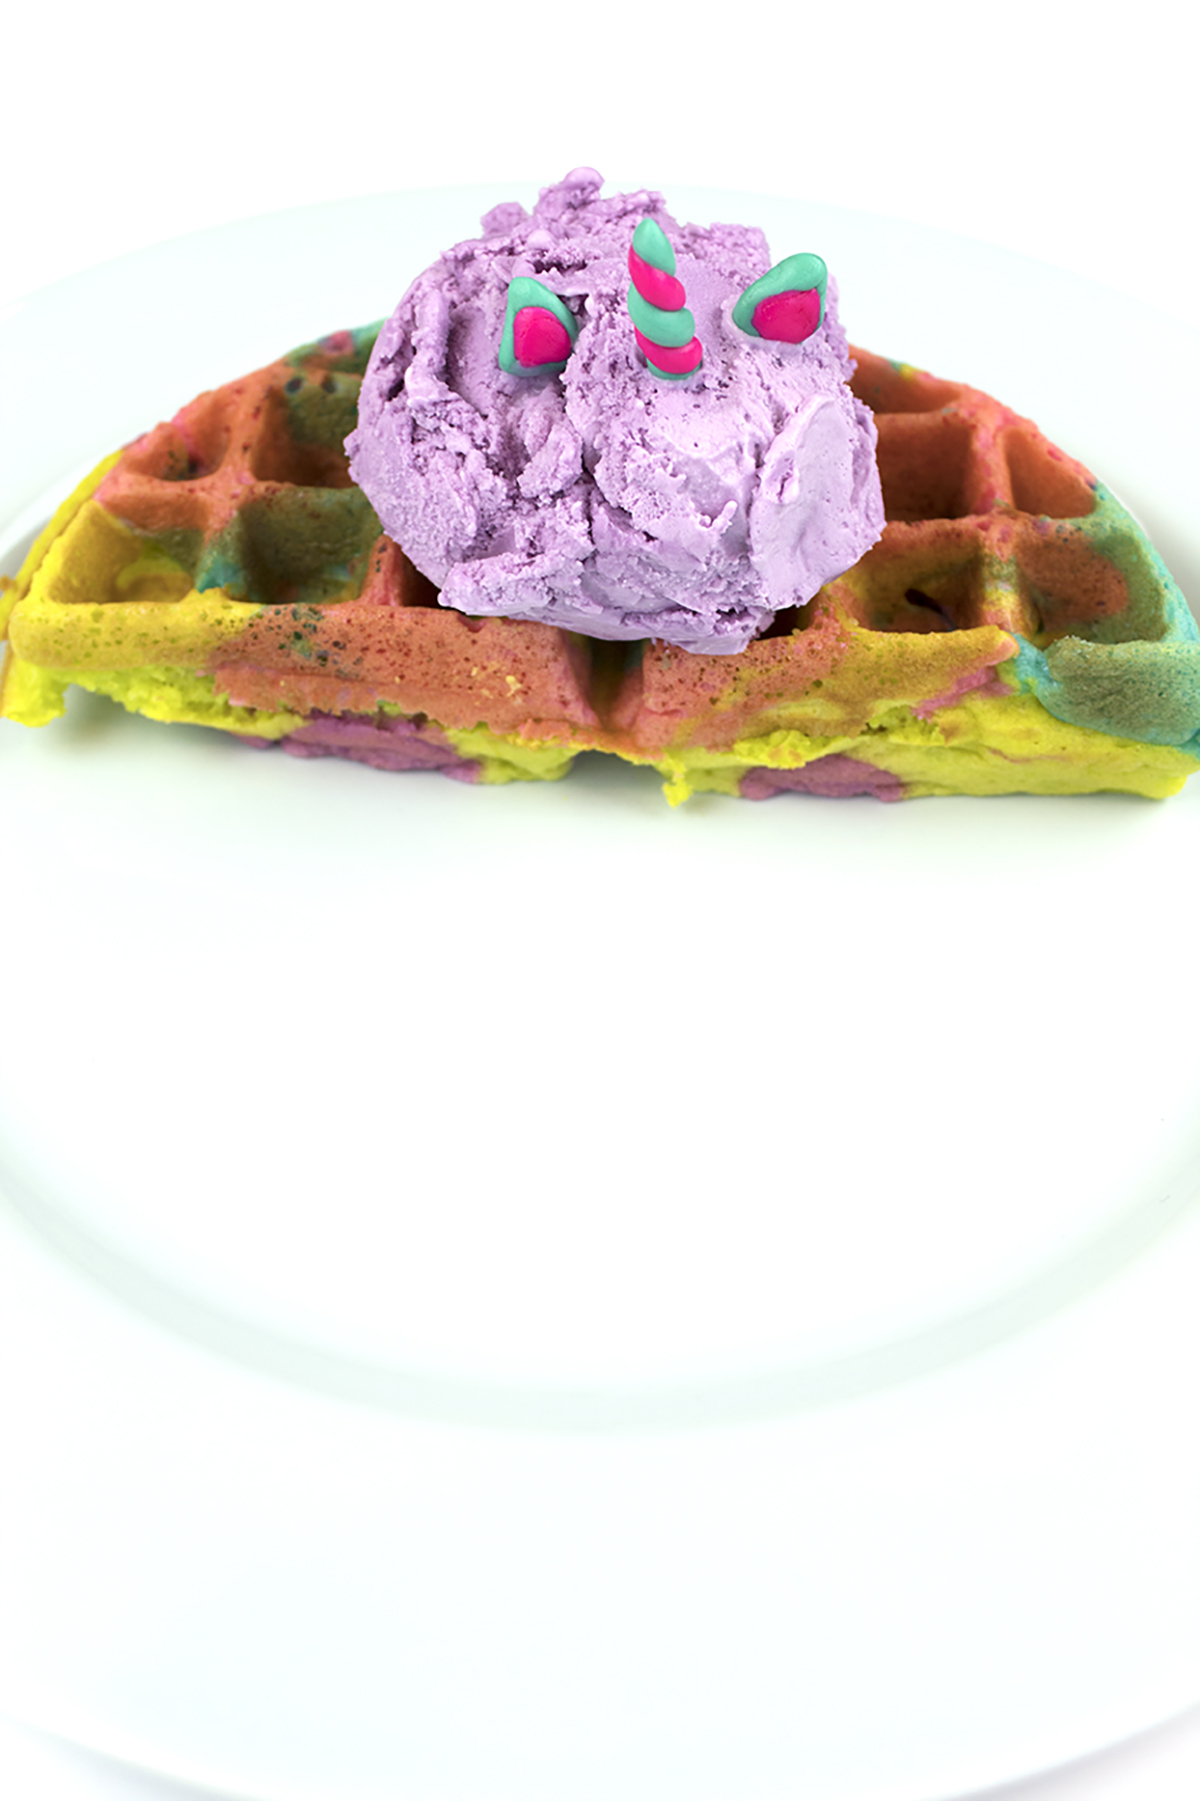
Just look at those colors! Seriously gorgeous.

You've got to try this recipe for a Lisa Frank Tie-Dye Waffle Sundae!

Making the fondant unicorn

1. Take a small scoop of your fondant in a ball and knead it with your fingers.

You've got to try this recipe for a Lisa Frank Tie-Dye Waffle Sundae!

They look like tasty little Marino's ices, don't they?!

You've got to try this recipe for a Lisa Frank Tie-Dye Waffle Sundae!

2. Pinch off a small piece of fondant. Roll your fondant in a ball, then into a cylinder shape. It helps if the cylinder is tapered, so that one side is slightly thinner. Twist the 2 cylinders together, then flatten the bottom slightly to create your horn.

You've got to try this recipe for a Lisa Frank Tie-Dye Waffle Sundae!

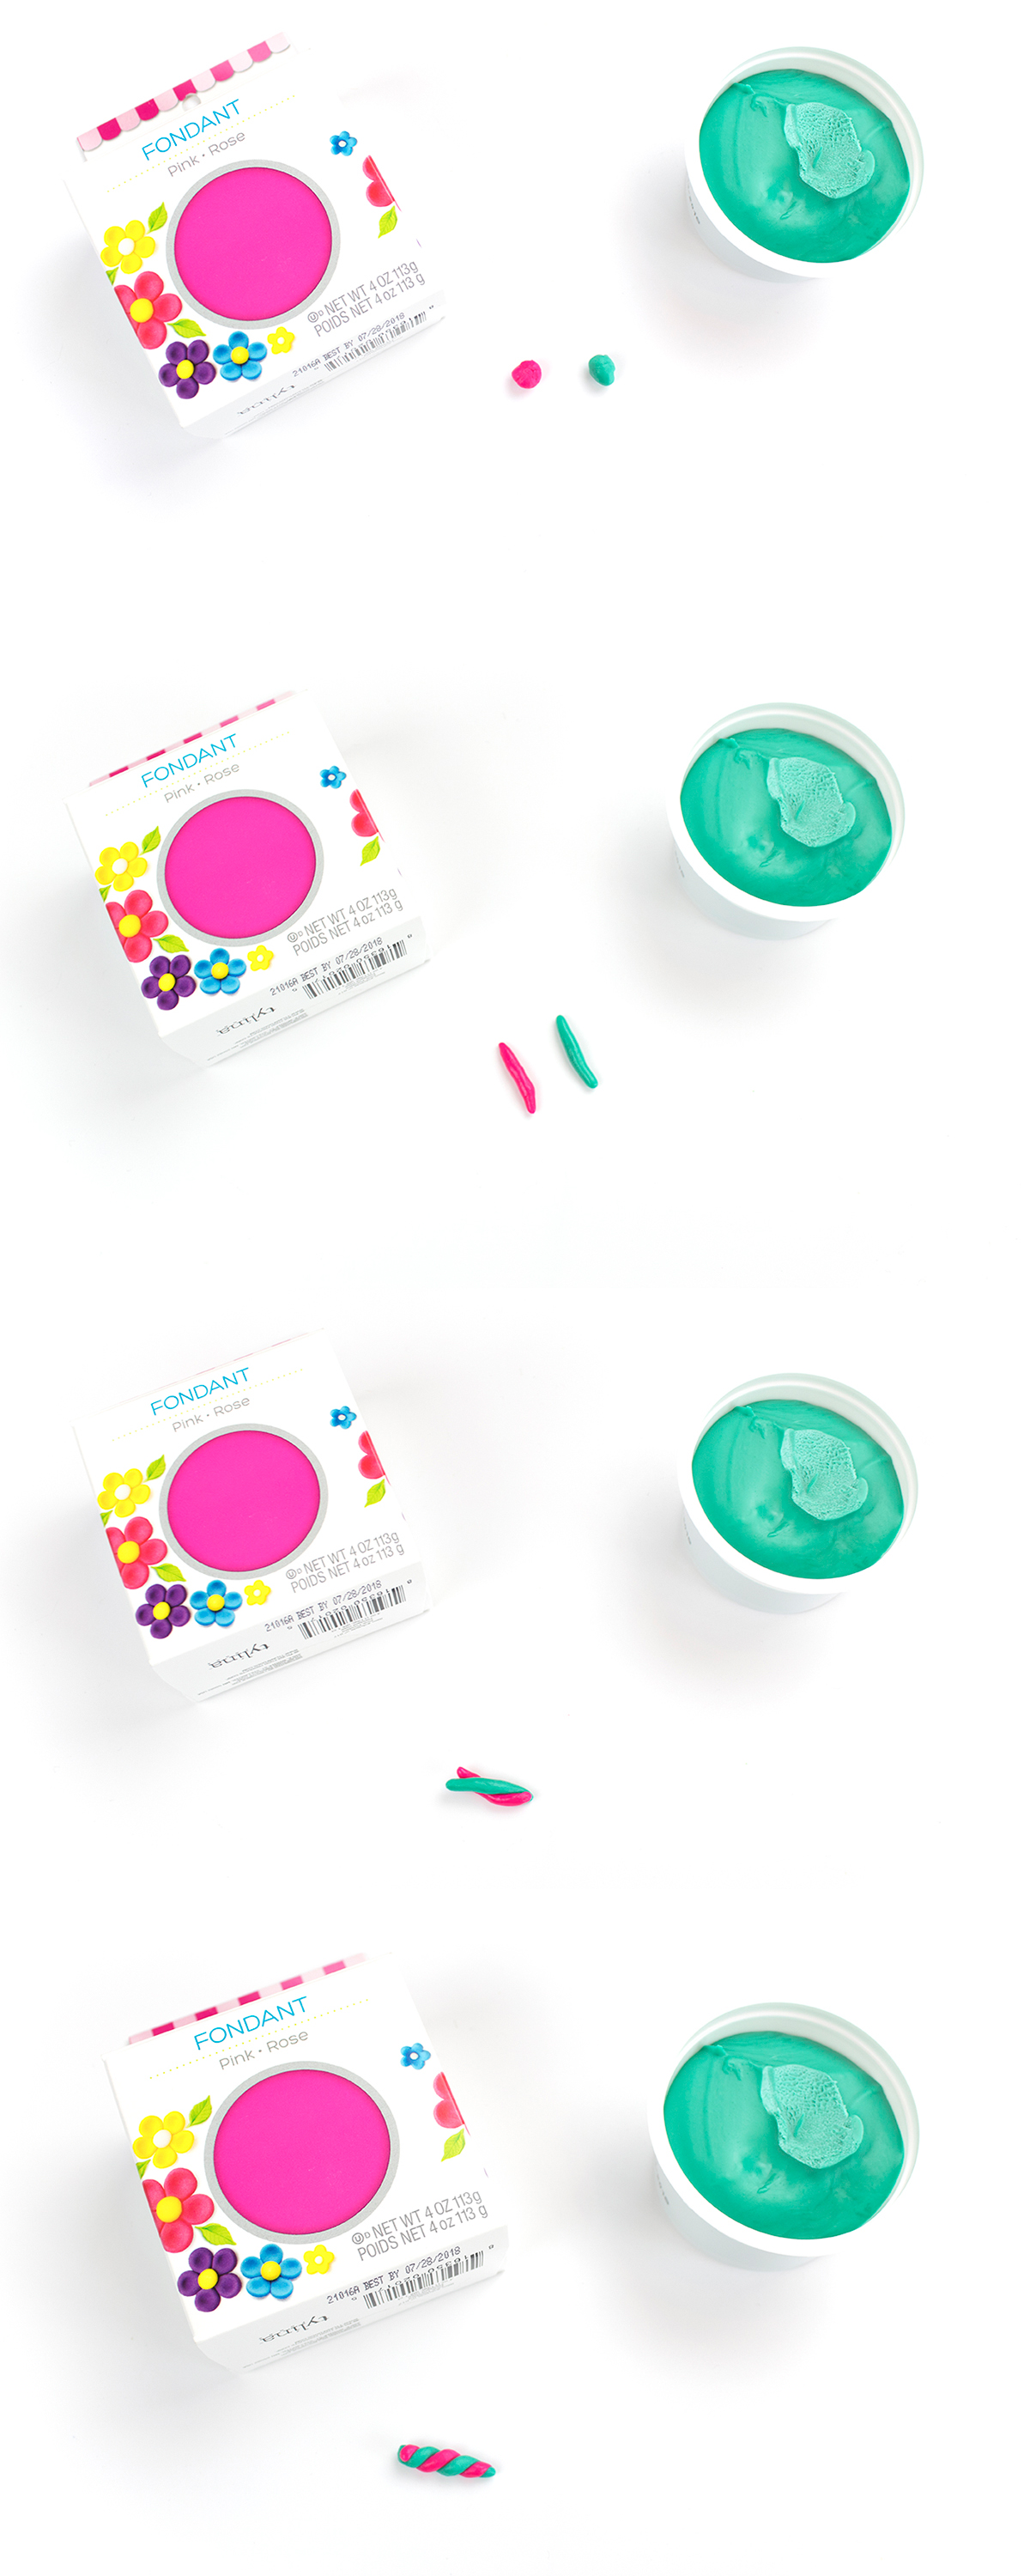
3. For the ears, take your ball of fondant and split it in half. Make it into a triangle shape. Repeat for the other color, creating a sightly smaller triangle. Then, press them together in the center of the larger triangle. Do this carefully, otherwise it totally warps the shape into a circle. They don't need to match perfectly, either!

You've got to try this recipe for a Lisa Frank Tie-Dye Waffle Sundae!

Assembling your sundae:

You've got to try this recipe for a Lisa Frank Tie-Dye Waffle Sundae!

1. Once your waffles have cooled, add a scoop of ice cream on top. (Similar shell bowls here and here)

You've got to try this recipe for a Lisa Frank Tie-Dye Waffle Sundae!

2. Carefully place in your unicorn horn, then the ears.

You've got to try this recipe for a Lisa Frank Tie-Dye Waffle Sundae! It’s perfect for a 90’s theme slumber party or a fun breakfast for the kiddos! #tiedye #lisafrank #icecreamsundae

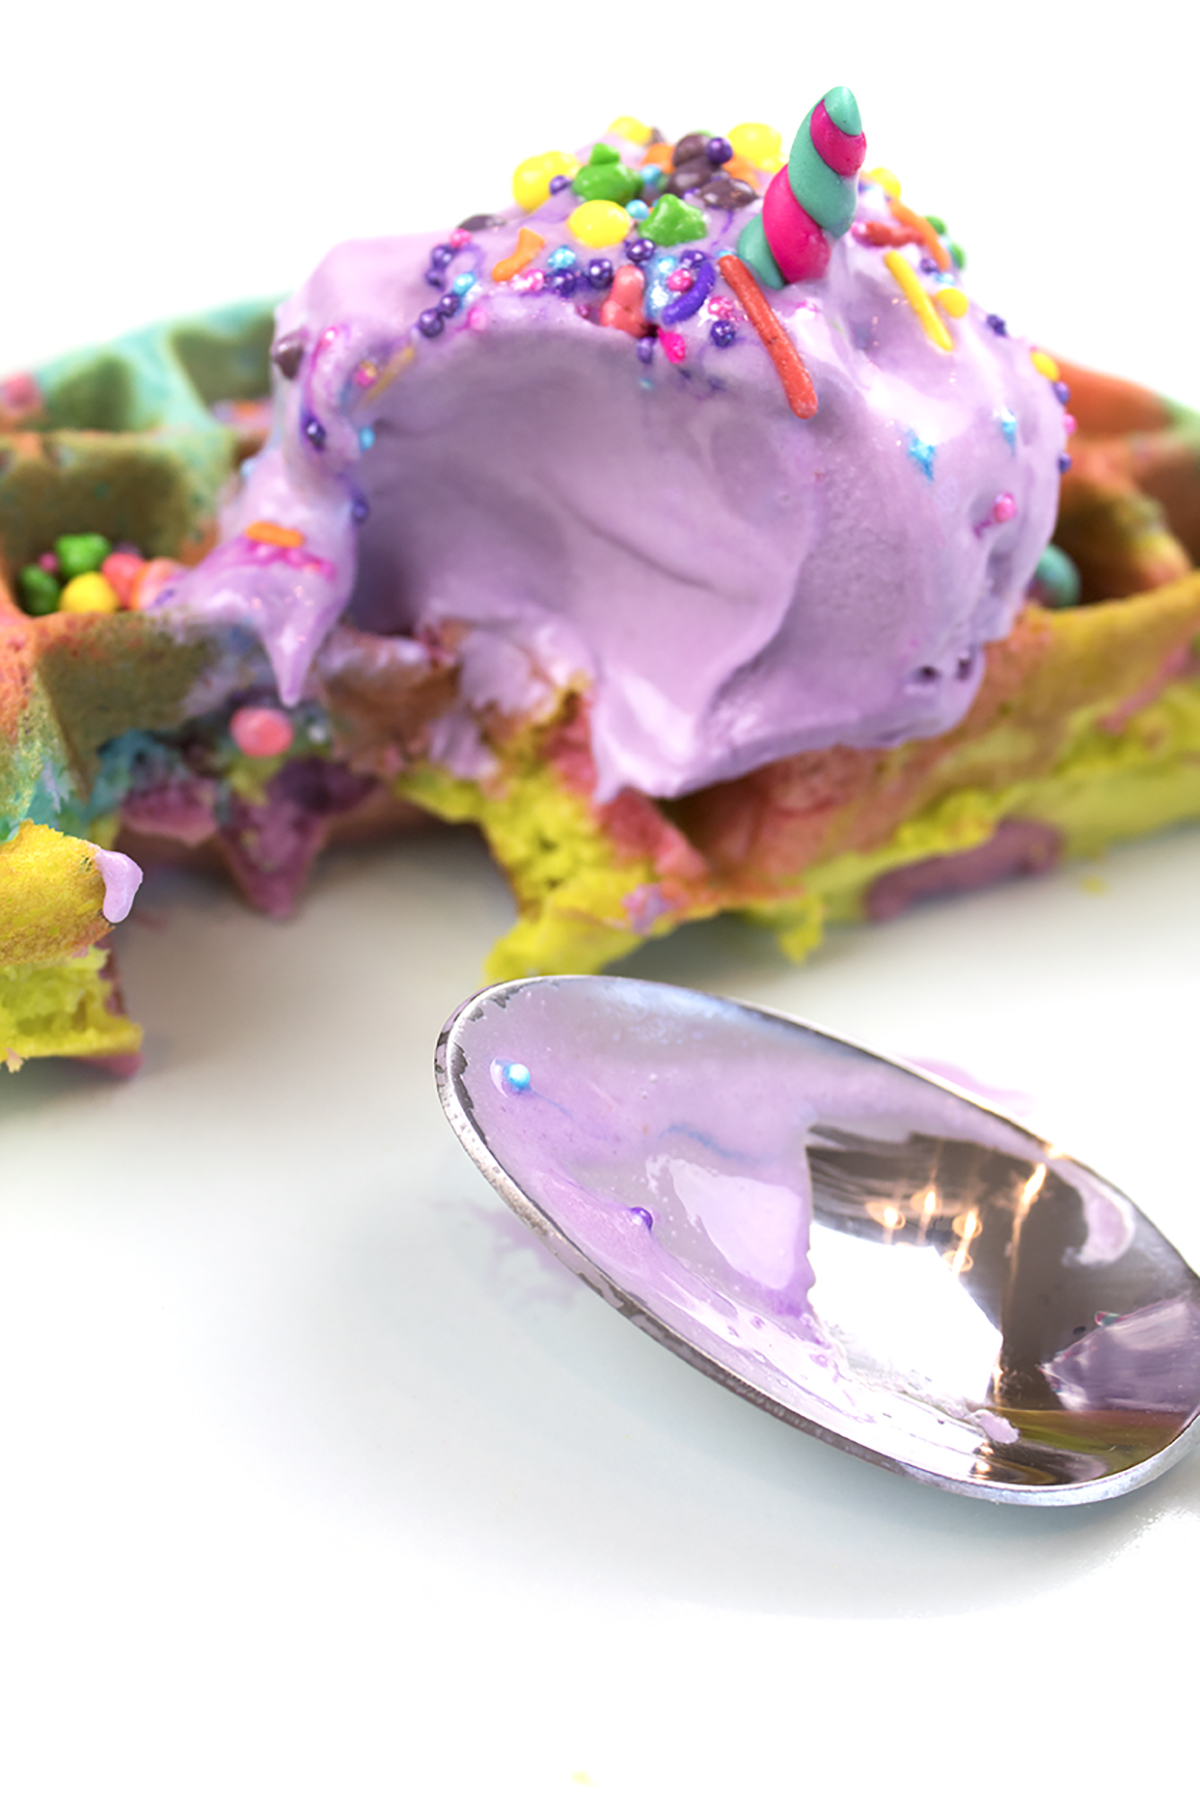
3. Add your choice of sprinkles and candy to the top. I used regular rainbow sprinkles, nerds, and small dot sprinkles. To make the plate more festive, I poured on the sprinkles. I can never get enough!

You've got to try this recipe for a Lisa Frank Tie-Dye Waffle Sundae! It’s perfect for a 90’s theme slumber party or a fun breakfast for the kiddos! #tiedye #lisafrank #icecreamsundae

YUM. Sprinkles and candy makes everything better. The fondant is actually really easy to use. Kinda like sweet and edible play-doh. Plus, I love that the round sprinkles landed perfectly to make a face on this little guy.

You've got to try this recipe for a Lisa Frank Tie-Dye Waffle Sundae! It’s perfect for a 90’s theme slumber party or a fun breakfast for the kiddos! #tiedye #lisafrank #icecreamsundae
You've got to try this recipe for a Lisa Frank Tie-Dye Waffle Sundae!

Now you can get your Lisa Frank fix and help that sugar craving all in one shot. I loved the Lisa Frank stickers, and still have them. I've hoarded them for like 20 years now! Jeez, that makes me feel OLD. What was your favorite Lisa Frank thing you ever owned? Let me know in the comments!

Rock Candy Christmas Tree Cake Topper

No one knows exactly why rock candy has gotten so popular, but I have some theories. 1, it's gorgeous and it's like glitter candy on a stick. 2, it tastes delicious. 3, it's a classy addition to any cocktail. But really I think its popularity is due to 4, its uncanny resemblance to a Christmas tree. Yes, you read that right. No, I'm not crazy. It's like Christmas in disguise, a tree hiding in the ordinary candy we all love. Subliminal messaging at its finest. And somehow no one noticed. We went around all these years blind to the fact that Christmas was right under our noses, disguised as something as ordinary and unassuming as rocks.

Everyone's favorite party candy has a whole new look. Lucky for you, this tutorial is as gorgeous as it is easy. Click to see the full tutorial for these rock candy Christmas trees.

Full disclosure: this post was supposed to go live around Christmas time, but I wanted to give it the cake it deserved. Since I'm not really ready to give up on Christmas quite yet, and it's pretty darn cold here, I'm posting it now. Let's call this a winter tutorial and suddenly it's right on time ;)

Everyone's favorite party candy has a whole new look. Lucky for you, this tutorial is as gorgeous as it is easy. Click to see the full tutorial for these rock candy Christmas trees.

One of the things I like most about this project is that it's like a magical glittering Christmas forest! Plus there are so many color options out there for rock candy, so you can match any decor.

Everyone's favorite party candy has a whole new look. Lucky for you, this tutorial is as gorgeous as it is easy. Click to see the full tutorial for these rock candy Christmas trees.

You will need:

Rock Candy (here)
Toothpicks
Scissors (here)
Glue Gun
Glitter Paper (similar here)
Star Punch (similar here)
Nail File

Directions:

Everyone's favorite party candy has a whole new look. Lucky for you, this tutorial is as gorgeous as it is easy. Click to see the full tutorial for these rock candy Christmas trees.

Using scissors, carefully cut the sticks off your rock candy, leaving about 1/4 inch of wood. I recommend cutting while holding it up off the table and twirling the stick to prevent pieces of candy from breaking off.

Everyone's favorite party candy has a whole new look. Lucky for you, this tutorial is as gorgeous as it is easy. Click to see the full tutorial for these rock candy Christmas trees.

Ta-da! A perfect little tree in the making.

Everyone's favorite party candy has a whole new look. Lucky for you, this tutorial is as gorgeous as it is easy. Click to see the full tutorial for these rock candy Christmas trees.

Use the star punch to cut the glitter paper. I picked neutral colors that would enhance the colors of my trees without clashing with them.

Everyone's favorite party candy has a whole new look. Lucky for you, this tutorial is as gorgeous as it is easy. Click to see the full tutorial for these rock candy Christmas trees.

Cut a toothpick in half, then use the nail file to sand the edge smooth.

Everyone's favorite party candy has a whole new look. Lucky for you, this tutorial is as gorgeous as it is easy. Click to see the full tutorial for these rock candy Christmas trees.

Using your glue gun, stick the star and toothpick onto your tree. I recommend gluing the toothpick to a large and covered crevice of the rock candy to create a strong but hidden base. Use varying lengths to keep it interesting.  

Everyone's favorite party candy has a whole new look. Lucky for you, this tutorial is as gorgeous as it is easy. Click to see the full tutorial for these rock candy Christmas trees.

So cute! That white one marches to the beat of its own drum though....

Everyone's favorite party candy has a whole new look. Lucky for you, this tutorial is as gorgeous as it is easy. Click to see the full tutorial for these rock candy Christmas trees.

Once they're all done, carefully nestle your rock candy trees into your cake. You can keep it simple with just a few for a pop of color, or create your own little forest.

Everyone's favorite party candy has a whole new look. Lucky for you, this tutorial is as gorgeous as it is easy. Click to see the full tutorial for these rock candy Christmas trees.

These are super cute for a winter birthday party or holiday gathering with friends. They really would fit in well all winter, especially if you put a different shape at the top of the tree. Maybe a heart for Valentine's day?!

And that's all there is to it folks. Once you're done, you can probably still eat the rock candy. Ya know, if you don't mind eating around the glue and paper ;)

I hope you enjoyed Cathy's crazy/amazing idea of the week. If you create your own toppers using this tutorial, I have to see it! Tag me on instagram and your picture might get featured. So what do you think? Do you see trees in your rock candy now? Let me know in the comments below!

TGIF 90's Themed Slumber Party

Thank God it's Friday, amirite guys?! Fridays have always been one of my favorite days of the week, but I think they were better back in the 90's. You know, back when you were in school and Fridays meant you didn't have to come home and immediately do homework so you felt like a real kid? And what was the best part of Fridays? Watching TGIF and having sleepovers! I remember disliking any Friday evening plans that interfered with watching my favorite shows on TGIF. Didn't these people understand that I had to know if Sabrina discovered the Spellman Family Secret?! 

*This post contains affiliate links.

TGIF, Amirite guys?! Want to host your own TGIF 90's Themed slumber party? Click for more photos, a shopping list, and free printables!

To recreate some of the magic (hah, see what I did there?) I decided to throw a 90's TGIF themed slumber party. This party is chock-full of the fun stuff you were obsessed with as a 90's tween, therefore generating the maximum amount of nostalgia. 

TGIF, AMIRITE GUYS?! WANT TO HOST YOUR OWN TGIF 90'S THEMED SLUMBER PARTY? CLICK FOR MORE PHOTOS, A SHOPPING LIST, AND FREE PRINTABLES!

Sleepovers are more fun with friends, but if you want to do it alone and binge watch Boy Meets World while eating Cosmic brownies and guzzling kool-aid, I won't judge you. I'll probably be doing the same thing! 

TGIF, AMIRITE GUYS?! WANT TO HOST YOUR OWN TGIF 90'S THEMED SLUMBER PARTY? CLICK FOR MORE PHOTOS, A SHOPPING LIST, AND FREE PRINTABLES!

Since sleepovers mean staying awake until the sun comes up, you have to make some sleep masks to be able to get some beauty rest. They're super easy to do with this tutorial by Aww, Sam.

TGIF, AMIRITE GUYS?! WANT TO HOST YOUR OWN TGIF 90'S THEMED SLUMBER PARTY? CLICK FOR MORE PHOTOS, A SHOPPING LIST, AND FREE PRINTABLES!

Another thing we loved to do at slumber parties was talk about boys. Since we were way too shy to actually talk to the boys we liked, MASH was extremely helpful in discovering which one was destined to become our husband. There was nothing better than laughing with friends as we predicted the future together- even if it meant that we would live in a shack with that guy in class that picked his nose. 

TGIF, AMIRITE GUYS?! WANT TO HOST YOUR OWN TGIF 90'S THEMED SLUMBER PARTY? CLICK FOR MORE PHOTOS, A SHOPPING LIST, AND FREE PRINTABLES!

I loved taking quizzes to find out which tv character I was most like. I was also intrigued by these cootie catcher fortune things, so I combined them into one SUPER handy apparatus. Because how can you consider your slumber party a success unless you know if you are more like Feeny or Topanga? 

TGIF, AMIRITE GUYS?! WANT TO HOST YOUR OWN TGIF 90'S THEMED SLUMBER PARTY? CLICK FOR MORE PHOTOS, A SHOPPING LIST, AND FREE PRINTABLES!

I've also created this handy shopping list so that you'll be sure to have the full TGIF menu.

TGIF, AMIRITE GUYS?! WANT TO HOST YOUR OWN TGIF 90'S THEMED SLUMBER PARTY? CLICK FOR MORE PHOTOS, A SHOPPING LIST, AND FREE PRINTABLES!

And this handy dandy banner to spice up your life. To make the pompom garland, all you need is a needle and some embroidery floss. Easy peasy!

TGIF, AMIRITE GUYS?! WANT TO HOST YOUR OWN TGIF 90'S THEMED SLUMBER PARTY? CLICK FOR MORE PHOTOS, A SHOPPING LIST, AND FREE PRINTABLES!

I also HAD to make this Dunkaroos recipe from Eat Yourself Skinny!

TGIF, AMIRITE GUYS?! WANT TO HOST YOUR OWN TGIF 90'S THEMED SLUMBER PARTY? CLICK FOR MORE PHOTOS, A SHOPPING LIST, AND FREE PRINTABLES!

Every slumber party needs a goodie bag! How amazing are these pouches from Target's dollar section?! They're so very 90's. What goes in these beauty pouches? Bonne Belle chapstick, roll-on glitter, a mani-pedi kit, stationary, and ring pops, duh.

TGIF, AMIRITE GUYS?! WANT TO HOST YOUR OWN TGIF 90'S THEMED SLUMBER PARTY? CLICK FOR MORE PHOTOS, A SHOPPING LIST, AND FREE PRINTABLES!
Pssst. Looking for some assistance planning your next big event? I can help! Visit my virtual party planning services page for more info and pricing.

Want to up the ante? Try some of these awesome tutorials! 

90’s Pun Valentines because we always LOVED cutting things out of magazines and making collages.

Barbie Pushpins and Pink Corkboard so your desk can be awesome too!

Spice Girls Rainbow Spa Slumber Party so you can pamper yourself AND spice up your life in the process!

Polly Pocket Iron On Tee which comes with FREE printables! Just have everyone bring a t-shirt.

TGIF, AMIRITE GUYS?! WANT TO HOST YOUR OWN TGIF 90'S THEMED SLUMBER PARTY? CLICK FOR MORE PHOTOS, A SHOPPING LIST, AND FREE PRINTABLES!

Don't forget your inflatable chair!

TGIF, AMIRITE GUYS?! WANT TO HOST YOUR OWN TGIF 90'S THEMED SLUMBER PARTY? CLICK FOR MORE PHOTOS, A SHOPPING LIST, AND FREE PRINTABLES!

Looking for more party ideas? Check out my party inspiration Pinterest board!

What was your favorite part of sleepovers? I've gotta know! Is it crafting, makeovers, movies, eating!? Let me know in the comments below.

My Sugar Sweet 27th Birthday Party

A month ago I celebrated my 27th birthday with a super fun Sugar Sweet Birthday Party. Armed with my pinterest board and list of tutorials, I created a DIY party that would satisfy any sweet tooth! I unfortunately had a really bad cold that day, which turned out to be sinusitis (and left me in bed for a week!) but I had SO MUCH fun planning this party and celebrating!

*This post contains Affiliate Links

Sugar Sweet Party Ideas. Donuts and cupcakes and ice cream, oh my! Check out this adorable party for ideas, decorations, and tutorials.

I bought some pink balloons and made them into donuts using this tutorial. I painted the sprinkles on instead of using tissue paper to save some time. The balloons were a huge hit. Everyone loved them and was amazed by the shape, and that I made them myself!

Sugar Sweet Party Ideas. Donuts and cupcakes and ice cream, oh my! Check out this adorable party for ideas, decorations, and tutorials.

We have some hooks in our living room that the previous homeowners had left, so I hung up some lanterns and a disco ball. The party never transitioned into a dance party like I had hoped, but since I was super sick, I didn't really mind that.

Sugar Sweet Party Ideas. Donuts and cupcakes and ice cream, oh my! Check out this adorable party for ideas, decorations, and tutorials.

Over the fireplace, I hung a DIY tassle garland. It was super easy to make and added a fun touch.

Sugar Sweet Party Ideas. Donuts and cupcakes and ice cream, oh my! Check out this adorable party for ideas, decorations, and tutorials.

And what's a Sugar Sweet party without a candy bar?! I kept mine small since there weren't any kids, and I knew my friends wouldn't be eating too much candy. I still have a lot left! To create your own dollar store candy bar, check out my tutorial.

Sugar Sweet Party Ideas. Donuts and cupcakes and ice cream, oh my! Check out this adorable party for ideas, decorations, and tutorials.

I loved making this donut platter.  It was a super fun and easy tutorial, and the tray can be used again and again.

Sugar Sweet Party Ideas. Donuts and cupcakes and ice cream, oh my! Check out this adorable party for ideas, decorations, and tutorials.

We rimmed some champagne glasses with sprinkles and added some cotton candy for a cute and a tasty beverage! Just pour some champagne over the cotton candy and enjoy.

Sugar Sweet Party Ideas. Donuts and cupcakes and ice cream, oh my! Check out this adorable party for ideas, decorations, and tutorials.

I made the festive 27 using sprinkles, mod podge, and cardboard numbers from the craft store. Everyone thought they were edible cookies!

For some fun, we played drinking games using these donut playing cards. How stinking cute are these?!

Sugar Sweet Party Ideas. Donuts and cupcakes and ice cream, oh my! Check out this adorable party for ideas, decorations, and tutorials.

To add some color to the walls, I hung up paper fans all around the house. We don't really have much artwork up yet, so this helped make the room more festive. It also ended up being a great photobooth backdrop!

Sugar Sweet Party Ideas. Donuts and cupcakes and ice cream, oh my! Check out this adorable party for ideas, decorations, and tutorials.

I also got these inflatable ice cream cones that served as decor and photobooth props. They were inexpensive and well worth it! To set up the photobooth, I propped up my camera on my tripod and we hit the timer button.  I really wish my clicker had arrived in time!

Sugar Sweet Party Ideas. Donuts and cupcakes and ice cream, oh my! Check out this adorable party for ideas, decorations, and tutorials.

I had a really great birthday, despite being so so sick. I just love planning parties! 

Be sure to follow my Sugar Sweet Party Pinterest board for more great ideas!

Easy DIY Dollar Store Candy Bar

Remember when you were a kid and you used to go in a candy store? The old-timey ones, with jars lined up along the walls of all different types of candies, sold by the pound. Your parents would hand you a bag and tell you "ok, get what you want. But not too much!" Or maybe your parents didn't trust you, so they'd ask you what you wanted and put tiny scoopfuls into the bag. Then for the next 10 hours, you were on a sugar high as you feasted on pretty much all the candy in one sitting. I loved this experience, so for my Sugar Sweet 27th birthday party, I had to have a candy bar! I wanted to do it on a budget so I could spend money elsewhere, especially since my party was all adults that don't have a big sweet tooth. I hit up my local dollar tree to find some supplies. P.S., there is some great glassware there for only a dollar!  Are you ready to make a candy bar for your next party?

*This post contains affiliate links.

Looking to add some fun to your next party? Check out this easy tutorial to create your own candy bar with items from the dollar store! #candybar #candybuffet #candytableideas

You'll need:

Candy Jars with lids (similar)
Vases or Fishbowls (similar vase and fishbowl)
Candlesticks (similar)
E6000 Glue (here)
Timer/Clock
Candy (and lots of it!) (similar here and here)
*Note: I purchased all my glass items from the Dollar Tree for only $1, but the Amazon links are for similar items

How to:

Looking to add some fun to your next party? Check out this easy tutorial to create your own candy bar with items from the dollar store! | Well Kept Chaos

1. First off, wash and thoroughly dry your supplies. I let mine dry overnight to be safe, but a good wipe and waiting a few minutes should work just as well.

Looking to add some fun to your next party? Check out this easy tutorial to create your own candy bar with items from the dollar store! | Well Kept Chaos

2. Using the E6000 glue, rim the perimeter of the candlestick. E6000 tends to ooze (a lot) so stop squeezing near the end of your perimeter, and store it tip-up between uses.

Looking to add some fun to your next party? Check out this easy tutorial to create your own candy bar with items from the dollar store! | Well Kept Chaos

3. Let the glue set for 2 minutes before attaching. This is so it gets tacky and sticks well.

Looking to add some fun to your next party? Check out this easy tutorial to create your own candy bar with items from the dollar store! | Well Kept Chaos

4. Hover the candy bowl over the candlestick and try to find the center. Place the bowl down and hold it for a few seconds so it can adhere.

Looking to add some fun to your next party? Check out this easy tutorial to create your own candy bar with items from the dollar store! | Well Kept Chaos

5. Wait 24-48 hours for the glue to fully cure. Then, pour in your candy and enjoy!

Looking to add some fun to your next party? Check out this easy tutorial to create your own candy bar with items from the dollar store! | Well Kept Chaos

I found that the lids for the candy bowls fit well with the vase and fishbowls, even though they were not airtight. 

Candy Tips:

-If you can, use name brand candy or something you've tried before. You don't want to get bags and bags of something that ends up tasting terrible!

-Get a mix of smaller and larger candies to create a visually appealing display.

-Pick a color scheme and stick to it. If you want to get all types of candies, then "rainbow" can be your theme. Just try not to have one candy/color that sticks out like a sore thumb.

-You'll probably need a lot more candy than you think. For most of my candies I bought 3 bags/boxes and it only fully filled one container. This wasn't a big deal to me because I had adults and figured they wouldn't be eating much candy anyway.

-Dollar store bags may be smaller than the bags from other stores, so grab the circulars and see if the candy might be cheaper elsewhere. Sometimes holiday candies go on sale, which can be great for a holiday themed party!

Do you have any tips for a candy bar on a budget? What's your favorite type of candy to put in the jars? Which is the most bang for your buck? Let me know!