Flamingo Pool Party

Toady I did something that I have not done for a very, very long time. I did something just for fun, with the sole purpose of being the type of person I want to be. You see, I host a lot of parties and do a lot of projects on this blog, but I’ve gotten to the point where I feel a little glum about it. A lot of pretending happens here and while it can be really fun (and it truly fuels me, if I’m being honest!) sometimes I really want to have actual fun. I see a lot of other people going out to real events, with real people. So, while it can be fun to create my own events, actually having someone to celebrate them with is even better.

Looking to add a little bit more fun to your everyday blow-up pool? How about making a super easy Flamingo pool party for your kids for less than $100?! This setup took me about 10 minutes, so it’s perfect for an impromptu summer day. Click for the …

So, when my husband suggested we fill up the pool and take a dip with Hailey, I got super excited and decided that I didn’t need a huge pool or a bunch of friends over to enjoy a tropical/ flamingo pool float/ colorful adventure. I just had to grab my supplies, set them up, and enjoy a tiny party all for myself. 

Looking to add a little bit more fun to your everyday blow-up pool? How about making a super easy Flamingo pool party for your kids for less than $100?! This setup took me about 10 minutes, so it’s perfect for an impromptu summer day. Click for the …

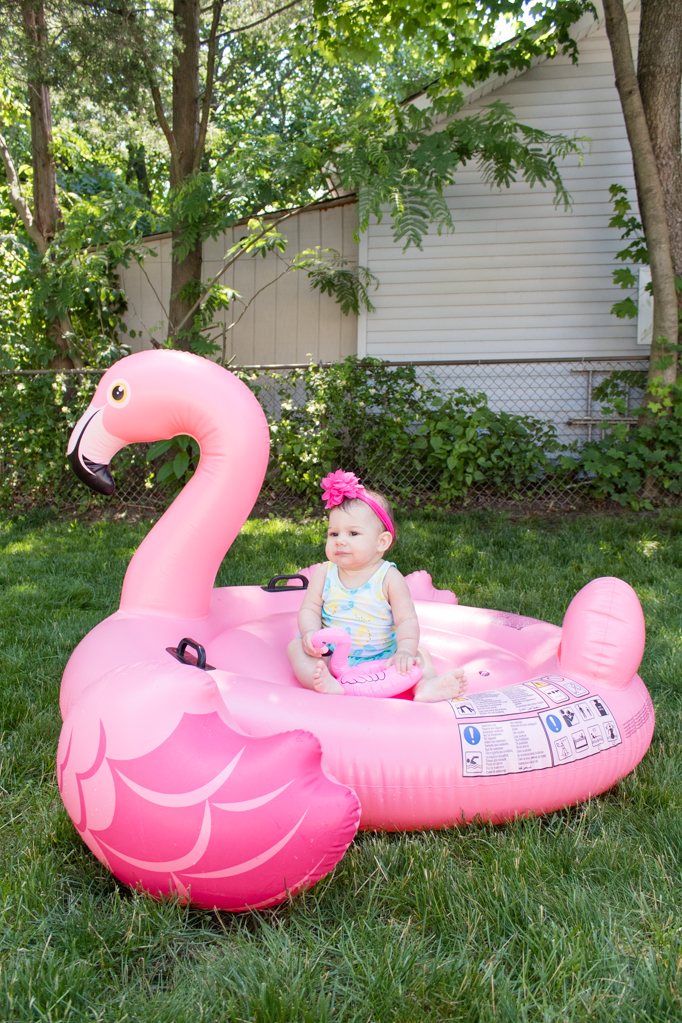
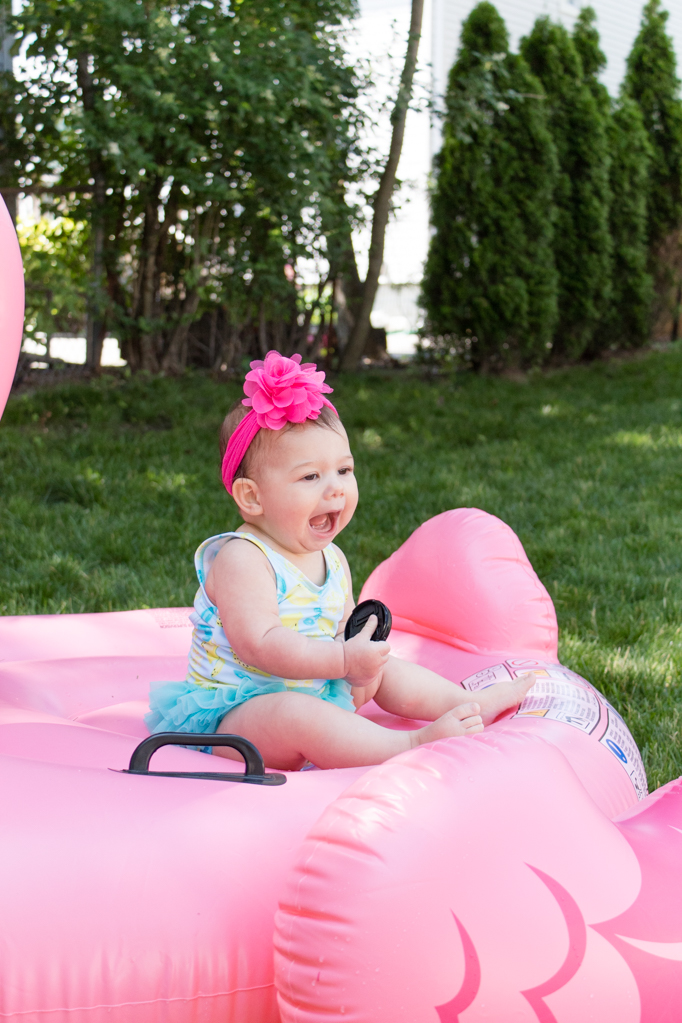
Our flamingo pool float, that my sister and I named Javier, was blown up as a chair to lounge on after a dip in the pool. It also provided a great photo op! Hailey wasn’t really in the mood to be in the pool for very long, so it was nice to have Javier for her to sit on and still have the pool party fun.

Looking to add a little bit more fun to your everyday blow-up pool? How about making a super easy Flamingo pool party for your kids for less than $100?! This setup took me about 10 minutes, so it’s perfect for an impromptu summer day. Click for the …

I used a small folding table next to the pool to hold the essentials- cell phones, glasses of water, and mini flamingo pool floats. I also dressed it up with some tassel garland (left over from Hailey’s half birthday party!) plus mini flamingo ornaments and tropical leaves from my baby shower. I’ve had these mini flamingo pool floats for so long- I’m not even sure when I first got them, but they came to my bachelorette party, Mexico, and even my wedding! I love keeping them in my purse and then blowing them up when the need arises. Which for me, is anytime!

Looking to add a little bit more fun to your everyday blow-up pool? How about making a super easy Flamingo pool party for your kids for less than $100?! This setup took me about 10 minutes, so it’s perfect for an impromptu summer day. Click for the …

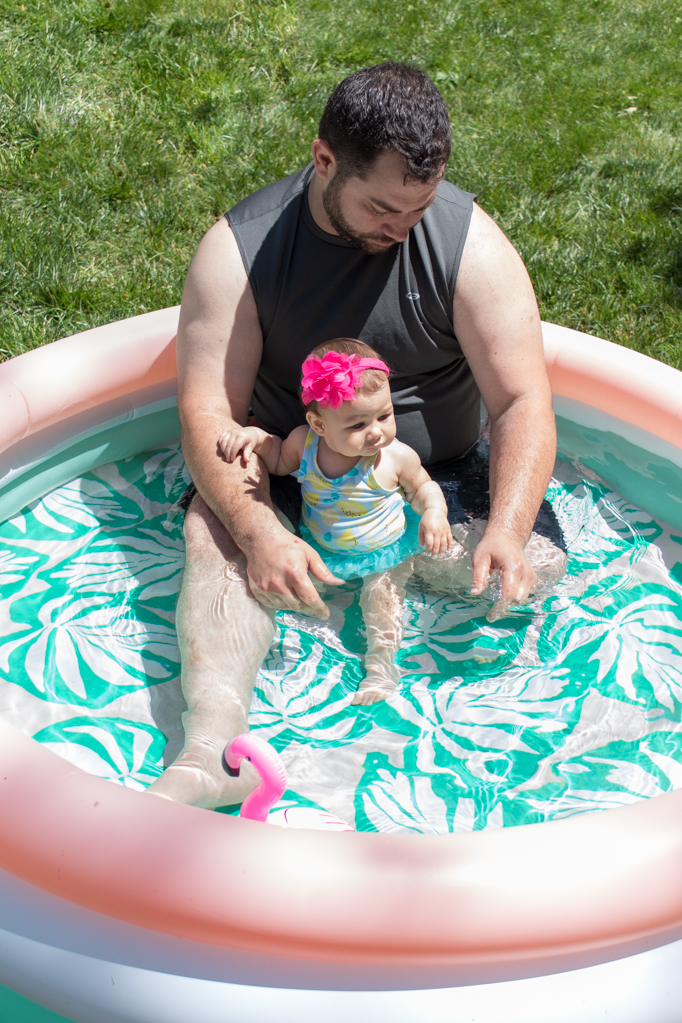
We don’t have a pool in our backyard, so I had purchased this mini one from Target that holds 3 adults. It was perfect for us and Hailey! I love the fun tropical pattern too. We keep ours inflated and store it in the shed, so it’s ready to go for the next pool party.

Looking to add a little bit more fun to your everyday blow-up pool? How about making a super easy Flamingo pool party for your kids for less than $100?! This setup took me about 10 minutes, so it’s perfect for an impromptu summer day. Click for the …

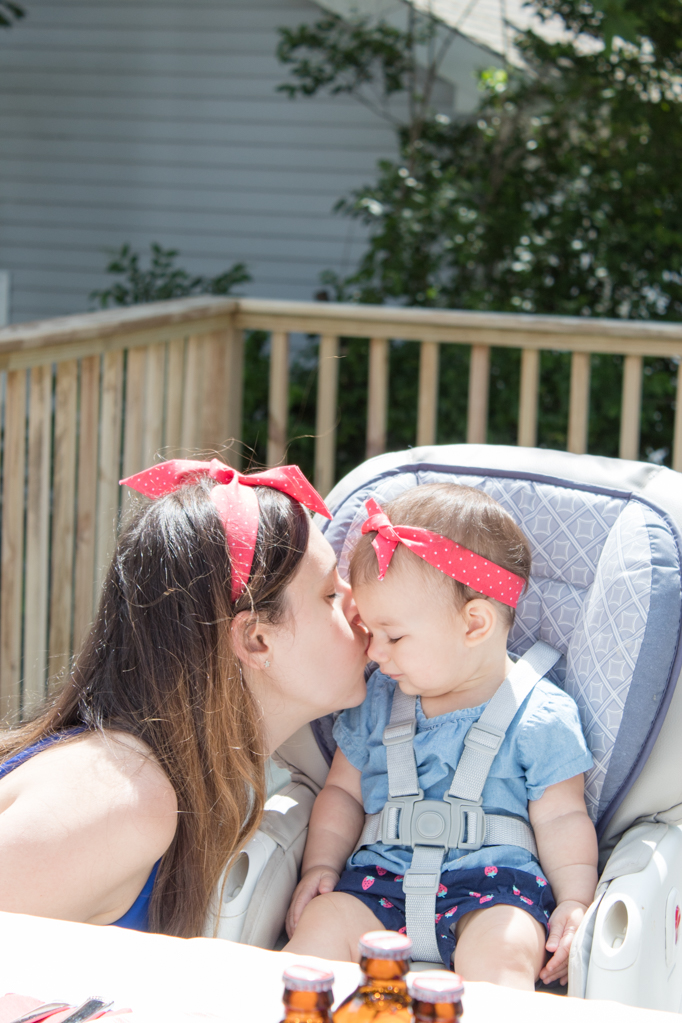
Hailey and I put on our fun, tropical bathing suits and added some festive accessories, like a big flower headband for Hailey and earrings and sunglasses for me. Everything was super easy to set up- it only took a few minutes to gather up all my supplies and then a few more to decorate the space. I was super happy while we splashed around in the pool- it was really fun to make an ordinary experience like hopping in the inflatable pool just a little but more festive.  

Looking to add a little bit more fun to your everyday blow-up pool? How about making a super easy Flamingo pool party for your kids for less than $100?! This setup took me about 10 minutes, so it’s perfect for an impromptu summer day. Click for the …

I know that to some having so many pictures of the impromptu pool party seems like I wasn’t in the moment truly having fun, but for me that’s how I celebrate! I love to look back and have nice photos of events. I could snap a few cell phone pictures but then I wouldn’t feel that moment of being back there. Hailey’s getting SO big and so quickly that I want to preserve every single moment with her. 

Looking to add a little bit more fun to your everyday blow-up pool? How about making a super easy Flamingo pool party for your kids for less than $100?! This setup took me about 10 minutes, so it’s perfect for an impromptu summer day. Click for the …

While an amazing, huge, Pinterest-worthy party can be fun and envy-inducing, it’s also important to enjoy the less noteworthy, everyday things that happen. By adding a little bit more fun to the everyday, you’ll be able to enjoy every minute instead of waiting for something important to happen. Well, my friends, YOU are important and that is worth celebrating!

Looking to add a little bit more fun to your everyday blow-up pool? How about making a super easy Flamingo pool party for your kids for less than $100?! This setup took me about 10 minutes, so it’s perfect for an impromptu summer day. Click for the …

What type of mini party will you be celebrating? Is there anything you want to see for inspiration? Perhaps a Christmas in July party? Halloween tea party? Face mask party? Let me know in the comments below and I’ll try to make it happen!

Hailey’s Happy Half- A Confetti Carnival Half Birthday Party

On March 28, Hailey officially became 6 months old! I truly cannot believe how quickly time flew by, but it’s true! I love a good party (surprise surprise!) so I decided to throw Hailey a small (but adorable) half birthday party to mark the occasion. I knew the party had to be cheap, because our budget is a little tight these days. I also knew it had to be simple so my husband wouldn’t get annoyed at me for having an unnecessary party. And I knew it had to be cute, because IT’S ME and I wouldn’t have it any other way. The result was an adorable little party on a budget that any mom can throw for their baby!

Hailey-Half-Party-18.jpg

Picking a Half Birthday Party Theme 

The first thing I had to do was pick a theme for the party. I was a bit stumped at first, but I knew I wanted something colorful and maybe with confetti. I browsed Pinterest for ideas, then I looked up the silly holidays and found that March 28 is food on a stick day. My mind instantly went to carnival food like corn dogs, and that’s how the confetti carnival theme came about! I created a mood board for the party (more on that coming to the blog soon!) and I began planning my purchases and menu. 

One of my goals for this party was to not generate a ton of trash afterwards. So, I purchased reusable supplies like the honeycombs instead of balloons. I decided not to use cute patterned paper/plastic plates because we had enough everyday plates for the guests. I also used our turquoise footed glass goblets that we never get to use with company and regular silverware. The only plates I got where these half circle plates because they just fit with the theme wayyyy too well, and I knew there was no way I’d find that affordably for a reusable set. I skipped paper straws altogether because no one really uses them anyway. 

Hailey-Half-Party-2.jpg

Carnival Party Crafts 

The good news is that all the fun DIYs that I did will be coming to the blog soon! I wanted to get this party post up before Hailey turned 9 months (or 9 years!) old. Like I said, I kept it simple and only did a few diy projects. I made Hailey a crown to wear with a 1/2 on it which at first seemed a little big but looked pretty cute overall. She wore it comfortably for most of the party! Then, I made a 1/2 cake topper. I had big plans for it with hanging ribbons but it looked funny, and 9pm the night before means you just gotta move on. I kept it simple with just glitter paper and a skewer stick. And lastly, I really wanted to display the photos I’ve been taking of Hailey each month so I made some picture holders! I picked my favorite photo from each month plus one from when she was first born.  It was really amazing being able to capture her growth each month because I can’t believe how big she’s gotten already and it hasn’t even been a year yet! I think I’m going to look back at these with such appreciation.

Psst- I made a baby photography course so that you can learn how to take better baby photos too! Learn more about Dreamy Baby Photography here.

Hailey-Half-Party-16.jpg
Hailey-Half-Party-47.jpg
Hailey-Half-Party-22.jpg

Carnival Party Decor

I knew I wanted to make a tent (even though it’s more circus than carnival) so I raided my fabric stash and found some tulle that I had bought for my veil, but it was too narrow. I would have preferred something bolder but hey, sometimes you just gotta move on! I also knew I wanted to have balloon animals, so I used these figures I had and put them around the house. Finally, I wanted to add some pizzazz to the party area so I purchased a set of tassel garlands and a pack of honeycombs and lanterns. I made some of the garland tassels thicker and some thinner (2 pieces of tissue paper vs 4) so I was able to make a ton of tassels and hang them up around the party area. I also used the tassels and the honeycombs to decorate the tent and give it more of a carnival feel. I also added my DIY cotton candy garland which is so fun and complimented the theme!

Hailey-Half-Party-27.jpg
Hailey-Half-Party-4.jpg
Hailey-Half-Party-8.jpg
Hailey-Half-Party-3.jpg
Hailey-Half-Party-14.jpg
Hailey-Half-Party-1.jpg

Carnival Party Menu

You can’t have a party without food! Well, you can but it wouldn’t be as good haha. We decided to keep the menu really simple (and cheap!) with traditional carnival fare. 

Popcorn chicken
Corn dogs
Mexican street corn (elote)
Loaded tot kabobs (recipe here)
Cotton candy
Cake pops
Popcorn
Buffalo wings (brought by family)
Spinach pies (common at Greek fairs!)

Hailey-Half-Party-13.jpg

Rainbow Layer Cake 

I decided that I wanted to do a layer cake and make it rainbow. I’ve never made a layer cake before nor a rainbow cake so I was a little worried. But it came out soooo cute! Since it was her half birthday I cut the cake in half, which left the layers out for everyone to see. The cake was actually really easy to make but in case you want a “tutorial”, here’s what I did. I used 2 white cake mix boxes and dyed them using neon McCormick dye. I sprayed the pans with flour spray which helped the cake not to stick to the pan. After they baked and cooled, I took them out of the pans and cut them flat using a long sharp knife. Then, I cut them in half and assembled the cake with a layer of frosting in between. Hailey was too young to eat the cake, but we took some pretty cute photos of her with the cake!

Hailey-Half-Party-32.jpg
Hailey-Half-Party-35.jpg
Hailey-Half-Party-36.jpg
Hailey-Half-Party-40.jpg
Hailey-Half-Party-46.jpg

I mean…. look at that rainbow gorgeous goodness! Not bad for my first attempt at rainbow cake and a layer cake. I served the cake on the half circle plates, because what better to eat half a cake on than half a plate?! Once the cake and dessert was served, Hailey opened a few gifts from my mom. We requested no gifts but she said she had purchased the items months ago and since my parents were moving, she didn’t want to lose them. Fair enough! Most of those toys ended up being some of her favorites.

Hailey-Half-Party-52.jpg
Hailey-Half-Party-62.jpg
Hailey-Half-Party-63.jpg

Such a fun and simple way to celebrate Hailey’s Half Birthday! Most of those decorations are still up, 2 months later. I love how festive the honeycomb balls and lanterns are! Even the circus tent is still up, although that’s probably due to laziness more than anything else. It’s hard to believe that in less than 4 months, we’ll be celebrating her first birthday. Seriously, where has the time gone and how do I stop it?!

Hailey-Half-Party-23.jpg
Hailey-Half-Party-24.jpg

Well, that’s all folks! I’ve got the individual DIY projects for this party (including the crown and photo holders!) coming to the blog soon, as well as Hailey’s monthly updates. It’s been a little busy around here and sadly I’m slacking on those! Part of me was thinking maybe I shouldn’t bother with them anymore but I think someday I’m going to look back at them longingly so I’m going to keep going! Keep an eye out for the DIY projects and don’t forget to follow me on Instagram for more behind-the-scenes plus reminders for new posts!

DIY Washi Tape Place Card

Summer is here, and that means constant get-togethers, picnics, and BBQ's. Essentially, we're all just looking for reasons to be outside with friends, with a glass of rosé or a sangria in hand. Sometimes it's fun to go beyond the usual paper-plate-and red-solo-cup combo we're used to, and whip up something a bit more elegant for our girls. What could be better than a simple summer tablescape featuring these washi tape placecards? They're really cheap to make and hella easy. Put that glue gun away girl- you don't need it for this project!

*This post contains affiliate links.

Summer is here, and that means constant get-togethers, picnics, and BBQ's. What could be better than a simple summer tablescape featuring these washi tape placecards? Get the super easy how-to on the blog! #placecards #washitapecrafts #summercrafts

You will need:

2.5 inch circle punch (similar here)

Colored cardstock (similar here)

Washi tape (similar here)

Glitter letters (From Michaels, similar here)

Directions:

1. Cut your circles out of your colored cardstock

Summer is here, and that means constant get-togethers, picnics, and BBQ's. What could be better than a simple summer tablescape featuring these washi tape placecards? Get the super easy how-to on the blog! #placecards #washitapecrafts #summercrafts

2. Add washi tape to the top and bottom of your circle.

Summer is here, and that means constant get-togethers, picnics, and BBQ's. What could be better than a simple summer tablescape featuring these washi tape placecards? Get the super easy how-to on the blog! #placecards #washitapecrafts #summercrafts

3. Fold over your excess washi tape. You can also cut it off if you want to, but it wasn't necessary. If you want the back to be neat, cut another circle from cardstock and glue it on the back.

Summer is here, and that means constant get-togethers, picnics, and BBQ's. What could be better than a simple summer tablescape featuring these washi tape placecards? Get the super easy how-to on the blog! #placecards #washitapecrafts #summercrafts

4. Starting from the middle, add your glitter letters to spell out your friends' names. I placed them down gently, then adjusted them once all the letters were on to make sure everything was straight.

Summer is here, and that means constant get-togethers, picnics, and BBQ's. What could be better than a simple summer tablescape featuring these washi tape placecards? Get the super easy how-to on the blog! #placecards #washitapecrafts #summercrafts

5. Press down on your glitter letters to seal them onto your place card.

Summer is here, and that means constant get-togethers, picnics, and BBQ's. What could be better than a simple summer tablescape featuring these washi tape placecards? Get the super easy how-to on the blog! #placecards #washitapecrafts #summercrafts

That's all folks! Add them to your letter place card holders (DIY coming soon!) and place them on your summer tablescape for your friends to enjoy. They're so cute and can be put at a desk or on a cork board after the party is over! This summer I'm all about the easy crafts projects and this one is no exception! It's no mess too. Perfect!

Summer is here, and that means constant get-togethers, picnics, and BBQ's. What could be better than a simple summer tablescape featuring these washi tape placecards? Get the super easy how-to on the blog! #placecards #washitapecrafts #summercrafts

So, what do you think about these placecards? Will you be whipping them up for your friends? Let me know how you plan to use them in the comments below!

No Cook, No Fuss Fourth Of July Party

This summer, I decided that I’m going to make every celebration as easy as I possibly can. That means less time in the kitchen and more time enjoying the outdoors with a drink in hand, laughing with my friends. Usually my husband John does most of the cooking (ok, all of the cooking!) and most events leave him stuck in the kitchen most of the day. He doesn’t necessarily mind cooking, but he does get frustrated having to spend the whole day running around- back and forth to the stove, the oven, and the grill while still trying to hang out. Because this is the fate of pretty much every party host since the beginning of time, I decided that I wanted to create a no-cook Fourth of July party. I figured where better to start than Trader Joe’s! I’ve been a fan of Trader Joe’s for a while now (and this post is in no way sponsored by them) so I thought it be a great place to go and get some ready-made, delicious, fresh options for a Fourth of July party. 

*This post contains affiliate links.

This summer, I decided that I’m going to make every celebration as easy as I possibly can. That means less time in the kitchen and more time enjoying the outdoors with a drink in hand, laughing with my friends. I decided to create a no cook party sp…

Before we get into the food, let’s talk about the table setup. For starters, I decided that I’m tired of always having crappy disposable plates and cups that are terrible for the environment and always manage to blow away. In addition, everyone always ends up losing their cup and using a whole bunch of extra ones- which makes it even worse for the environment. Because of this, I decided that I was going to use only reusable items and keep the party smaller so that I can have a nice intimate gathering with my guests where we could actually talk instead of spending the entire time trying to cater to a huge group and just spending the whole party cooking. 

Related: Use This, Not That: Eco-Friendly Party Swaps

This summer, I decided that I’m going to make every celebration as easy as I possibly can. That means less time in the kitchen and more time enjoying the outdoors with a drink in hand, laughing with my friends. I decided to create a no cook party sp…

Before I bought any party supplies, I searched my house for appropriate red, white and blue items. First, I grabbed an affordable tablecloth that I had purchased from Amazon. The table runner was from Home Goods and it was perfect for adding a pop of blue to the table. Then I added a red star table runner I had purchased years ago from H&M on top so there’s also a pop of red. On the sides of the table where the runner did not extend, I used reusable napkins as placemats. The red stripe plates were from Target as part of their Hearth & Hand collection and were ideal for adding the perfect nautical touch to the table spread. I used my regular utensils from my dinner set and added a red napkin, folded in half to keep it simple.  Then I scattered some blue tea light holders with battery operated tea lights to add a little light and romance as the sun goes down.

This summer, I decided that I’m going to make every celebration as easy as I possibly can. That means less time in the kitchen and more time enjoying the outdoors with a drink in hand, laughing with my friends. I decided to create a no cook party sp…

Now, onto the Trader Joe’s stuff that I purchased for this party that I’m so excited about! I originally went to Trader Joe’s for only a few items, including flowers and a pie. I managed to find red, white and blue flowers that were only a few dollars each and added a nice touch to the table. When I went to the bakery section, I found a pie which couldn’t be more perfect for the Fourth of July. It’s strawberry rhubarb (YUM) and it has stars on the crust (what?!). I grabbed those two items and continued about my normal shopping trip, when I realized there were so many easy and delicious options that were ready-made that would be perfect for a Fourth of July party. So, I decided that I was going to grab them and I changed this event from just a regular Fourth of July tablescape to a Trader Joe’s easy-to-do party theme. Because let’s be honest, if we can find a great shortcut, we want to do it!

This summer, I decided that I’m going to make every celebration as easy as I possibly can. That means less time in the kitchen and more time enjoying the outdoors with a drink in hand, laughing with my friends. I decided to create a no cook party sp…

I went to the drink section and grabbed some Red Stripe beers and Spiked Seltzer, both of which had a great nautical red, white and blue theme to them. I think one of the best parts about this is that you don’t even need cups, so it’s one less thing to wash, less waste if you’re using plastic cups, and everyone will know which drink is theirs because it’ll just be in front of them or in their hand. Plus, having the option of a beer or a spiked seltzer means that you’ll have something for everyone. They’ve also got great rosés and craft beers if you chose to go that route too. Or to really celebrate the 4th, you could pick an American beer!

This summer, I decided that I’m going to make every celebration as easy as I possibly can. That means less time in the kitchen and more time enjoying the outdoors with a drink in hand, laughing with my friends. I decided to create a no cook party sp…

I decided to keep the food super simple just like everything else. I made a salad with mixed greens, fresh strawberries, blueberries, and feta cheese to keep with that red white and blue theme. You can also add nuts like sliced almonds if you want to! I added Trader Joe’s vinaigrette on the side so that people could serve themselves and the salad wouldn’t get mushy.

This summer, I decided that I’m going to make every celebration as easy as I possibly can. That means less time in the kitchen and more time enjoying the outdoors with a drink in hand, laughing with my friends. I decided to create a no cook party sp…

I also decided to make a really simple cheese and charcuterie platter since we all love a good cheese! I started by using a goat cheese log covered in blueberries- again, going with the theme.  I served them with bread crisps, which ended up being really good. Usually these types of crackers end up being rock hard and not good (at all) but these were really soft and crispy, the perfect texture to hold the goat cheese and meats. They also work great for avocado toast too! 

This summer, I decided that I’m going to make every celebration as easy as I possibly can. That means less time in the kitchen and more time enjoying the outdoors with a drink in hand, laughing with my friends. I decided to create a no cook party sp…

I picked up a meat platter in the refrigerated section and everything was pre-sliced and ready to go. I personally don’t eat these types of meats (I pretty much just eat chicken and turkey!) but I figured it be great for everyone else to enjoy. Trader Joe’s also has tons of ready-made salads, sandwiches, and pasta salads so you could grab some pre-made meals for your gals. Just place them on a pretty platter and everything’s ready to go with no fuss and no cooking!

This summer, I decided that I’m going to make every celebration as easy as I possibly can. That means less time in the kitchen and more time enjoying the outdoors with a drink in hand, laughing with my friends. I decided to create a no cook party sp…

Aside from the fact that everything so simple to do, Trader Joe’s is actually very affordable and I prefer getting pre-made things from their supermarket over others. For starters, Trader Joe’s is usually smaller than most supermarkets, and I think that’s what makes it better. Instead of wandering the aisles looking at 1 million different brands and getting overwhelmed, you’re able to see everything laid out really nicely and neatly. You know where all the pre-made stuff is and you have a choice of only the best items, so you never have to worry that the things that you purchase are going to be bad for your guests. I also love that they have a great selection of craft beers and that you’re able to mix and match your own set, which is perfect for trying new ones out. 

This summer, I decided that I’m going to make every celebration as easy as I possibly can. That means less time in the kitchen and more time enjoying the outdoors with a drink in hand, laughing with my friends. I decided to create a no cook party sp…

Ever since baby Hailey came around, I find that I want to keep my events as simple as possible. In the end, it’s all about spending time with friends- having fun and getting to hear about each other’s day. We’ve all become busy and have our own full lives, so we need to take a break from all that to relax and unwind. The opposite of relaxing is spending the whole day cooking for everyone! So, run out to your local Trader Joe’s and grab some pre-made meals for your friends. Then kick back and relax- it’s all been taken care of!

This summer, I decided that I’m going to make every celebration as easy as I possibly can. That means less time in the kitchen and more time enjoying the outdoors with a drink in hand, laughing with my friends. I decided to create a no cook party sp…

What are your favorite pre-made Trader Joe’s products to serve your guests? Will you be skipping the cooking at your next summer event? Let me know in the comments below!

Use This, Not That: Eco-Friendly Party Swaps

Although I love (love love love!) party supplies, I had to take a step back and think about my contribution to the trash of this world. It's no secret that single-use plastics are polluting the planet, especially because most of the time they aren't actually recycled. We've all seen images of trash-filled beaches, trash islands in the ocean twice as big as Texas, and floating trash in the Caribbean Sea. As much as we think our trash is gone, it really isn't. Time and time again, we are seeing it pop up in oceans, landfills, and beaches. It's our responsibility to do all we can to improve these conditions. Because of this, I am going to try to do something practically no DIY and party blogger has done before- strive to be more eco-friendly and show you more sustainable methods for your parties. Because while these projects and party themes may be cute, they're killing the planet. And you don't have to sacrifice style to be eco-conscious. To start off small, I'm showing you 10 ways that you can make easy swaps for your next party!

*This post contains affiliate links

Although I love (love love love!) party supplies, I had to take a step back and think about my contribution to the trash of this world. Because of this, I am going to try to do something practically no DIY and party blogger has done before- strive t…

Wooden Cutlery Instead of Plastic

Single-use plastic utensils are probably the biggest waste of money and resources. But, they're so easily accessible and convenient! I challenge you to try wooden cutlery for your next party. There are so many ways that you can customize the utensils if you wanted to, but honestly they are totally fine as-is! They come in fun shapes and colors, but I think tying them with a simple ribbon can also add a nice pop of color similar to the way plastic forks can. Or, try decorating the handle with washi tape for an easy, stress-free look!


Paper Straws Instead of Plastic

I think we've all seen that tragic story of a straw being pulled out of a turtle's nose. Along with being absolutely heartbreaking, we know it's unnecessary. There are so many times we get a straw and don't need one. Any time I'm at a restaurant, I get a cup and a straw- and I always give back the straw. For your next party, try switching to paper straws. There are SO MANY fun designs, which makes them even better for mixing and matching the theme. They're pretty affordable too, and can be used after the party for ordinary drinks. They don't last as long as plastic straws (which is a good thing!) so be sure to keep them out of the liquids until guests are ready to drink.


Compostable Plates Instead of Plastic

Another easy swap is going from plastic plates to paper or compostable ones! Plastic party plates aways end up in regular trash (not recycling) and that's a huge amount of plastic going straight to the landfill. Try switching to something more eco-friendly, like these sugarcane/bagasse plates. You can also use paper plates, which are still better than plastic ones. Look for uncoated paper plates, which can be composted if you're into that sort of thing. This article explains a little more about it.


Reusable Melamine Plates Instead of Disposable

If you really want to be eco-friendly, reduce and reuse! Instead of going for disposable items, invest in a cute set of reusable melamine plates that can match any theme. I love these because they are white on top but have a fun pop of color underneath. If you want to go this route but can't afford the investment, consider going in with a group of friends to create a complete party set. Then, you can put it in a giant container and share it whenever it's needed! Fostering community and saving the environment. What could be better?!

Although I love (love love love!) party supplies, I had to take a step back and think about my contribution to the trash of this world. Because of this, I am going to try to do something practically no DIY and party blogger has done before- strive t…


BYO-Cup Party Instead of Disposable

I had a party earlier this year and I decided the theme was Bring Your Own Cup! Each guest brought a cup of their choice to drink out of for the night. This is fantastic because you don't need to worry about having cups for everyone and you don't ned to wash dishes either! I can't tell you how many parties I've been to where I'm tossing out dozens of plastic cups because no one knew which cup was theirs. This solves that problem even better than a sharpie! I always use my disco ball cup for parties, but my new favorite is a pineapple cup or shell cup for summer. The options are endless!

Reusable Cups That Double as a Favor

If you don't have enough cups for the group, how about purchasing a set of reusable cups that can double as favors? Home Goods always has tons of cute and affordable cups that you could purchase as a favor, and they're definitely better than giving a bag of plastic toys that kids play with for 2 minutes and forget about! This idea would be great for both kids and adults. Just make sure you don't get anything too cheap and crappy- you don't want it going right in the trash!


Personalized Mason Jars Instead of Plastic Cups

Another alternative to plastic favor cups is to use glass mason jars as cups. You can find these in almost any store (like Michael's, Target, or similar) and they've always got sales. To personalize them, use a Sharpie to write each guest's name. This way, everyone knows which cup is theirs! Add a cute paper straw and you're in business.

Although I love (love love love!) party supplies, I had to take a step back and think about my contribution to the trash of this world. Because of this, I am going to try to do something practically no DIY and party blogger has done before- strive t…

Paper Fans Instead of Tissue Paper Poms

Tissue paper poms are easy party decor items that takes up a lot of space, but they don't store well so you can't re-use them. Once they've been unfolded and fluffed, they're pretty much trash. Try using paper fans instead! They come in every color and pattern imaginable, plus they fold up again if you want to re-use them, especially if you use my handy dandy hack! They don't take up a lot of room to store because they fold so compactly, but once they're set up they really make an impact!


Honeycomb Balls Instead of Balloons

Unfortunately, we are starting to see that even balloons aren't good for the environment. Releasing them can have devastating effects, as they can get tangled up with animals or land in places they shouldn't. Even those tossed in the trash can end up in the ocean, where they are mistaken for food. Instead of balloons, use honeycomb balls to create unique party decor and even "balloon" arches! They have the same round shape and come in all kinds of sizes (and even shapes!), so you can create the exact look you'd like. PLUS, you don't have to worry about them deflating!


Disposable Paper Tablecloth (or Reusable Ones) Instead of Plastic

Aside from the fact that plastic tablecloths look kinda cheap, they are full of creases that you can never get out (and not to sound like a broken record but... awful for the environment). Try switching to paper tablecloths! They come on a roll or in a pack, but they usually have a plastic liner underneath so be sure to get a fully paper one. Or, even better, invest in some inexpensive polyester tablecloths that you can toss in the wash after use. I have a large black one I always use for my food table and it's held up really well- plus no stains! For the easiest party set, skip the tablecloth completely and stick with a simple runner!

I like to keep it light over here, but this was something that was really weighing on me. We're all guilty of choosing convenience over sustainability sometimes but it's important to start making changes that will help the earth, not hurt it. I hope this blog post showed you that being eco-friendly isn't really hard, and can actually be really cute! 

Now, I need some feedback from you. What did you think of this post? What types of items would you like alternatives for? Let me know in the comments below!