Maternity Style: Movie Date Night

When you're pregnant in the summer, few things are as fun and refreshing as going to see a movie in an ice cold theater! It's got all our favorite things- entertainment that you get sitting down, a comfy recliner, and snacks. A few weeks ago, my husband and I went to see a movie and I  decided to try something a little different with my outfit. You see, baby HATES pants/shorts, and I get cold in the theaters but it's hella hot outside. So, I wore a maxi skirt up high so that it was nice and breezy before I got to the theater, but could be pulled down to my hip area for extra warmth when I got inside. It was also a fun alternative to wearing one of my same 7 dresses yet again!

*This post contains affiliate links

Movie Stripes.jpg

If you want to re-create the look, I've rounded up a few great options for each fashion piece! I've also linked a few scarves that you could add on for some extra warmth in the theater.

White Tanks  1  2  3 

Maxi Skirts  1  2  3  4

Bangles  1  2  3  

Shoes  1  2  3  

Clutch  1  2  3  4

Earrings  1  2  

Necklace  1  2  3  4

Belt  1  2  3 

Keychain  1  2  3 

Scarf  1  2  3  

Movie Stripes1.jpg

It's such an easy, comfy, effortless way to look stylish.

What do you wear to the movies? Do you get cold, or is the temperature just right? Let me know in the comments below!

How I Improved My Photos (And You Can Too!)

Since I started blogging over 2 years ago, I have put a lot of effort into improving my brand's photography. It's been a series of trial and error, some frustration, and even a little cursing. But I can honestly say, without a doubt, that I am so proud of the achievements I have made in my brand's photography! Blogging has been one of the most amazing challenges I have ever put myself through. There's been good times (like landing my first paid guest posting spot!) and bad times (like, my shop failing) but honestly I would not go back and change the decision to start- despite all the efforts and time it has taken that I didn't even account for. And so much of my success can be attributed to the images I put forth on my blog.

Today, I want to take a trip down memory lane and show you a few before and afters to show you how my photography improved over the years. And, I want to show you some real-time before and afters- aka, how bad weather or editing can drastically change the quality of a photo! So, strap on your seatbelt. It's gonna be a bumpy ride.

Camera 3.jpg

Humble Beginnings: Donuts

For the first stop on our journey, I'm taking you way back to April of 2016. I did my first ever (and still the most popular!) DIY's- a Donut Party Platter. Overall, the photos were ok. But, they were kinda shadowy, small, and a little out of focus. It was really difficult to get the lighting to be even- you can see that the left side is brighter than the right! I can't remember how exactly I did this, but I know that back then I was working with white poster board, 2-3 desk lamps with regular incandescent bulbs (yikes!) and whatever sun I could find. I recently re-took the photos of the donut platter so I'd have a new pinnable image on Pinterest. You can definitely see the improvement in the photography! The photo is crisper and cleaner, and definitely matches my aesthetic better. Plus, now I don't rely on text to get people to stop and see what my pin is about. The images speak for themselves, and the details are in the captions. This makes my Pinterest boards look much cleaner than they were before!

donuts.jpg

Fake it 'til you make it.

I'm going to let you in on a blogging secret- most party posts are staged! And there's a good reason for that- it's pretty much impossible to get a real party set up with enough time to photograph it and get yourself ready. Plus, parties are based on what time is best for your guests NOT for photography! Well, back in my early days of blogging I didn't know this. So, I had a Sugar Sweet Birthday Party and tried to take photos... at night... without external lighting. And well, you can see the results for yourself. Also, the party table was set up in my kitchen, and just a few feet away from the party table was my kitchen island, which nearly blocked every effort to take a good photo! More recently, I had an Ice Cream Party and I used my improved photo skills. You can see the photos are less grainy, and there is a clear focus on specific items rather than the whole table randomly!

party.jpg

If at first you don't succeed, try try again.

Ok guys, now I am taking you on an exclusive, behind the scenes tour of a failed blog post that has never been shown before. In 2016, I had a genius idea to make some cute Christmas stirrers. I literally did an entire photoshoot for these. The whole post was DONE. But when I sat down to edit, I was appalled by my photos. I straight up could not get them to edit properly, and couldn't bring myself to post such hideousness on my blog. I didn't have time to re-do the whole post (#TisTheSeason) so I decided that it would have to wait, because these photos were too dang horrible to put forth into the world. Fast forward to 2017 and I re-did the whole shoot, start to finish. And I LOVED the results! The photos were bright and clean with a special holiday spirit. And I was SO glad I had waited.

Christmas Spirit.jpg

Honestly, holiday posts are some of my favorites and I knew I couldn't put forth work I wasn't proud of.  One of the reasons why this post was so awful was because I was playing around with backdrops, trying to infuse some color into my photos instead of having the backdrop always be white. And while I applaud myself for trying, this was a massive fail. The color of the backdrop wasn't even on brand, but I don't regret it. This was a big risk for me, photo-wise, and it helped me to create a new look for my blog. Now I LOVE my angled wrapping paper look, because it has that pop of color I was looking for while still being really clean. Don't be afraid to try new things, like backdrops. They may be a fail the first time, but you eventually can find a look you love- and that, my friends, is SO worth it.

The art of the flatlay.

A popular photo setup sweeping the nation is the flatlay. I don't remember them being quite so popular when I was younger but hey, I was an oblivious kid. Nonetheless, a killer flaylay is a surefire way to get noticed. But, they can be kinda hard to get right. First off, you have to arrange things nicely. Then, you have to light them up nicely. And lastly, you have to shoot them from overhead at a straight angle. YEA... good luck with that! I actually broke my toe trying to shoot a flat lay. Did you know that? I was standing on a chair to get just the right angle (hint: it wasn't) and just the right lighting (another hint: it wasn't) and as I was stepping off the chair, the whole thing freakin flipped over and I landed on the chair, scraped my back the whole way down, and landed with a loud THUD. I was pissed at myself (as we all are when we fall!) and got myself up. And I thought, huh... I fell on my back but my toe feels funny. A nice long trip to the ER later, I discovered that I fractured my toe and had to wear a boot for 2 months. So believe you me when I say that flatlays are HARD to get right, and it's really important to protect yourself from their evilness! Anyway...

The first trick I learned was to have consistent lighting for my flatlay (using these lights!) so that there aren't any weird shadows. The second trick was investing in a horizontal camera mount so that the photos could be nice and straight! There's obviously more to it than just that, but those were two HUGE improvements for me when it came to flatlays. And the proof is in the pudding.

before & after-5.png

If you're looking to improve your photos, I've created a FREE photography e-course to help you do just that! Be sure to sign up and get your workbook by clicking the photo below!

Use This, Not That: Eco-Friendly Party Swaps

Although I love (love love love!) party supplies, I had to take a step back and think about my contribution to the trash of this world. It's no secret that single-use plastics are polluting the planet, especially because most of the time they aren't actually recycled. We've all seen images of trash-filled beaches, trash islands in the ocean twice as big as Texas, and floating trash in the Caribbean Sea. As much as we think our trash is gone, it really isn't. Time and time again, we are seeing it pop up in oceans, landfills, and beaches. It's our responsibility to do all we can to improve these conditions. Because of this, I am going to try to do something practically no DIY and party blogger has done before- strive to be more eco-friendly and show you more sustainable methods for your parties. Because while these projects and party themes may be cute, they're killing the planet. And you don't have to sacrifice style to be eco-conscious. To start off small, I'm showing you 10 ways that you can make easy swaps for your next party!

*This post contains affiliate links

Although I love (love love love!) party supplies, I had to take a step back and think about my contribution to the trash of this world. Because of this, I am going to try to do something practically no DIY and party blogger has done before- strive t…

Wooden Cutlery Instead of Plastic

Single-use plastic utensils are probably the biggest waste of money and resources. But, they're so easily accessible and convenient! I challenge you to try wooden cutlery for your next party. There are so many ways that you can customize the utensils if you wanted to, but honestly they are totally fine as-is! They come in fun shapes and colors, but I think tying them with a simple ribbon can also add a nice pop of color similar to the way plastic forks can. Or, try decorating the handle with washi tape for an easy, stress-free look!


Paper Straws Instead of Plastic

I think we've all seen that tragic story of a straw being pulled out of a turtle's nose. Along with being absolutely heartbreaking, we know it's unnecessary. There are so many times we get a straw and don't need one. Any time I'm at a restaurant, I get a cup and a straw- and I always give back the straw. For your next party, try switching to paper straws. There are SO MANY fun designs, which makes them even better for mixing and matching the theme. They're pretty affordable too, and can be used after the party for ordinary drinks. They don't last as long as plastic straws (which is a good thing!) so be sure to keep them out of the liquids until guests are ready to drink.


Compostable Plates Instead of Plastic

Another easy swap is going from plastic plates to paper or compostable ones! Plastic party plates aways end up in regular trash (not recycling) and that's a huge amount of plastic going straight to the landfill. Try switching to something more eco-friendly, like these sugarcane/bagasse plates. You can also use paper plates, which are still better than plastic ones. Look for uncoated paper plates, which can be composted if you're into that sort of thing. This article explains a little more about it.


Reusable Melamine Plates Instead of Disposable

If you really want to be eco-friendly, reduce and reuse! Instead of going for disposable items, invest in a cute set of reusable melamine plates that can match any theme. I love these because they are white on top but have a fun pop of color underneath. If you want to go this route but can't afford the investment, consider going in with a group of friends to create a complete party set. Then, you can put it in a giant container and share it whenever it's needed! Fostering community and saving the environment. What could be better?!

Although I love (love love love!) party supplies, I had to take a step back and think about my contribution to the trash of this world. Because of this, I am going to try to do something practically no DIY and party blogger has done before- strive t…


BYO-Cup Party Instead of Disposable

I had a party earlier this year and I decided the theme was Bring Your Own Cup! Each guest brought a cup of their choice to drink out of for the night. This is fantastic because you don't need to worry about having cups for everyone and you don't ned to wash dishes either! I can't tell you how many parties I've been to where I'm tossing out dozens of plastic cups because no one knew which cup was theirs. This solves that problem even better than a sharpie! I always use my disco ball cup for parties, but my new favorite is a pineapple cup or shell cup for summer. The options are endless!

Reusable Cups That Double as a Favor

If you don't have enough cups for the group, how about purchasing a set of reusable cups that can double as favors? Home Goods always has tons of cute and affordable cups that you could purchase as a favor, and they're definitely better than giving a bag of plastic toys that kids play with for 2 minutes and forget about! This idea would be great for both kids and adults. Just make sure you don't get anything too cheap and crappy- you don't want it going right in the trash!


Personalized Mason Jars Instead of Plastic Cups

Another alternative to plastic favor cups is to use glass mason jars as cups. You can find these in almost any store (like Michael's, Target, or similar) and they've always got sales. To personalize them, use a Sharpie to write each guest's name. This way, everyone knows which cup is theirs! Add a cute paper straw and you're in business.

Although I love (love love love!) party supplies, I had to take a step back and think about my contribution to the trash of this world. Because of this, I am going to try to do something practically no DIY and party blogger has done before- strive t…

Paper Fans Instead of Tissue Paper Poms

Tissue paper poms are easy party decor items that takes up a lot of space, but they don't store well so you can't re-use them. Once they've been unfolded and fluffed, they're pretty much trash. Try using paper fans instead! They come in every color and pattern imaginable, plus they fold up again if you want to re-use them, especially if you use my handy dandy hack! They don't take up a lot of room to store because they fold so compactly, but once they're set up they really make an impact!


Honeycomb Balls Instead of Balloons

Unfortunately, we are starting to see that even balloons aren't good for the environment. Releasing them can have devastating effects, as they can get tangled up with animals or land in places they shouldn't. Even those tossed in the trash can end up in the ocean, where they are mistaken for food. Instead of balloons, use honeycomb balls to create unique party decor and even "balloon" arches! They have the same round shape and come in all kinds of sizes (and even shapes!), so you can create the exact look you'd like. PLUS, you don't have to worry about them deflating!


Disposable Paper Tablecloth (or Reusable Ones) Instead of Plastic

Aside from the fact that plastic tablecloths look kinda cheap, they are full of creases that you can never get out (and not to sound like a broken record but... awful for the environment). Try switching to paper tablecloths! They come on a roll or in a pack, but they usually have a plastic liner underneath so be sure to get a fully paper one. Or, even better, invest in some inexpensive polyester tablecloths that you can toss in the wash after use. I have a large black one I always use for my food table and it's held up really well- plus no stains! For the easiest party set, skip the tablecloth completely and stick with a simple runner!

I like to keep it light over here, but this was something that was really weighing on me. We're all guilty of choosing convenience over sustainability sometimes but it's important to start making changes that will help the earth, not hurt it. I hope this blog post showed you that being eco-friendly isn't really hard, and can actually be really cute! 

Now, I need some feedback from you. What did you think of this post? What types of items would you like alternatives for? Let me know in the comments below!

Maternity Style: Tropical Summer Tassel Outfit at Pier17

Back on June 30, I attended the Color Block Party for Pier 17 as they re-opened and launched their new Geronimo orb installation! It was pretty hot that day and I was 6 months pregnant, but I made the most of it with a cool, lightweight dress and my very own water cup. I still feel a little bit left out when everyone's having cocktails and I can't, so having this cup made me happy! People kept coming up to me and asking me what I was drinking. Spoiler: just water!

ACS_0069.JPG

The theme of the event was to be colorful and wear summer brights, so I wore my awesome tassel dress I got last year from Forever 21. I accessorized it with tassel everything, like earrings, a bracelet, and a keychain. I wore cute and comfy colorful crocs plus my flamingo bag for the very first time. To copy the look, I've got 3-4 options you can snag to get a similar look!

Dress  1  2  3  4

Sandals  1  2  3 

Earrings  1  2  3  4  5

Flamingo Bag  1  2  3 

Bracelet  1  2  3  4

Pineapple Cup  1  2  3 

Keychain  1  2  3  

ACS_0074.JPG

Overall the outfit was perfect for keeping cool on such a hot day. I didn't even get to wash & style my hair because I wasn't feeling well, but putting it in a cute bun helped to keep me cool so it ended up being perfect. I brought along a matching pair of sunglasses too, but it ended up not being that sunny so I didn't need them. Into the purse they went!

My husband wasn't planning to come with me that day, but I wasn't feeling well and it was over 90 degrees on top of that, so I was thinking of not going which made me super bummed! I had already convinced all my friends to join me, but I live much farther so it was a long trip to do alone. I asked him to come and I think he felt bad for me so he joined as well! You can see by his face he was having so much fun joining us. That's sarcasm, by the way. He didn't enjoy the heat!

IMG_9745.JPG

PS- You can tell I love a theme and picked out my husband's outfit so he could match too! As for everyone else, well... I have no control over them! Haha. Overall it was a really fun event and I love getting dressed up in fun colors, so I call that a win! So crazy that soon I'll have a mini-me to bring to all these events.

I'm hoping to post about my cute and comfy outfits and adventures more often. Hopefully it'll encourage me to dress better- hah!

5 Tips to Speed Up Your Photography Process

Does this sound familiar? You have an idea for a photoshoot. You spend a day thinking about it, another day gathering supplies, and then another full day trying to find out where to set it up and take the photos. You try here, there, and everwhere, but in the end the photos are only mehhh. And, it took FOREVER. Maybe you don't even use the photos you took in the end! We all know that taking your time to create an amazing photo can really fun and rewarding. But sometimes, you just need a quick photo of a project, a product, or a process. What’s the best way to speed up the photography process, especially when you have lots of photos to take? Creating a routine, and sticking to it. These 5 tips will help you take quick and easy photos in no time!

What’s the best way to speed up the photography process, especially when you have lots of photos to take? Creating a routine, and sticking to it. These 5 tips will help you take quick and easy photos in no time!

1. Be predictable.

Create a photo ā€œtemplateā€ aka the usual way you take photos. For me, that means an overhead shot with a piece of wrapping paper angled sideways. This can be pretty boring, so why am I suggesting it? First, it allows you to take photos without wondering how exactly to set them up. And second, it creates brand identity and makes you easily recognizable. There are PLENTY of opportunities to be creative. But sometimes you just gotta get things done without reinventing the wheel each time. 

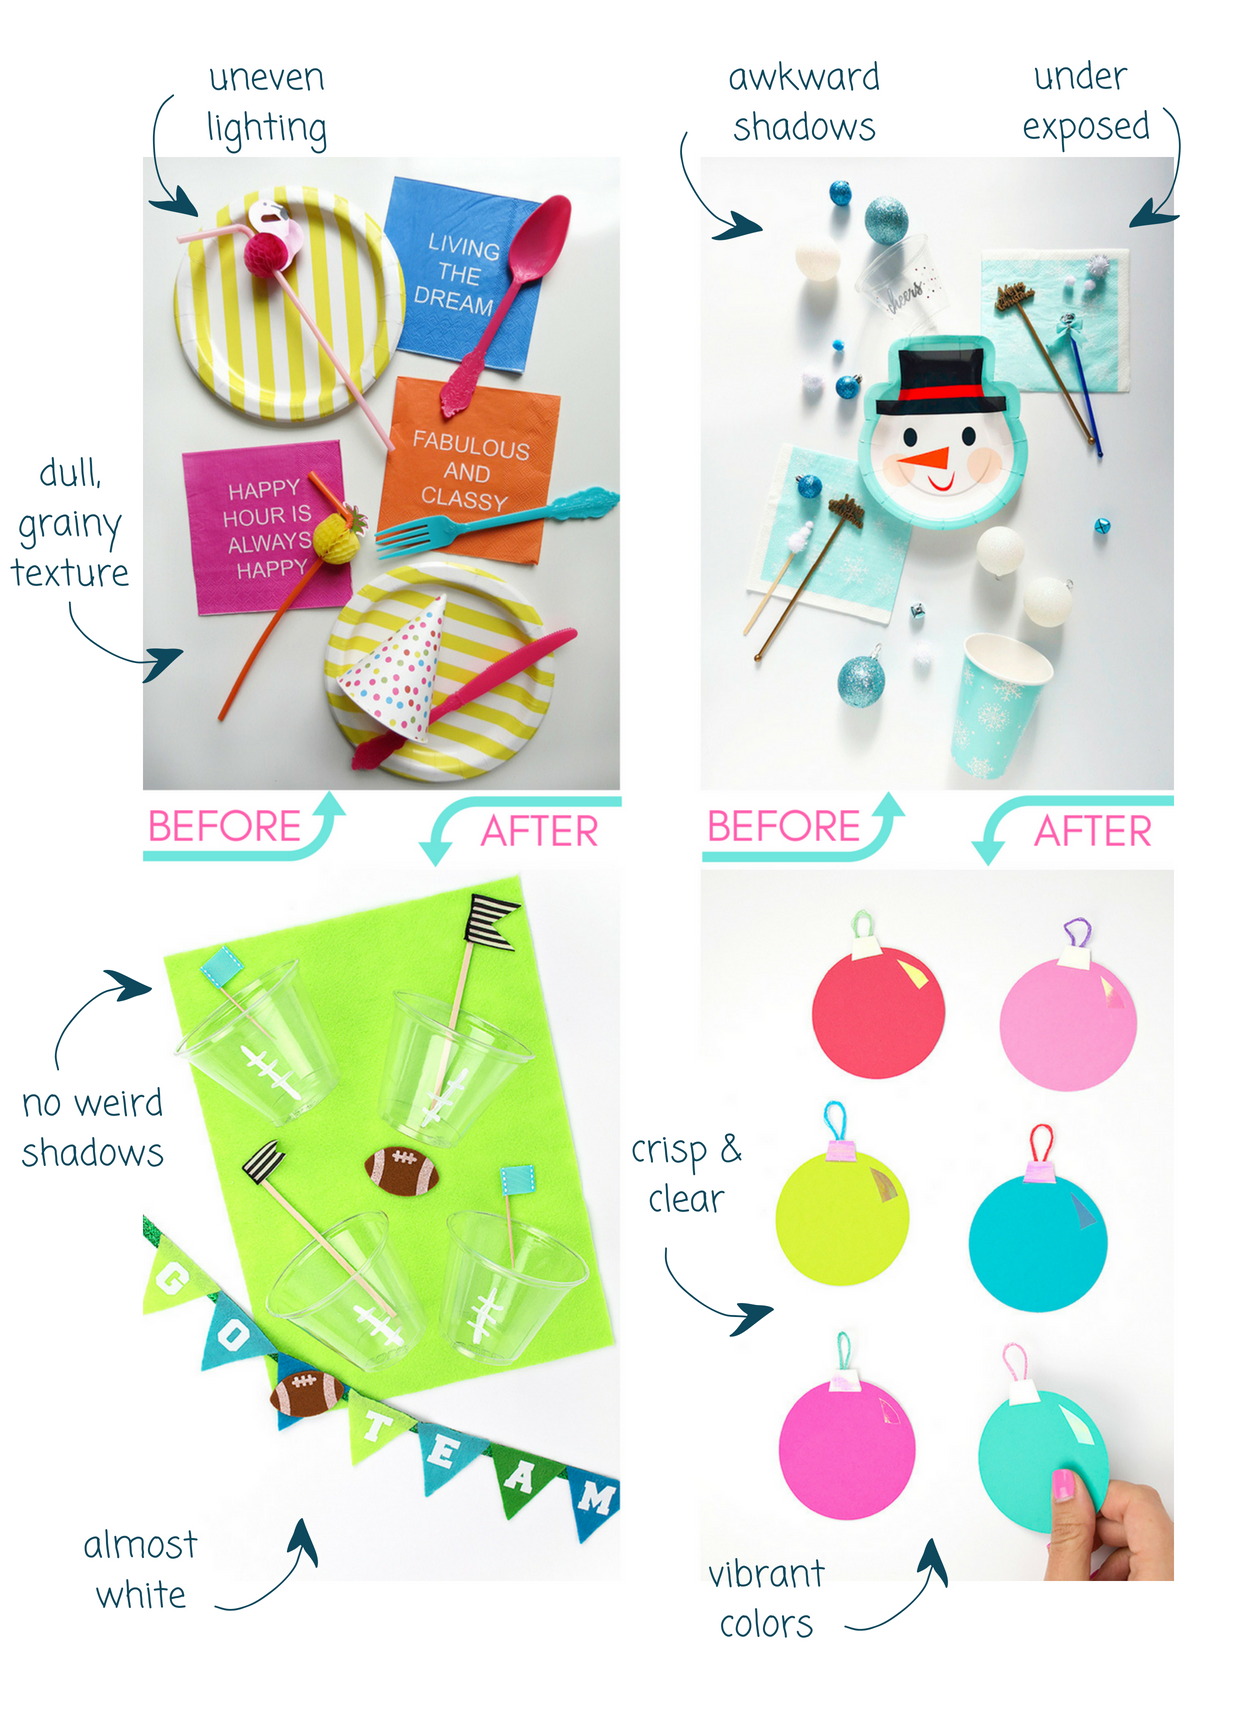
2. Create an editing workflow.

Once you’ve perfected your photo template, you've gotta perfect your editing workflow. Create a process where you can batch edit your photos and speed through them. This will also create brand identity since all your photos will have a similar look. Your website or shop will seem cohesive and will help people build trust in you. 

3. Keep all supplies together.

Whether it’s all in one box, one room, or one closet, having all your items in the same place will help drastically reduce the amount of time it takes for you to set up your photos. You’ll be able to grab everything you need in one go. Try your hardest to avoid the ā€œwhoops my extension cord is downstairs and my camera is in the carā€ dance. Why? Because any time spent running around is time you can get distracted by something else. And believe me, chances are you will!

4. Plan ahead.

Some factors are better for photography than others. The weather, time of day, and even the season can all have an effect on your photography. So, plan ahead! Check the weather app to see which days will be sunny (or partly sunny) and try to take your photos then. Add the photoshoot to your calendar, so you don't miss the best weather OR the best time of day. And, be sure to gather all your supplies before the day of the shoot and have them ready to go. It's way better to go shopping for props on a rainy Wednesday than on a sunny Saturday when you were hoping to take your pics!

5. Batch photos.

While everything is set up and ready, do ALL the photos you need to take. If you’re doing different poses or angles (like flatlays and model shots) batch those too! All the flatlays at once, all the model shots at once. Any time you can avoid moving lights, backdrops, etc. around is time saved. In the editing process you can batch your photos together if you need to (like by keyword, or into folders) otherwise once you name them they’ll magically group together! 

Taking your own photos doesn't have to take tons of time. With a bit of planning, you can speed up the process and take even better photos than you imagined!

If you're looking to improve your photos, I've created a FREE photography e-course to help you do just that! Be sure to sign up by clicking the photo below!

enroll in the free course now