Update: The Shop is Closed 

So, I have something to admit- I shut down my shop. I wish I could say it was with a heavy heart, but the truth is that I’m relieved it’s closed. Opening this shop cost me hundreds of dollars. I am not kidding you, and I truly wish I was. I’m embarrassed to think of all the cool things I could have bought with that money, or the trip I could have gone on. The truth is that there's no way of knowing what's going to be a success or a bust. Sometimes you need to dive into the pool to see if you can swim. As a very apt metaphor, I could not. (And, I can't actually swim either.... but thats a story for another day...)

Today I'm going to answer some "FAQ", if you will, about the shop and why it failed. I hope that you guys can feel a bit better about your failures when you read about mine!

Update: The Shop is Closed. Learn about my failures, and why I'm ok with losing hundreds of dollars. Spoiler: It's not because I made more some other way!

How much did you make from the shop?

About $100 and 3 sales. Yes, you read that right. I probably spent 7 times more than I made. That’s a pretty big failure, don’t you think? But hey, I’m ok with it. I’m giving myself a pass on this one. And if you’ve ever fallen flat on your face, I’m giving you permission to forgive yourself too. 

Why did the shop fail?

Well... I don’t know. I put a lot of thought into curating some amazing products that I loved. I bought about 45 items and whittled the shop down to my top 15 or so items. I was super picky about what I sold. I was super picky about the photos. And I was super picky about the names and descriptions. But in the end, it didn’t matter. Cute photos didn’t work. Begging didn’t work. Coupons didn’t work. So, l figured if no one wants to buy it, I might as well stop selling. 

Why did you spend so much? 

Well, the inventory cost money. I didn’t buy tons of anything (less than 15 of each item!) but it adds up. Then, having a Shopify account cost $30/month. I had my items on Amazon too and that was $40/month. And to list on Amazon I had to buy UPC codes which were like $25. In short? My overhead was way too high. My items were priced fairly, but they didn’t sell. At all. And none of this even includes labor- all the time I spent on finding the items, photographing and styling them, editing, listing, promoting, storing, buying packing supplies... a lot went into this shop! 

Update: The Shop is Closed. Learn about my failures, and why I'm ok with losing hundreds of dollars. Spoiler: It's not because I made more some other way!

What are you gonna do with all that inventory then?

I’m going to have a flash sale for it, probably on Instagram stories. With a baby on the way I need to get rid of all the clutter in my life! The supplies are currently taking up a closet in my home, and I’m going to need it for other things soon enough. Plus, what am I gonna do with 15 of the same earrings!?

Why are you telling us all this?

Because hey, maybe you failed too. We only see success stories on the internet from bloggers, the picture perfect moment in their day where things went right. Part of me wanted to shut down my shop in shameful silence. To not publicize the fact that literally no one cared what I had to offer. And another part of me was like, fudge it. I FAILED and maybe you did too. And that’s ok! Let’s commiserate together. Let’s laugh at how bad it was, and dream of successes ahead. Let’s cry over spilled milk and wasted money until we feel a little better about it. Let’s remember that it’s ok to fail, because that means we tried. And that’s wayyyyy better than those guys on the sidelines that were too afraid to jump in. 

At the end of the day, I have no regrets. I tried something, knowing full well it could fail. Which was pretty terrifying, because I hate failure. But guess what? I survived. My friends and family still love me. I’m not ready to give up on my dreams of owning another shop someday. I’m not going to tell others to abandon ship on their dreams because I failed mine. It’s all a learning curve. I just happen to be learning A LOT lately ;)

So, that's my story. Do you guys have a story about a massive failure? How did you feel about it? Did better things come after? Let me know in the comments below!

Steal the Look- Target's Art Class + Museum Of Ice Cream Collections

Oh my gosh you guys! Have you even SEEN the adorable Art Class + Museum Of Ice Cream Collections at Target?! Literally so jealous that all these items are made for kids. They get ALL the good stuff! The good thing is that although they don't have any adult items (cue tears) they do have some awesome items you can use for yourself. Check out these items you can snag from the Art Class + Museum Of Ice Cream Collection that will be sure to add some sweetness to your wardrobe!

Art Class + Museum Of Ice Cream Collections

Gummy Bear Fanny Pack
Ok, fanny packs don't exactly have the best rep in the biz. They're best known for being a 90's staple, or something only tourists and dorky parents wear. BUT I think this fanny pack can change your mind! First off, it has gummy bears. Yum! And second, it's transparent and will blend in better with your outfit. They're really rocking' the clear trends with this collaboration! Note that since this is for kids, the waist strap may be a little short. Buyer beware!

Sprinkle Print Lanyard
Man oh man do I love this lanyard! If you need to carry your ID card for school, work, or even going on cruises, you HAVE to get this sprinkle lanyard! It's such a perfect shade of pink, and it has a hanging ice cream cone. RUN, don't walk, to get it! If you don't carry an ID, it can be used for your keys, a mini-wallet for trips to the deli, or even at the gym!

Kid's 3pk MOIC Pin Set
Let's be honest- we all LOVE enamel pins! These are perfect to use anywhere, for anyone of any size. Put them on your purse, your lapel, your jean jacket... heck, even store them as wall decor! This set features a cute-as-pie ice cream truck, MOIC signature banana, and a soft-serve cone for obvious reasons.

Top Handle Crossbody Bag
Although it may be a little small, you can totally carry this mini purse around to the mall or on a small day trip! It'll fit the essentials- wallet, keys, lip gloss, and sunglasses. Plus it has a cute little sprinkle scarf and lining!

Banana Print Backpack
This backpack is bananas! No but seriously, how perfect is this backpack. It's perfect for commuters to carry their books and a snack, or just for wandering around in the park. Take it along hiking or to grab a few items at Target- the choice is yours! It's perfect for casual Fridays or to look cute anytime.

Lunch Bag with Ice Pack
If ever there was a reason to bring your own lunch to work, THIS IS IT!  Aside from being the freakin cutest little lunch bag, this comes with a soft-serve cone ice pack to keep everything cool. Bringing your own lunch saves money and the environment, since you won't purchase food that comes in one-time use plastics or styrofoam, then gets carried back to the office in a plastic bag. 

BTW- who do we have to contact to get these cute clothes in adult sizes?! Kids get all the good stuff! What do you think of this collaboration? Are you in love, or do you think it's nothing to brag about? Are you planning to get any items in the collection? Let me know in the comments below!

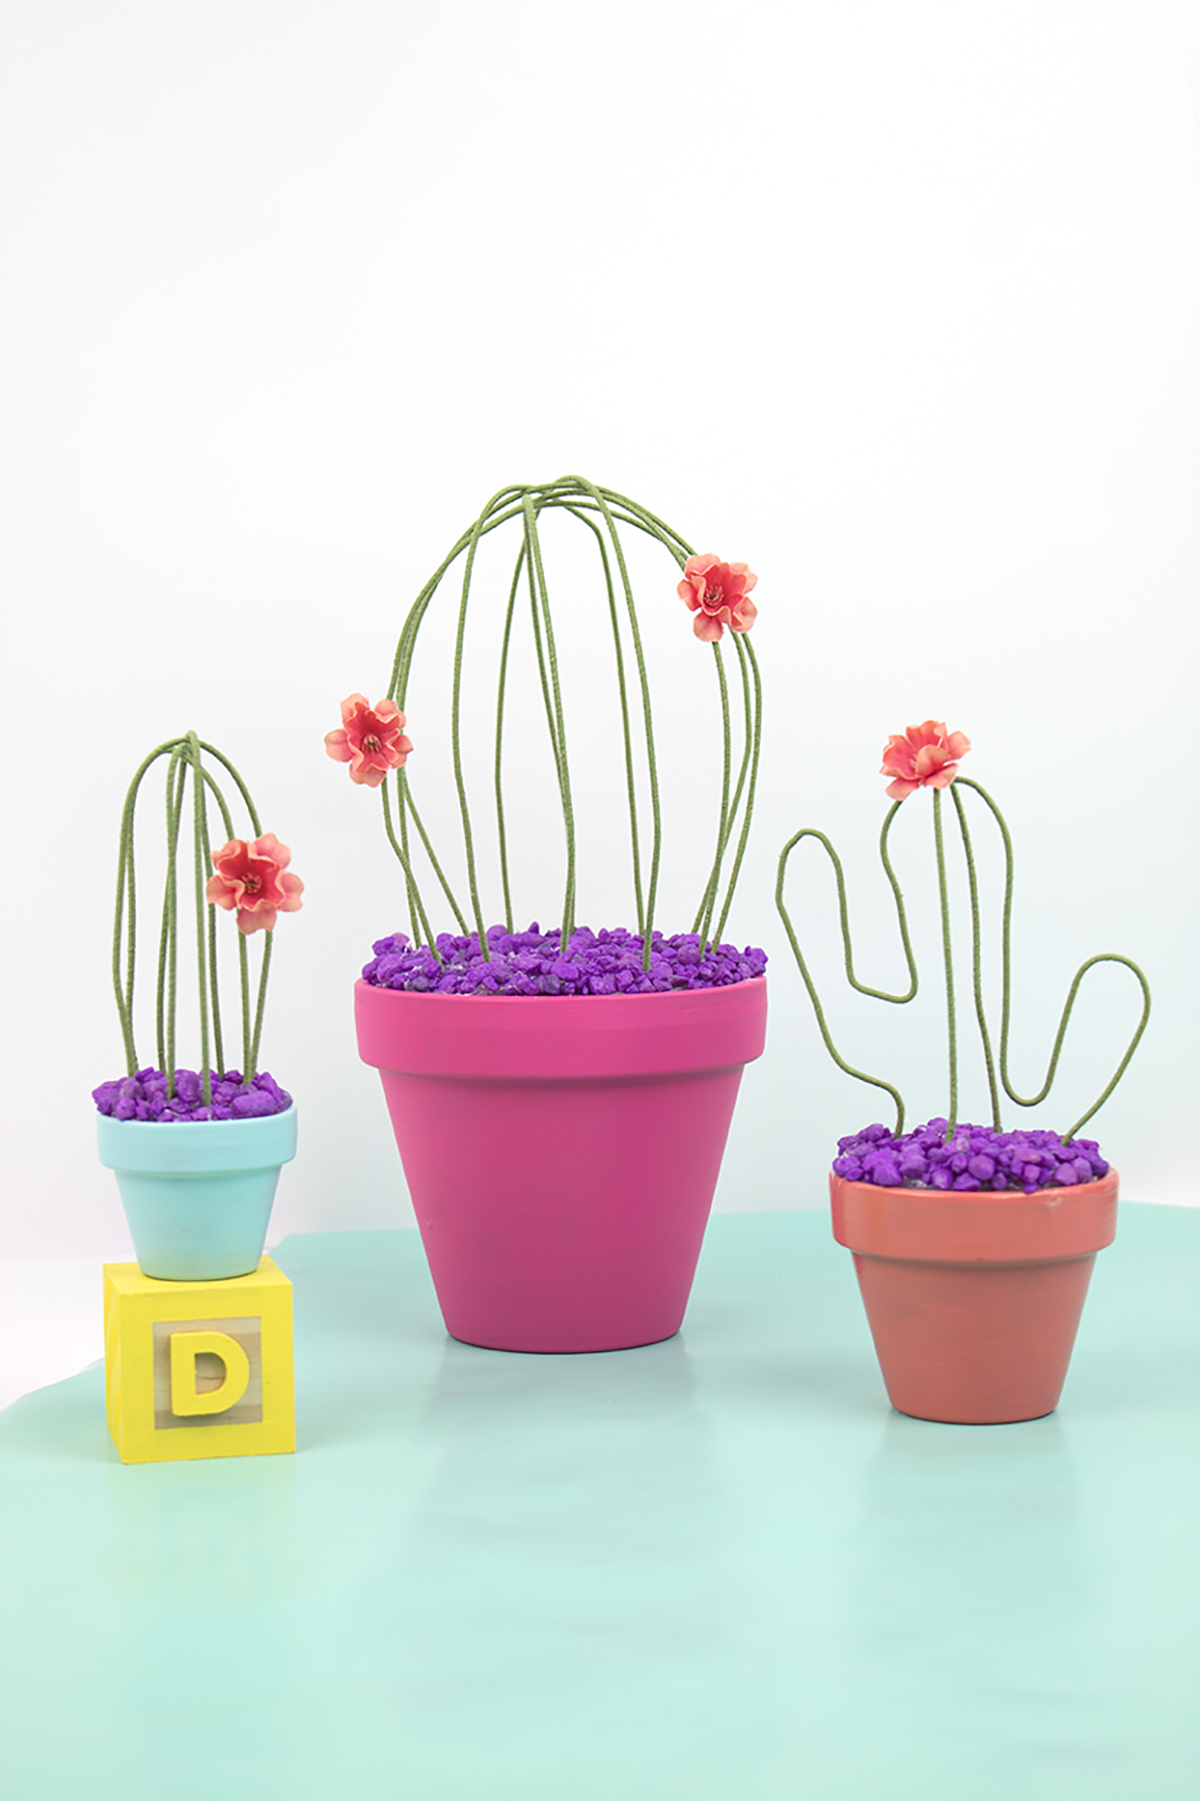
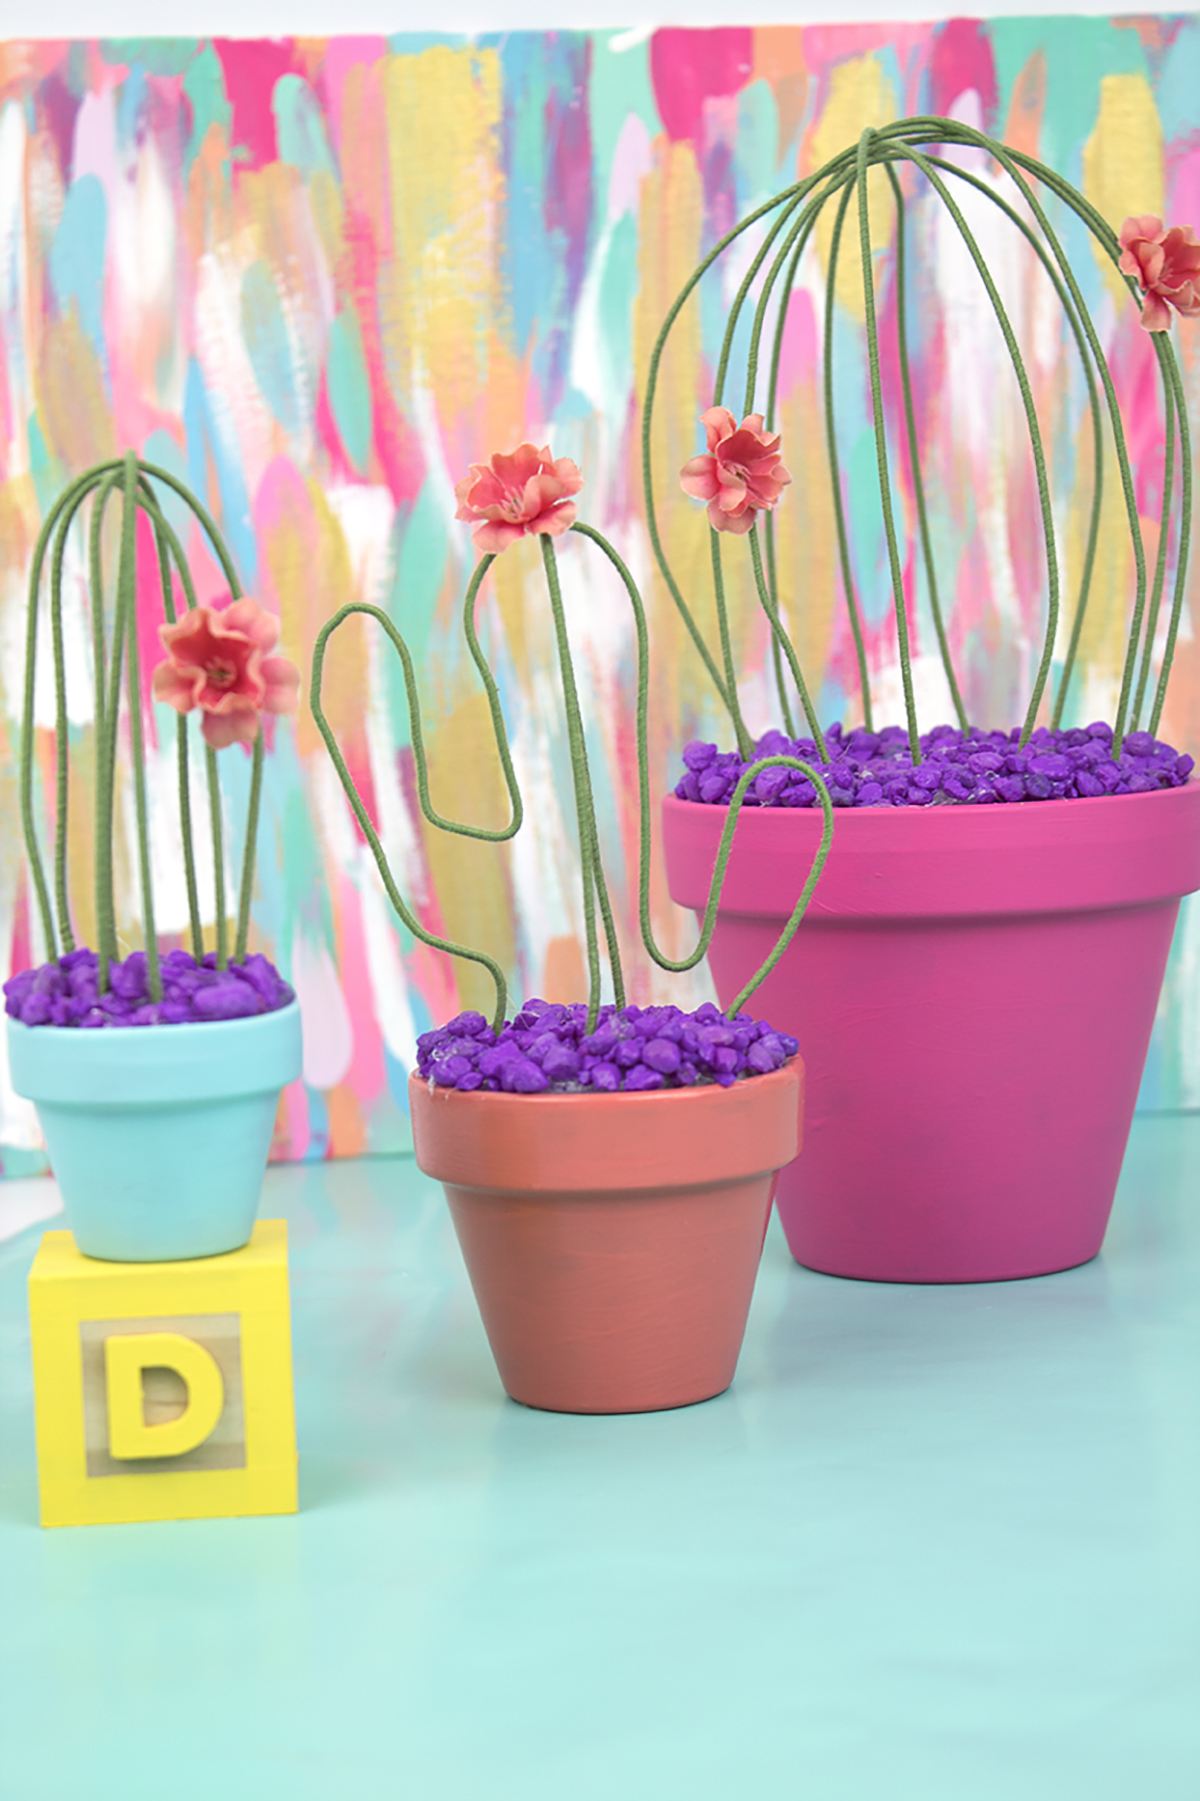
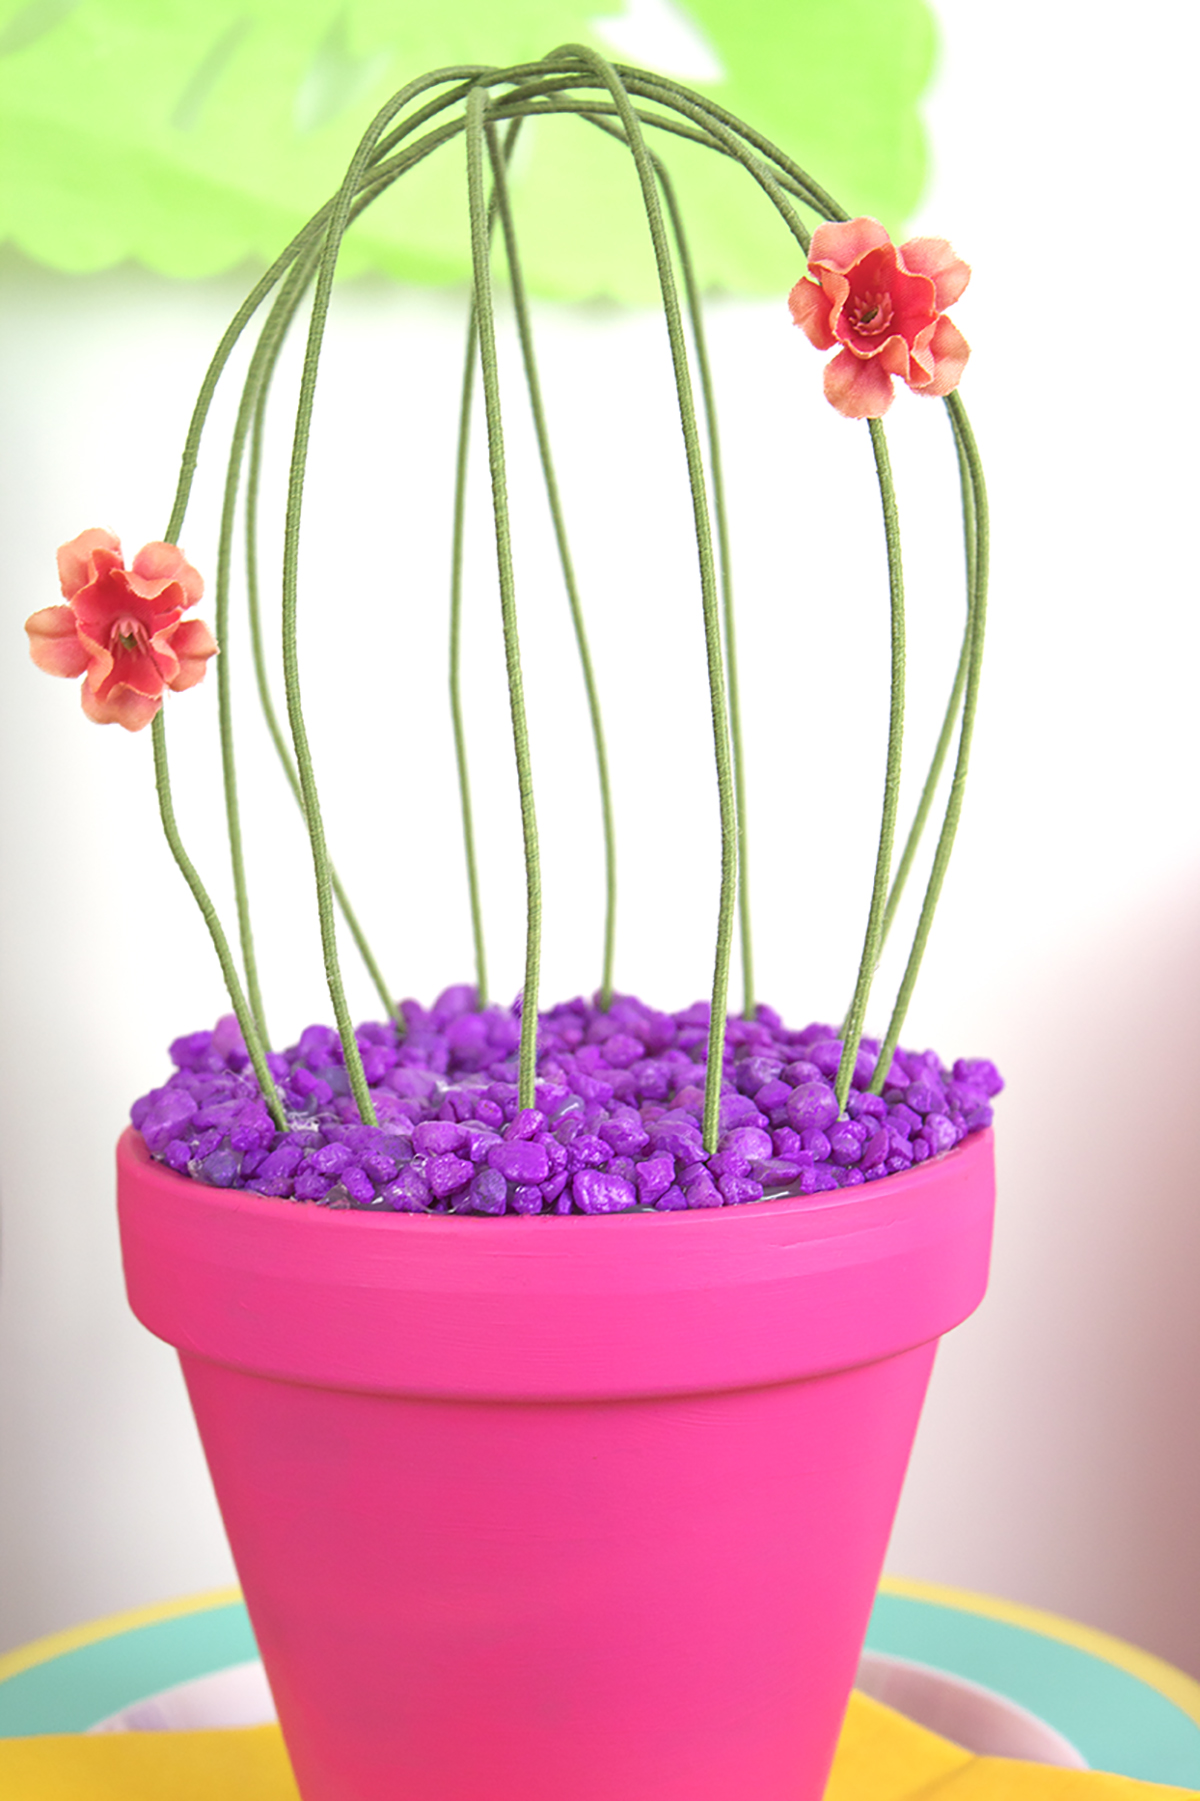
Wire Cactus Potted Plant

Although I am creating life within me, I am absolutely terrible at keeping plants alive. I even got succulents because I thought they were supposed to be easy to care for. Um... nope. They all dried up and died! In an effort to save the plants, I’ve decided I’d better stick to fake plants from now on. So, I decided to make these little beauties! They’re actually really simple to make, so its pretty funny that I started working on them about a year ago (!!!) and never got around to finishing them. Since one of my 29 goals for this year is to finish what I started, it seems like an appropriate task to cross of my to do list! After all, it’s been on there for so long. So grab your supplies, and maybe a friend, and let’s get crafting! 

Do you somehow kill all your plants like I do? In an effort to save the plants, I’ve decided I’d better stick to fake plants from now on. So, I decided to make these little beauties! This wire cactus is perfect for your home. Click for the full…

You will need:

Wire (similar here)
Styrofoam Cones (similar here)
Acrylic paint (similar here)
Ceramic pots (from the local craft store)
Aquarium rocks (here)
Small flowers (similar here)
Glue gun (similar here)
Wire cutters (here)
Long knife or small saw (similar here)

Directions:

Do you somehow kill all your plants like I do? In an effort to save the plants, I’ve decided I’d better stick to fake plants from now on. So, I decided to make these little beauties! This wire cactus is perfect for your home. Click for the full…
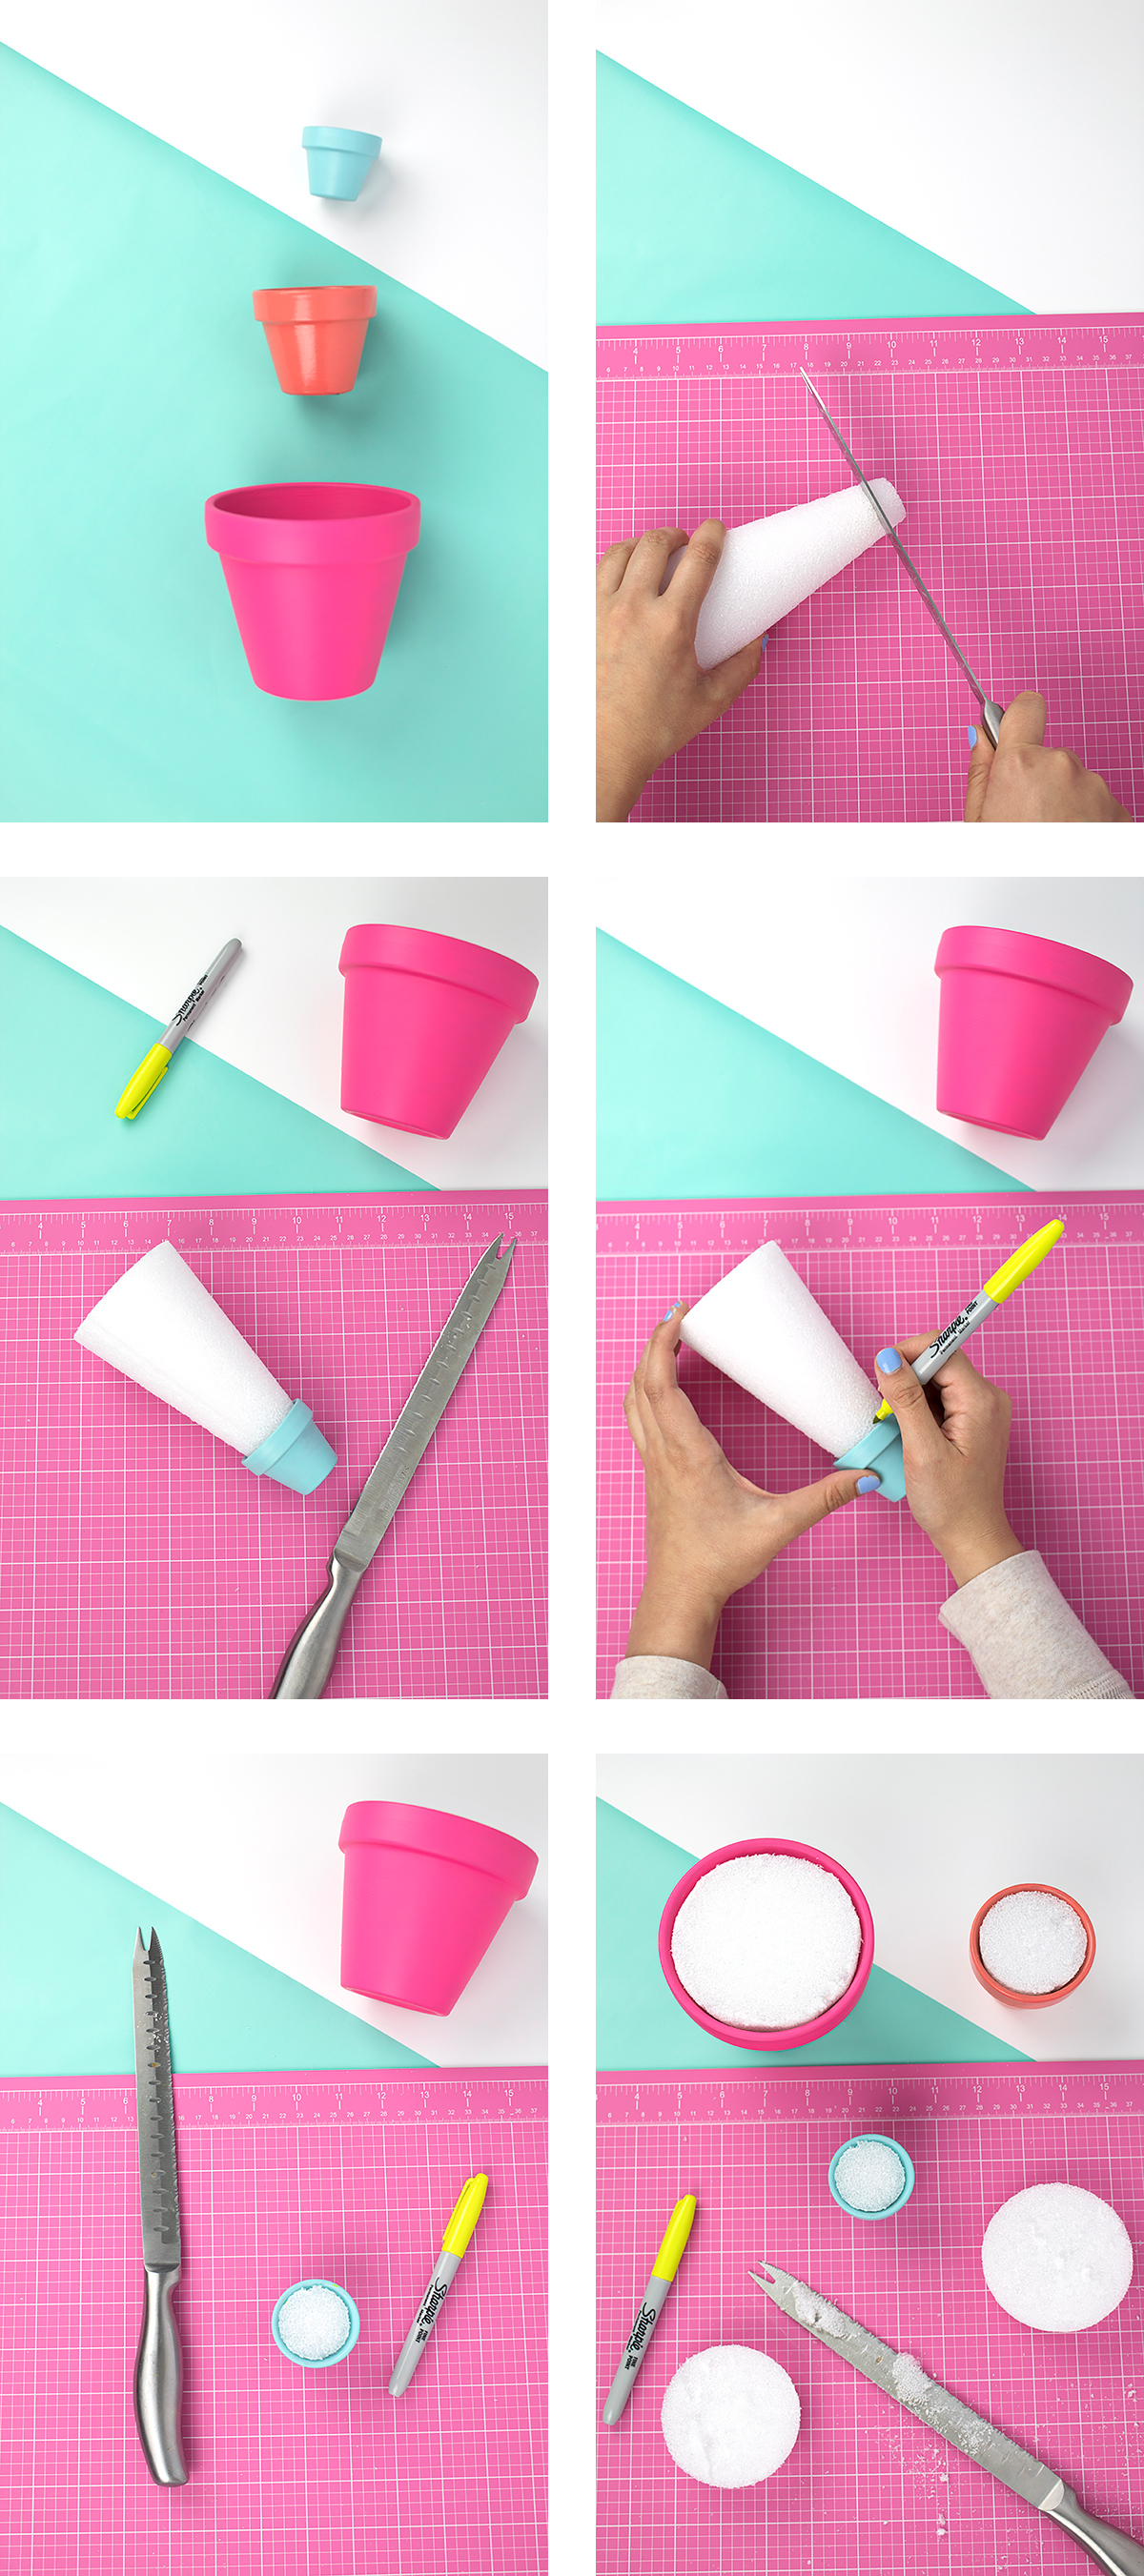
  1. Paint your ceramic pots in your choice of color and let dry. 
  2. Take your styrofoam cone and place it inside your pot, starting with the smallest one. Mark where you need to cut. 
  3. Using your knife or saw and a cutting mat, carefully cut the styrofoam cone in a straight line. Test that it fits, and adjust if necessary. Repeat for all 3 pots.

Directions: Small Cactus Plant

Do you somehow kill all your plants like I do? In an effort to save the plants, I’ve decided I’d better stick to fake plants from now on. So, I decided to make these little beauties! This wire cactus is perfect for your home. Click for the full…
  1. Take your wire and fold it in half. Cut the wire. Repeat so you have 4 parts. 
  2. Fold your half wire loosely into a U shape and place into the styrofoam. Take another piece and do the same, crossing over the first piece of wire. 
  3. Repeat for the remaining pieces. Adjust if necessary. 

Directions: Medium Cactus Plant

Do you somehow kill all your plants like I do? In an effort to save the plants, I’ve decided I’d better stick to fake plants from now on. So, I decided to make these little beauties! This wire cactus is perfect for your home. Click for the full…
  1. Take a long piece of wire and fold it in half. 
  2. Turn the wire so the curve is at the top. Bend the wire up then down to create cactus arms. 
  3. Take a new piece of wire. Fold it in half, and measure so that it covers the arm cactus. Trim. 
  4. Place the arm cactus into the styrofoam, then add the loop you made to fit. 

Directions: Adding the Rocks

Do you somehow kill all your plants like I do? In an effort to save the plants, I’ve decided I’d better stick to fake plants from now on. So, I decided to make these little beauties! This wire cactus is perfect for your home. Click for the full…

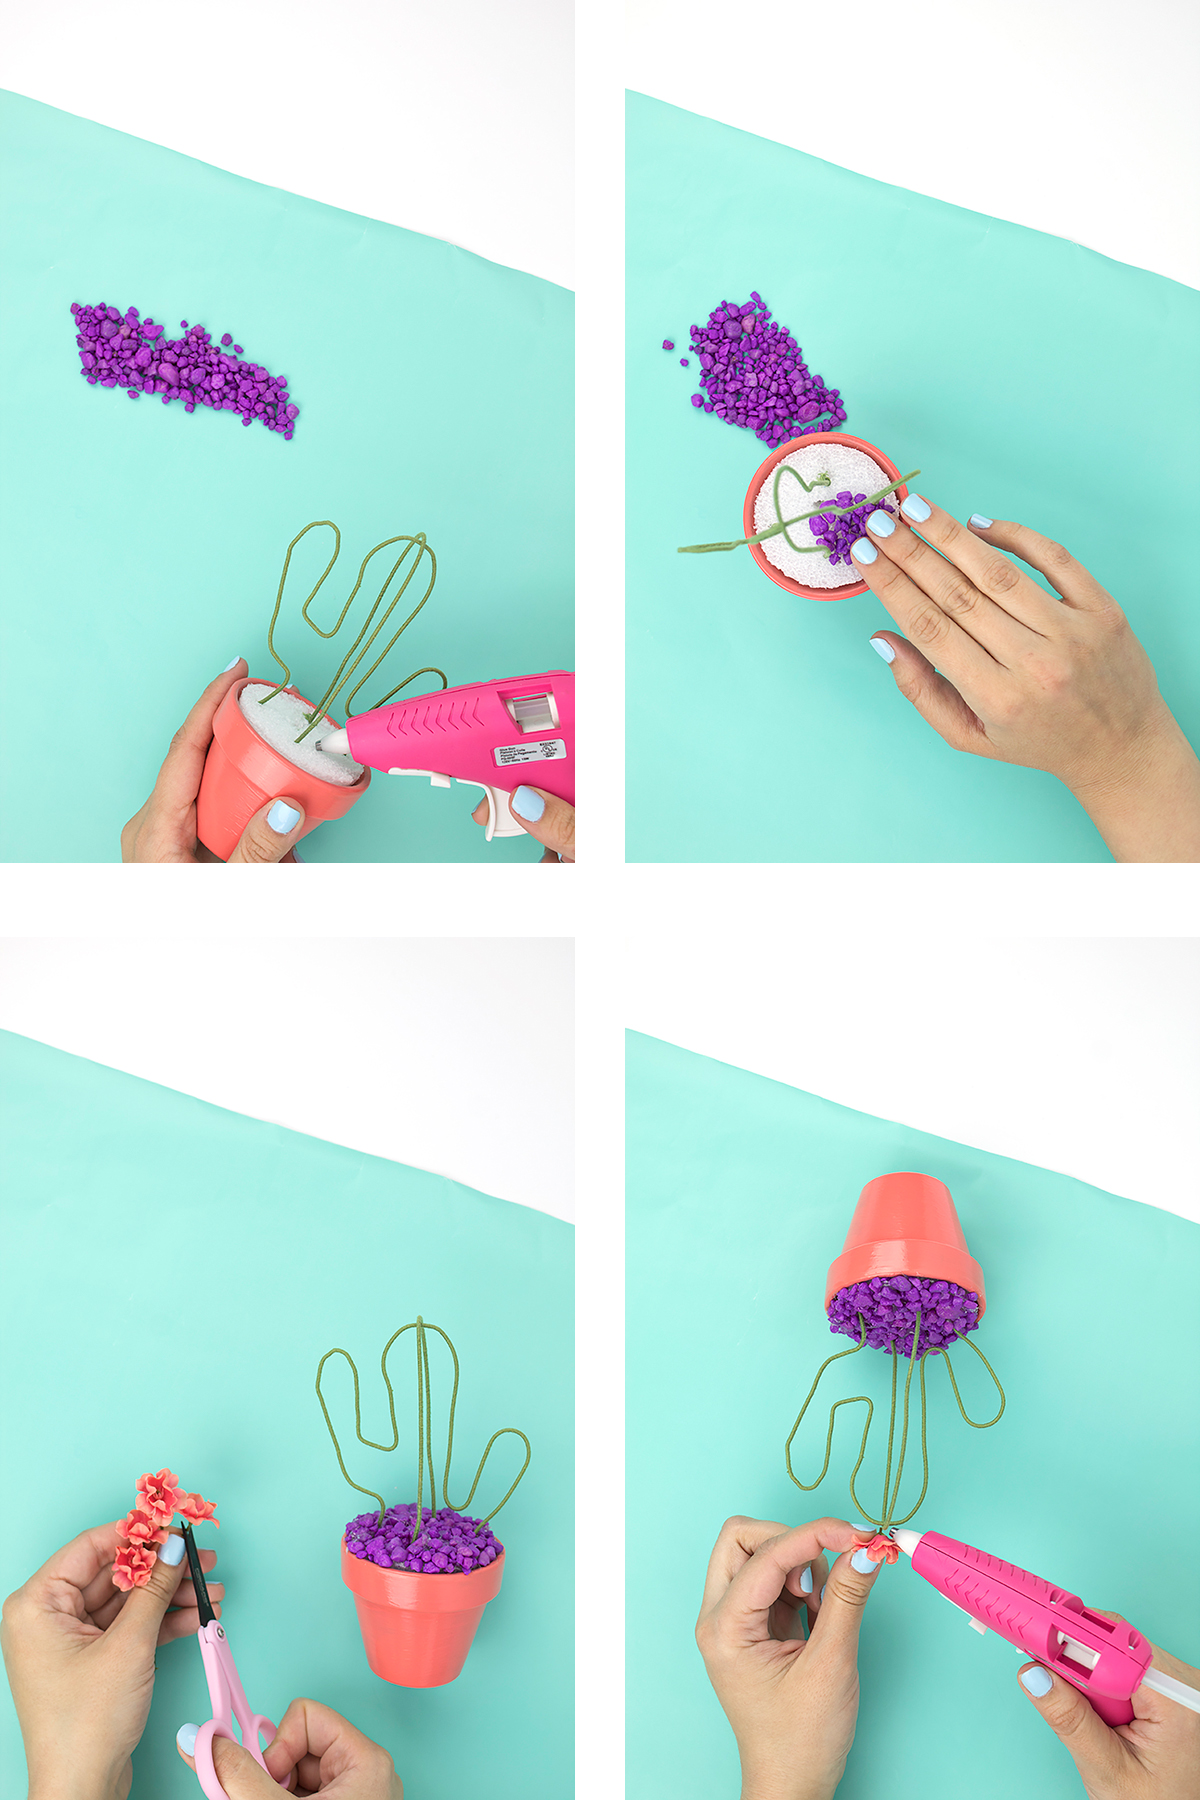
Once you are happy with the placement of your wires, you’re ready to add the rocks! 

  1. Using your glue gun, add a small patch of hot glue in the center of your cactus. 
  2. Cover your glue with a hefty handful of rocks. Press them into the glue gently. 
  3. Give it a moment, then tilt the plant to get rid of any excess rocks that are not glued on. Repeat until your styrofoam is covered. 
  4. Note: for the large cactus, I had to remove one side to create a hole big enough for my hand. Just make sure you remember to put it back before you cover the whole thing up :)
  5. Add a few small flowers on your wire to dress up your cactus. 
Do you somehow kill all your plants like I do? In an effort to save the plants, I’ve decided I’d better stick to fake plants from now on. So, I decided to make these little beauties! This wire cactus is perfect for your home. Click for the full…

Artwork can be found here and blocks DIY can be found here.

Do you somehow kill all your plants like I do? In an effort to save the plants, I’ve decided I’d better stick to fake plants from now on. So, I decided to make these little beauties! This wire cactus is perfect for your home. Click for the full…

Love it! Here are some photos of the cacti in action at the Cinco de Mama party.

Do you somehow kill all your plants like I do? In an effort to save the plants, I’ve decided I’d better stick to fake plants from now on. So, I decided to make these little beauties! This wire cactus is perfect for your home. Click for the full…

This plant is perfect for those of us who don't have a green thumb. You can make them as big or as small as you'd like, in any color you want. You could probably even use pipe cleaners if you wanted to! 

So, what do you think of this wire cactus? Perfect for your home, or do you prefer real plants? Let me know in the comments below!

Hey Girl: Ryan Gosling Gender Reveal

This just in: we are having a GIRL!!!! Holy poop you guys, I am seriously shocked. I was CONVINCED we were having a boy, but I also knew I was going to be wrong. I told John many times "I think it's a boy, but I also think they're gonna tell me it's a girl and I'm gonna be wrong." But I was so sure baby was a boy I made them double check. Hah! Nope... she's a girl! Hilarious, because I’ve had two dreams about the baby’s gender and both times it was a girl. And both times I asked the person who told me in the dream “are you sure?!” I really thought the baby was a boy! 

Now, let's talk about this quirky gender reveal! My friend at work was on vacation and wanted a fun "gender reveal" after my appointment so I searched for "girl" on my memes keyboard (my favorite add-on, by the way!) and Ryan Gosling came up. So, I thought that was pretty funny and I sent it to her. She loved it, so when it came to telling everyone at work, I made these delicious cookies (in pink, of course!), and added a picture of Ryan Gosling next to them. And that my friends is where I got this genius idea for a party!

Hey Girl: Ryan Gosling Gender Reveal

This theme is absolutely perfect for a gender reveal where at least one person knows what the gender is (especially the mom) but I also think it would make a FANTASTIC baby shower theme!! At that point everyone knows the gender anyway, so it wouldn't ruin the element of surprise. It's definitely never been done before, so your friends won't be bored of the same old, same old!

*Note: This post contains affiliate links

Hey Girl: Ryan Gosling Gender Reveal

Free Printables!

I created some unique printables for this party (inspired by these awesome invites!) that you can easily download and print to decorate, invite people, etc. The best part is that they're totally FREE! Not many things you can say are free these days, but this would actually be a super affordable baby shower. To get the free printables, just fill out the form below!

The Party Setup

Hey Girl: Ryan Gosling Gender Reveal

Let's talk about this super easy setup! I gathered up alllll the pink items I had around my house to make this an affordable party. I used some leftover plates from New Year's Eve, as well as some super cheap frames I had on hand. These were from Walmart but you could honestly use any frames from around your house to save money, or buy super cheap ones and give them out as favors. I know I have Ryan Gosling's photo up in my office now! I mean, he's wearing a suit so it's super inspirational for success, right?

Hey Girl: Ryan Gosling Gender Reveal

I bought a pack of white card stock and used it for all the printables. I made the small circles 1" and the large ones 2" so you can use paper punches to quickly and easily cut these out! I have this and this paper punch and they worked perfectly. Then, I used a paper cutter to cut out the invites and other straight-edge things so they were nice and neat. Although it may seem like a silly expense, I've used this paper cutter countless times. I guarantee that if you own it, you'll find tons of uses for it! 

Hey Girl: Ryan Gosling Gender Reveal

For the place settings, I kept it super duper simple with black and white striped napkins and a printed postcard on top. People can tape this postcard up in their house, take pics with it at the party, or just recycle it afterwards. Easy peasy! To create the cupcake picks, all you need are those paper punches I mentioned above and a toothpick. You can either tape it on, or glue it. You can make it single-sided or double-sided. You can also arrange them in a line with skewer sticks for a cake topper, or add them to drink stirrers or straws like I did. They'd also make great embellishments for a favor box or with a tiny hole punched into them as a gift tag for favor bags!

Hey Girl: Ryan Gosling Gender Reveal

Part of the fun of the "hey girl" quote is what comes after it. I had a little fun and created a letter board message about my sweet little daughter. Honestly can't even believe I can say that! I'm going to have a daughter. Pardon me while I go wipe away these tears... 

Affordable cupcake stands are super easy too! I had these plastic cupcake stands left over from my ornament making party and I turned them upside down to hold these tiny cupcakes. Btw- these are store-bought cupcakes. I scraped off the frosting and piped on my own tinted store-bought frosting! It took a couple of tries and they clearly aren't perfect, but honestly they did the trick. I just recommend getting some new cupcake liners to go over the old ones, because they do kinda separate off the cupcake for some reason. These mini pink "stands" are actually just paper baking cups that I've had forever and never used. They were too big for these teeny little cupcakes, but they were great as stands!

Hey Girl: Ryan Gosling Gender Reveal

Now, let's talk about those cookies! The recipe uses cake mix, so they're super soft and fluffy. I made them for work and everyone was raving about how good and different they were. Best of all, they're super cheap and easy to make! I just used store-bought white cake mix and pink food coloring. I piled them up on top of a cake stand that, again, was left over from a blog post!

Hey Girl: Ryan Gosling Gender Reveal

For another easy decor piece, I used my lightbox sign and added a sonogram of my tiny girl. I know some people find sonograms weird and creepy (um, ok...) but I think that when it's your child it's the most amazing thing. Like... she has the cutest up-turned nose and you can even see her teeny little heart! Pure magic.

Hey Girl: Ryan Gosling Gender Reveal

To decorate the area above the table, I placed a bunch of paper fans I had laying around. I really thought I had more pink ones than I did, but most of them were a dark hot pink since they were for Halloween and Christmas posts. Had I realized, I probably would have ordered a set of pastel fans to have a nicely mis-matched set!

Hey Girl: Ryan Gosling Gender Reveal

Either way, I’m so excited to finally know more about this little baby and to buy some baby clothes. Now that I know, I can’t wait to get started on the nursery and some fun DIY projects for baby! Plus endless matching “mommy and me” outfits.

Hey Girl: Ryan Gosling Gender Reveal

Don't forget to download your printables and create your own Ryan Gosling themed gender reveal or baby shower! It felt very "teenage stalker obsessed with a celebrity" as I was creating the party setup, but it's so much fun. 

So, what do you think about this idea for a gender reveal or baby shower? Now I want to do a whole bunch of amazing, uniquely-themed baby showers. What weird theme would you do? Or is this JUST what you were looking for? Let me know in the comments below!

DIY Rainbow Alphabet Blocks

Call it a mother's intuition but I made this project before I even knew I was pregnant! I wanted them for an Instagram challenge I have since put aside, but hey... they're pretty cute and I've used them for a few blog posts already too! You probably saw them make a cameo in my Easter party post, my baby post and my Painted Notebook post. They're too awesome (and useful) to resist. Find out how to make a set for yourself!

Colorful rainbow alphabet baby blocks? Yes please! Find out how to make a set for yourself. Click for the full how-to!

Disclaimer: I do not have children, and therefore I do not know what age this would be for. I’m going to say 3+, but please use your discretion! Mine will be mainly for decorative purposes. I don’t want any children getting hurt with toxic paint or swallowing a loose letter. Please use caution when giving this project to children!!!

You will need:

1.5" blocks (here)
Painter’s tape 1 inch (here)
Paint in your choice of colors (similar here)*
Wood letters (from Michael’s, similar here)
Paintbrushes (similar here)
Super glue or wood glue (here)
Newspaper or similar to cover workspace

*My colors were Martha Stewart Pink Dahlia, Apple Barrel Pink Parfait, Martha Stewart Wild Salmon, Martha Stewart Yellow Jacket, Martha Stewart Diving Board, Apple Barrel Parrot Blue, Apple Barrel Bimini Blue, Craft Smart Grape Taffy

Directions:

Colorful rainbow alphabet baby blocks? Yes please! Find out how to make a set for yourself. Click for the full how-to!
  1. Pick the colors for your paint, and decide on whether you want a pattern. I wanted to do a rainbow, so I assigned each letter a color and counted out how many of each block I needed from that.

  2. Find the best side of your block to be the front, and add tape to the center as a “stripe”. I did this on two sides so that I would have the ability to add extra letters or something else to the back. Or at least, if gave me an extra option in case one side looked funky!

  3. Once you’ve taped a few (or all) of your blocks, begin painting them. Each round, I painted the “front” of the block with two stripes, 2 sides full color, and the “back” with two stripes. I did the stripes first, then the sides, and went and did a second coat on the stripes before letting it dry.

  4. Peel your tape off your blocks and save it for round 2. Make sure your blocks dry fully before doing round 2!

  5. While your blocks dry, start painting your letters. I did the front and all the sides with a few coats.

  6. Take your tape, and reposition it on the sides with the stripes, this time going the other direction to form a “border” of color around the edge. Paint the stripes on the front, back, and opposite sides. And let dry fully.

  7. Glue your letters into your blocks and let dry according to directions.

Colorful rainbow alphabet baby blocks? Yes please! Find out how to make a set for yourself. Click for the full how-to!

Alternatives:

  1. For a safer alternative, you can paint or stamp the letters onto the blocks so that there is no choking hazard

  2. Instead of matching all the blocks and letters, try mixing them up or color blocking with different shades of the same color! I tested that below.

  3. Add stamps to the sides of the blocks for extra learning fun!

  4. Add numbers for a complete block set

Colorful rainbow alphabet baby blocks? Yes please! Find out how to make a set for yourself. Click for the full how-to!

Ahhh! I mean, how stinking cute are these!? They'd also be really cute as decor with just the letters of your baby or child's name. I love love love these! Are you planning to make a set for your kids? Let me know in the comments below!