DIY Confetti Gift Tags

If you're anything like me you've left gift wrapping (and shopping!) to the last minute. Well, don't you worry- I've got just the thing for you! These gift tags are so easy to make, and they're fun and interactive!

These Confetti Christmas Gift Tags are just what you need for your gifts! Click for the full how-to. #diygifttags #giftwrapideas #diychristmascrafts

They're colorful, adorable, and festive! You can find the full directions on Giggles Galore.

These Confetti Christmas Gift Tags are just what you need for your gifts! Click for the full how-to. #diygifttags #giftwrapideas #diychristmascrafts

So head over to Giggles Galore, grab your supplies, pop on a Christmas movie, and let's start making them!

DIY Paper Fan Christmas Tree

Merry (almost) Christmas! I'm trying to add some fun color to my decor this year! I wanted something really simple that had a great impact. It's no secret that I love paper fans, so I figured they would be the perfect focal point for my ornament making party! I teamed up with Oriental Trading to get all the supplies I needed. This DIY only takes a few minutes to put up, and it can be used again and again. It would look really cute starting lower and being a photo prop or even as a Christmas tree alternative for a small space. Let's get started!

*This post was sponsored by Oriental Trading. All projects and opinions are my own.

This DIY backdrop only takes a few minutes to put up, and it can be used again and again. It would look really cute starting lower and being a photo prop or even as a Christmas tree alternative for a small space. #paperfans #partybackdrops #christma…

You will need: 

This DIY backdrop only takes a few minutes to put up, and it can be used again and again. It would look really cute starting lower and being a photo prop or even as a Christmas tree alternative for a small space. #paperfans #partybackdrops #christma…

Paper fans (pink, red, blue, light green, dark green)
Tape
Stapler
string or similar

Directions

This DIY backdrop only takes a few minutes to put up, and it can be used again and again. It would look really cute starting lower and being a photo prop or even as a Christmas tree alternative for a small space. #paperfans #partybackdrops #christma…

1. Grab a few different colors and sizes of your paper fans. Lay them out on a floor, table, or other large surface.

This DIY backdrop only takes a few minutes to put up, and it can be used again and again. It would look really cute starting lower and being a photo prop or even as a Christmas tree alternative for a small space. #paperfans #partybackdrops #christma…

2. Open each paper fan and thread the string through the hole at the top. Then, place a small staple just under the hole. I know that the paper fans come with double sided tape, but sometimes it doesn't stick well, and better yet, this method allows you to re-use them! Reduce, reuse, recycle :)

This DIY backdrop only takes a few minutes to put up, and it can be used again and again. It would look really cute starting lower and being a photo prop or even as a Christmas tree alternative for a small space. #paperfans #partybackdrops #christma…

3. Start arranging your fans into a tree shape, starting at the bottom. I tried a few different color combos, and I found that using a pattern was better than going totally random. My pyramid (starting from the bottom) went 3 large fans, 1 large 2 medium, 3 medium, 2 small 1 medium.

4. Once you like your shape and color combo, take a string and roughly measure up the height of the tree and cut. I found that a pair of headphones I had was the exact height of the tree. You might be wondering, why are we doing this? We are using this string as a guide so we can make sure the tree is centered where we want it, and so that we can maintain the right distance between the levels! It's hard to tell when it's laying on the floor, and you don't want to tape everything up and realize it's all wrong.

5. Tape up your guide string, and take a look to make sure it's in the right place and the right height for your space. I placed mine high because I wanted it to be a backdrop for a table. 

This DIY backdrop only takes a few minutes to put up, and it can be used again and again. It would look really cute starting lower and being a photo prop or even as a Christmas tree alternative for a small space. #paperfans #partybackdrops #christma…

6. Starting at the bottom center, tape your first fan, making sure to move the guide string out of the way. Then, tape the next 2 on either side. I fit mine "together", like a zipper, since the pieces went into each other. This made the shape tighter and neater.

7. Go up the rows, adding the center fan and moving outwards. I also tried to cover the hanging string and cardboard of the one below whenever possible. Remember that the shape you created on the floor was an estimate. When you get it up on the wall, it might not look quite as good as it did on the floor. I ended up switching out the top levels and liked the shape much better.

8. You can add a star at the top, or even some small ornaments, like these holographic paper ornaments or quirky animal ornaments if you wanted to decorate it a bit.

This DIY backdrop only takes a few minutes to put up, and it can be used again and again. It would look really cute starting lower and being a photo prop or even as a Christmas tree alternative for a small space. #paperfans #partybackdrops #christma…

I think this backdrop is a great, easy addition for any holiday party! If you wanted to save some money, pick two main colors and alternate them for each row. You can also add a stem/base if you want, but mine would have interfered with the chairs so I left it off. Christmas is fast approaching, so head on over to Oriental Trading now to place your orders!

This DIY backdrop only takes a few minutes to put up, and it can be used again and again. It would look really cute starting lower and being a photo prop or even as a Christmas tree alternative for a small space. #paperfans #partybackdrops #christma…

How do you plan on using your tree? Christmas tree alternative? Door decoration? Photo Booth backdrop? Kids room decor? Let me know in the comments below!

DIY Animal Sweater Ornaments (Perfect for Mini-Trees!)

It's beginning to look a lot like Christmas! While I usually decorated in traditional red and green growing up, my dad got us a little 3-foot PINK tree one year. It was the cutest thing! We decorated it with a few small ornaments, and basked in its pretty pink glow. 

Although I don't think I could EVER get my husband to agree to a pink tree in our living room (unless I have 7 daughters, and we all take a vote!) I did get myself a tiny pink mini-tree for the attic. And this mini-tree needed some fun ornaments to go with it. I had stumbled upon this puppy ornament from Neiman Marcus while browsing Pinterest, and knew I needed to make my own version! A few days, 2 coats of paint, and some glitter later, I was ready with an army of festive little animals! The best part (aside from how adorably colorful they are) is that they're not breakable! Plus, you can make them in any color scheme you'd like. So, pop on a Christmas movie, grab your supplies, and get crafting!

You need these festive friends on your tree! The best part (aside from how adorably colorful they are) is that they're not breakable! Plus, you can make them in any color scheme you'd like. So, pop on a Christmas movie, grab your supplies, and get c…

You will need:

Plastic animals (here and here)
Acrylic paint (here)
Felt (similar here)
Screw eyes (similar here)
Glitter (here)
Toothpicks
Gluegun
Scissors
Pliers
Embroidery floss (similar here)

Directions:

You need these festive friends on your tree! The best part (aside from how adorably colorful they are) is that they're not breakable! Plus, you can make them in any color scheme you'd like. So, pop on a Christmas movie, grab your supplies, and get c…

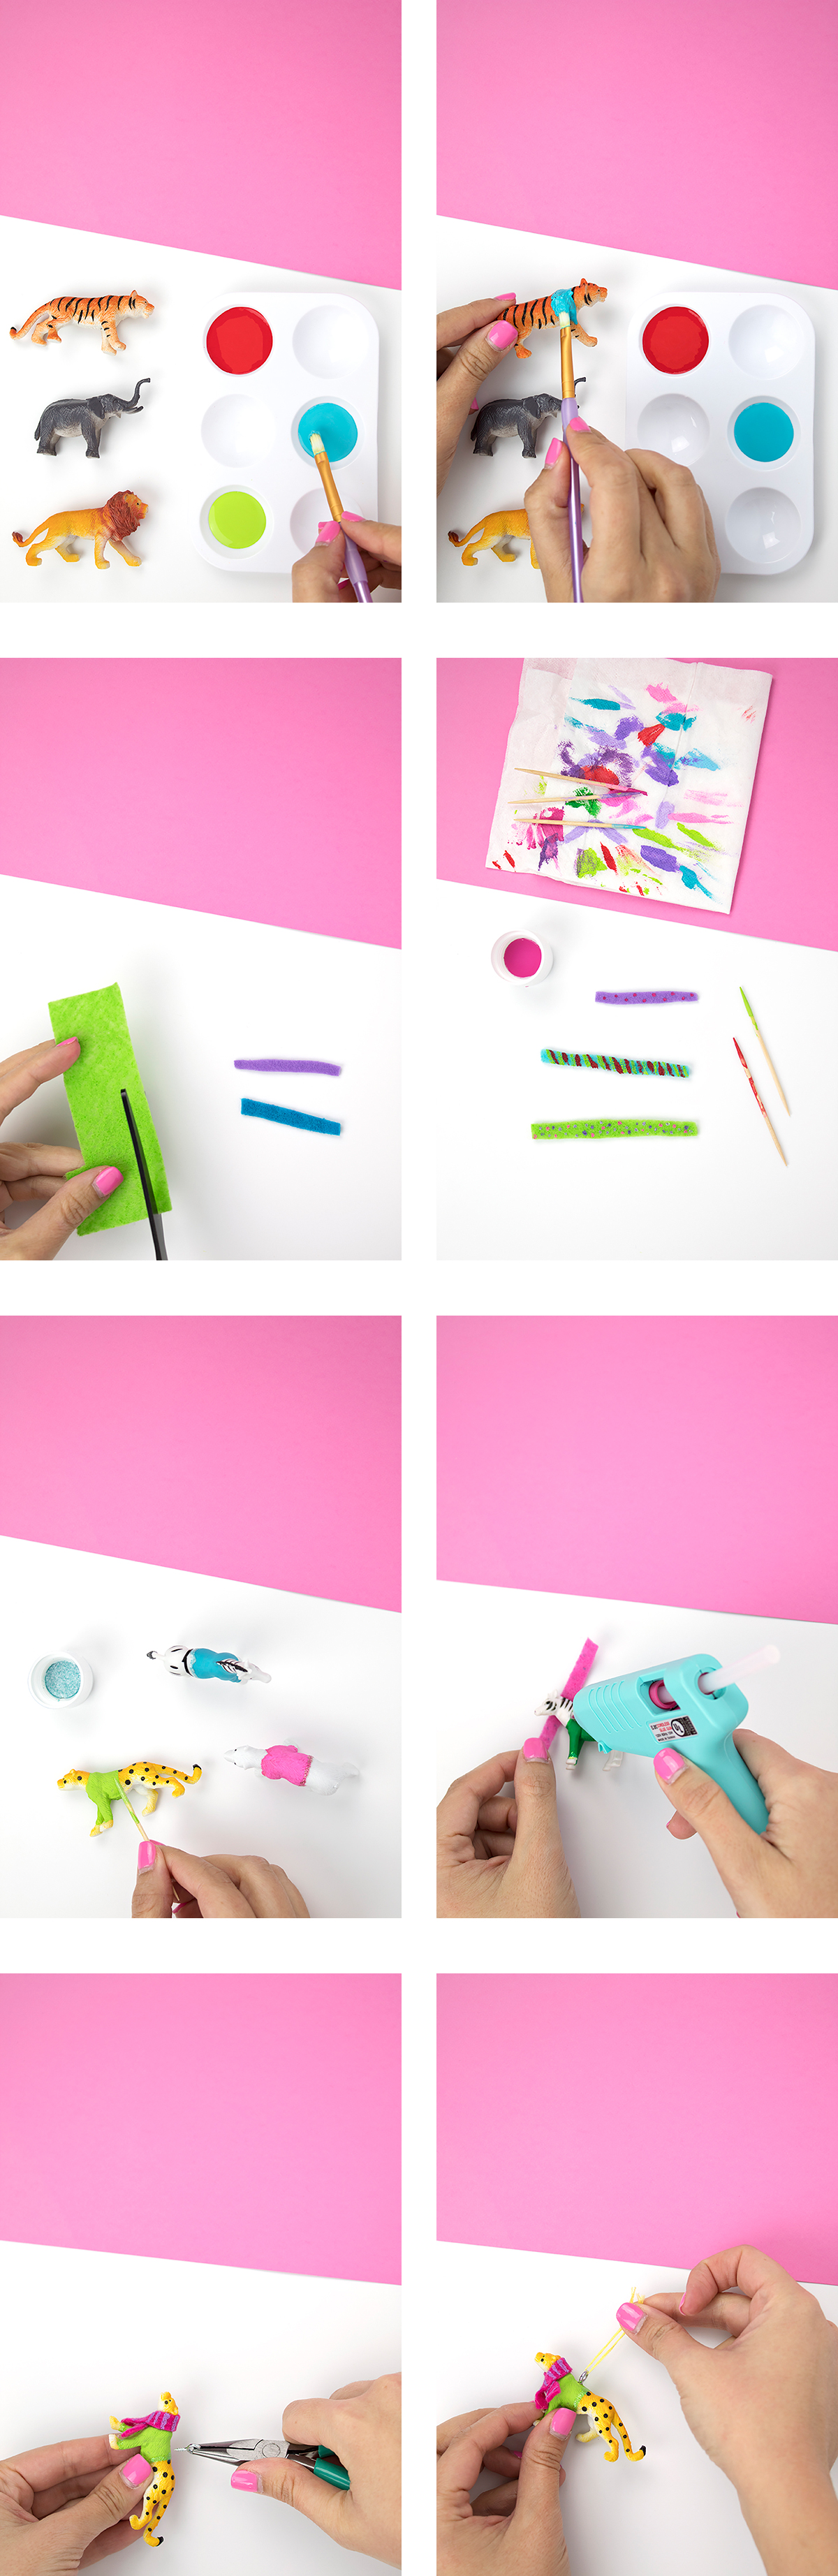
1. Paint a sweater onto your animals using your acrylic paint. I did it freehand, but you can always use some artist's tape if you don't have a steady hand. I did 2 coats.

2. While they dry, cut a few thin strips of felt for the scarf. Try to be mindful of how large the animals' necks are in comparison to the length and width of the scarf.

3. Paint your scarves with either a thin paint brush or a toothpick. I used the pointy side for the polka dots, and the edge for stripes. I used a paintbrush for the thicker stripes, but overall I mostly used toothpicks.

4. Once the animals are dry, add glitter to the edge of the sweater to jazz it up and provide a clean edge. I used glitter paint, but you can achieve a similar look by using a small amount of equal parts glue and glitter to create your own paste/paint. I found that a toothpick was the perfect tool to get the glitter paint on in a thin line.

5. Glue your scarf in place. I used a small dab of hot glue on the scarf to shut it. If it moved around too much, I added a small dab of glue on the animal to secure it in place.

6. Using your pliers, screw the screw eye into place. I first took the pointy screw side and twisted in to make a small hole, then I used my pliers to twist the screw eye into place. When it gets to a point that it's mostly in, I recommend using your hand to twist it all the way in, so that your pliers don't scratch the paint.

7. Add a small piece of embroidery floss to hang.

You need these festive friends on your tree! The best part (aside from how adorably colorful they are) is that they're not breakable! Plus, you can make them in any color scheme you'd like. So, pop on a Christmas movie, grab your supplies, and get c…

Dinosaur ornaments!! I mean, how stinking cute are these?! I know that dinosaurs could never exist among the other animals, but maybe a sweater and a cute scarf could have saved them from extinction.

You need these festive friends on your tree! The best part (aside from how adorably colorful they are) is that they're not breakable! Plus, you can make them in any color scheme you'd like. So, pop on a Christmas movie, grab your supplies, and get c…

How cute are these ornaments?! This has become one of my favorite and most fun projects to make on the blog! I really love re-purposing little animal toys, as exhibited by my Circus Animal Drink Stirrers and Zebra Party Tray. You can also use larger toys for a regular-sized tree, but these were perfect for my tiny pink mini-tree! Oh, and did I mention that they make a great necklace? Because they do!

You need these festive friends on your tree! The best part (aside from how adorably colorful they are) is that they're not breakable! Plus, you can make them in any color scheme you'd like. So, pop on a Christmas movie, grab your supplies, and get c…

Will these ornaments be joining your tree this year? Or, perhaps your kids' tree?! Let me know what you plan to make in the comments below!

DIY Holographic Ornament Tags

Every year at Christmas, I always think back to Christmas when I was a kid. There was something magical about the holiday season back then. I distinctly remember Christmas feeling different. There was an anticipation in the air, like anything could happen. The magic of Santa, the warmth of your home, the mystery surrounding the gifts you would receive… it was exhilarating. This year, I wanted to make something that commemorate the amazing childhood Christmases that I had. The iridescent effect on these ornaments is super 90’s, while also being modern. Holographic items are coming back! These are relatively cheap to make in bulk, so you can make them for all your gift tags, to decorate a tree, or to create a Christmas banner. Give them to all your friends who love the 90’s as much as you do!

The iridescent effect on these ornaments is super 90’s, while also being modern. Holographic items are coming back! Give them to all your friends who love the 90’s as much as you do! Click for the DIY. #diychristmasornaments #diygifttags#diychristma…

You will need:

Colored cardstock (similar here)
2.5 inch circle punch (similar here)
Holographic paper (similar here)
Scissors (here)
Embroidery floss (similar here)
Glue Stick
Glue gun

Directions:

The iridescent effect on these ornaments is super 90’s, while also being modern. Holographic items are coming back! Give them to all your friends who love the 90’s as much as you do! Click for the DIY. #diychristmasornaments #diygifttags#diychristma…

1.     Cut out circles with your circle punch.

2.     Cut a trapezoid shape out of your holographic paper and a white or light colored backdrop. You’ll need one for each ornament you make.

3.     Cut a “shine” shape out of the holographic paper (not the backdrop paper). I made an L shape with a curve to finish off the triangle.

4.     Using your glue stick, glue the large edge of the trapezoid onto the top of your ornament. Add glue to the holographic trapezoid, and glue it on top. Finally, add glue to your shine and put it with the flat edge facing down.

5.     Using your glue gun, secure your hanging ribbon or embroidery floss. I made mine short and cute, but you can make it any length you need!

6.     Hang on your tree, a gift, or make a garland and you’re ready to go!

The iridescent effect on these ornaments is super 90’s, while also being modern. Holographic items are coming back! Give them to all your friends who love the 90’s as much as you do! Click for the DIY. #diychristmasornaments #diygifttags#diychristma…

You can add names to the front or the back of your tag if you wish, or you can add a simple monogram using a sticker. I kept the front of mine plain because I thought they looked so cute! I love tilting mine back and forth to see the iridescent effect!

The iridescent effect on these ornaments is super 90’s, while also being modern. Holographic items are coming back! Give them to all your friends who love the 90’s as much as you do! Click for the DIY. #diychristmasornaments #diygifttags#diychristma…

How do you plan to use your holographic ornaments? Let me know in the comments below!

Make a Statement: The Shop is LIVE!

EDIT: The shop is now closed. Read more here.

YOU GUYS! Remember back in October when I relaunched the blog as Party HarDIY? Well, I told you there were some big plans in STORE (hah, see what I did there?) and I’m sooo excited to announce the launch of our shop! I’ve always wanted to have my own shop full of cutesy things, and I’ve always had a love of jewelry! Well, now the two have come together in one magical, glimmering place.

Flower Necklace Yellow.jpg

So, what’s available?

A collection of unique and colorful jewelry, sure to add a pop of color to any outfit! The holidays are coming, and these pieces are perfect for adding some sparkle to your outfit, a fun touch of Christmas colors, or to change up an outfit that’s already been worn a bunch of times! Because let’s be real, these pieces are WAY cheaper than buying a new dress!

Um… Tell me more about this collection!

Well, ok! This all started back when I was in my favorite jewelry shop in the city. I thought, wouldn’t it be great to have a collection of fun and colorful necklaces that are affordable? There are SO many expensive jewelry shops out there, and my opinion on costume jewelry is the more, the merrier. So, I decided to curate my own collection of fun, bold, and most of all BRIGHT jewelry. There will also be some new items coming to the shop as well, but for now I decided to start small for the holiday season!

Red Tassel xmas.jpg

Where did your love of jewelry come from?

My grandma! My yiayia had the most insane collection of costume jewelry. I don’t think I ever saw her wearing real jewelry, haha! She had a bunch of bold necklaces and earrings. Fun fact- her ears weren’t pierced! She only owned clip-ons. Here's a picture of us when I was a kid. She's dressed very on brand, and I'm the one in the tutu. I took ballet for a hot minute, but I was AWFUL at it.

Grandma Inspo.jpg

Um… am I brave enough to wear this stuff?

YES! I used to be shy about wearing bright things too. I finally realized that it’s fun to be bold and daring. People notice! I get compliments on my jewelry all the time, and in a sea of people, it’s fun to stand out a bit. You can always start small with a pair of colorful studs!

Blue Square Earring auto.jpg

Ok, you’ve convinced me! What do I even wear this stuff with?

My very favorite thing to wear bold jewelry with is a basic tee! It’s really adds a pop of fun and sass to an otherwise casual item. Try pairing the Daisy Dreams Statement Necklace or the Fringe Benefits Earrings with a basic tee. Another great way to wear these is with a Christmas sweater! Try the Rudolph the Red Nosed Rhinestone Tassel Earrings with your ugly Christmas sweater, or the Worth The Tassel Earrings with a warm, cozy sweater! Heading to a holiday party? Try the Chic-a-Boo Rhinestone Earrings for some added glitz and glam, or the Dragonfruit Dilemma Earrings for a fun, unexpected touch.

Dragonfruit Earring Pink.jpg

Can I get free items?

Um, heck yea!! I’m hosting a giveaway! To enter, follow the instructions on this post on Instagram. Tag a friend for an extra entry! One winner will get all 4 jewelry ornaments- perfect for giving out as Secret Santa gifts, hanging on the tree, or keeping them all for yourself!

DIY Jewelry Ornament 12.jpg

Eek! I hope you guys are as excited about this as I am! I've been working on this for MONTHS, and I'm so happy to see the store is finally live! So, go sign up for free shipping, and enter the giveaway!