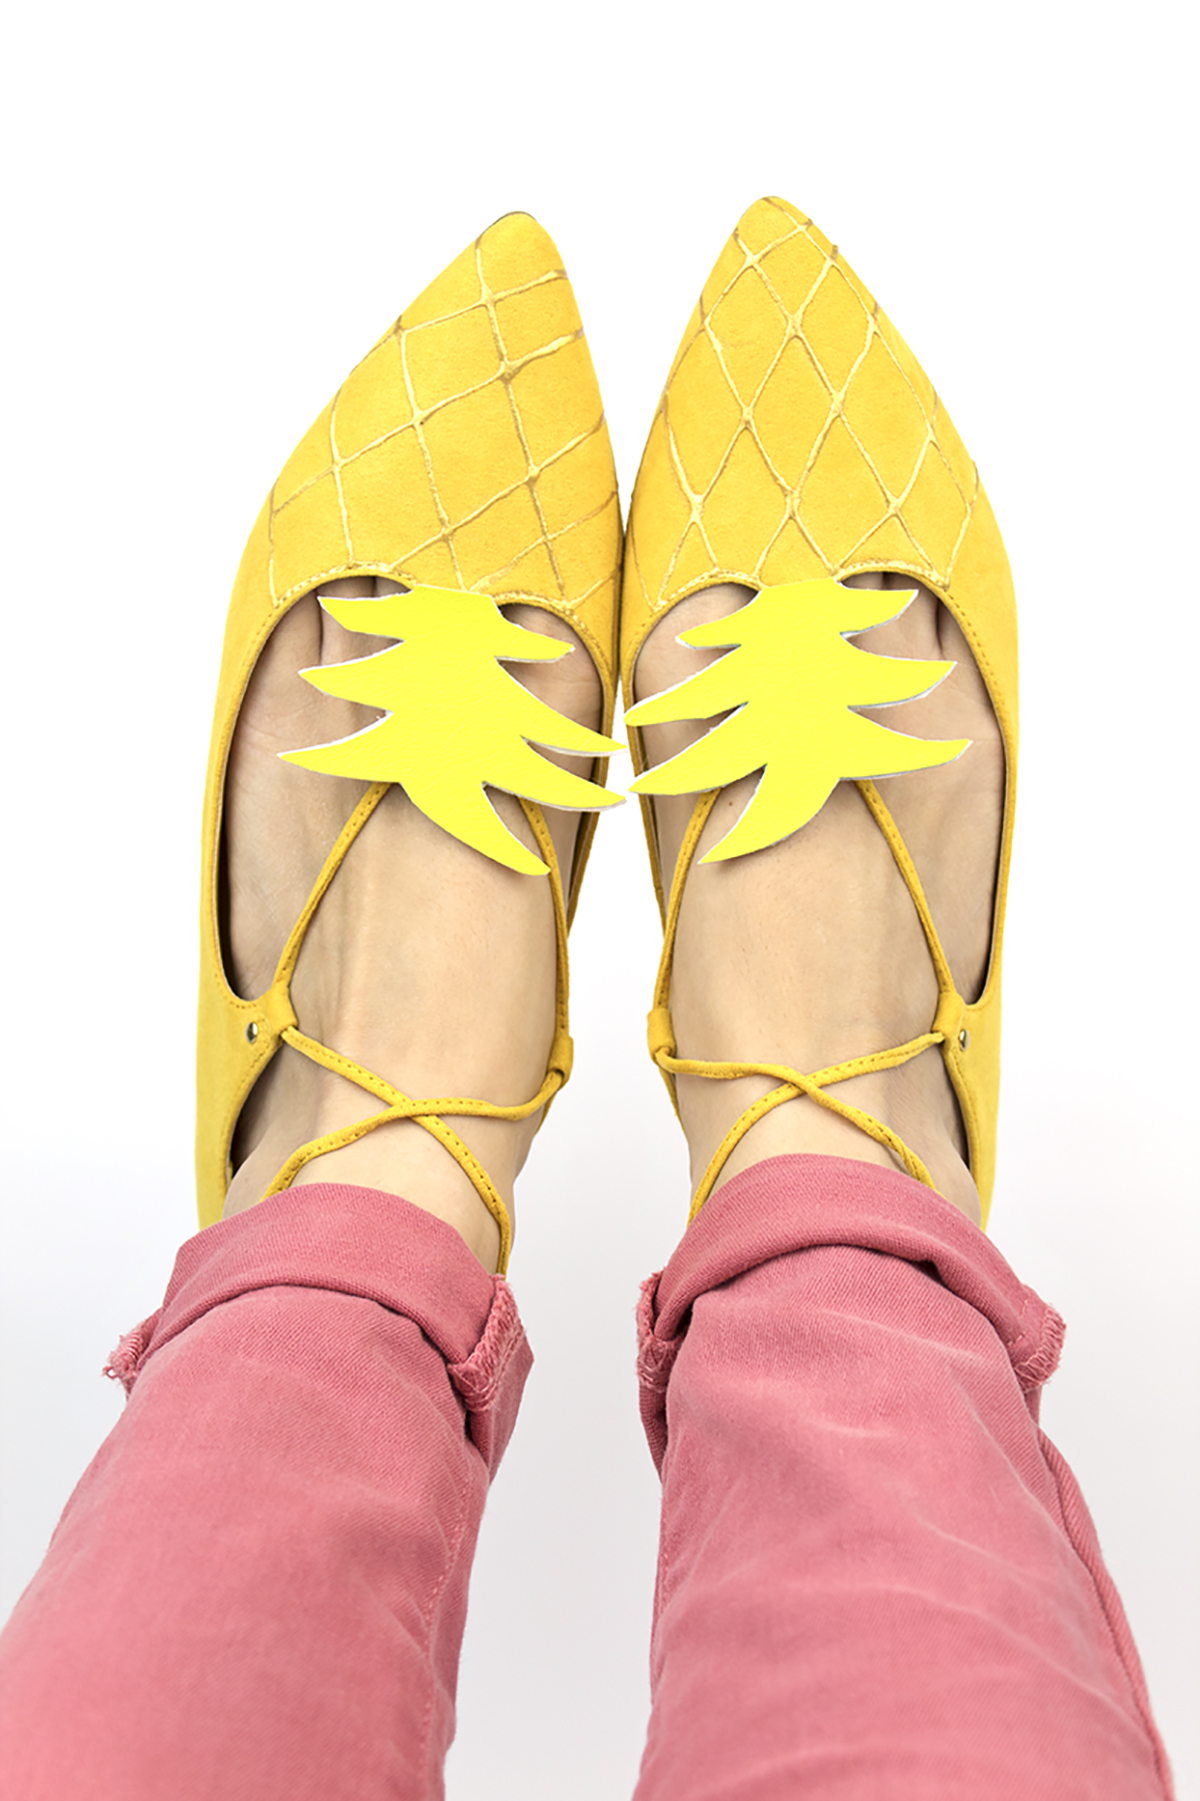
DIY Pineapple Summer Shoes

Happy Summer, everyone! I'm not sure what the weather has been like where you live, but here in NYC we've had muggy, spring-like weather for most of May and June. It's finally starting to get warm and sunny and summer-like! While warm weather and beach days are clearly the best part about summer (especially after a long NYC winter!) my other FAVORITE part is getting to switch up my wardrobe! I love adding in some of my summer staples, and kicking off my winter boots/rain boots and popping on some summer shoes, like flats and sandals. When it comes to summer shoes, I think the quirkier, the better. That's why I am head over heels in love with these pineapple shoes I made! They're the cutest and possibly most fun shoes I own (and I currently own a pair of sneakers covered in Barbie shoes!) I seriously cannot wait to wear them out and about. They're actually really easy to DIY yourself with a few craft supplies!

When it comes to summer shoes, I think the quirkier, the better. That's why I am head over heels in love with these pineapple shoes! Click for the DIY. #pineapple #pineapplediy #summercrafts

You will need:

Yellow Fabric Shoes (here or similar here)
Green Vinyl Fabric (I got mine from Joann Fabric)
Tailor's Chalk (here)
Gold 3D Fabric Paint (here)
Stiff Adhesive Felt (here)
Glue Gun
Scissors
Ruler

How to:

When it comes to summer shoes, I think the quirkier, the better. That's why I am head over heels in love with these pineapple shoes! Click for the DIY.

1. Using your tailor's chalk and ruler, create a grid pattern on your shoes. I used the top center of my shoe as the main point. 

When it comes to summer shoes, I think the quirkier, the better. That's why I am head over heels in love with these pineapple shoes! Click for the DIY.

2. Using your 3-d fabric paint, go over your chalk lines. I went section by section, since the paint would create gaps if the line was too long. Also, be careful of it spitting out a big glob of paint. If that happens, gently guide the paint away with the clean tip of the nozzle. Wipe the nozzle clean, and keep going.

3. Once your paint has dried for at least 24 hours, it's time to add the top! Draw a few pineapple tops on white paper and pick your favorite one. If you're not a good artist, find one online and print it out. 

4. Cut your pineapple top out and trace it onto your green vinyl (the back side). I wanted mine to mirror each other since they weren't exactly the same, so I flipped the paper stencil and traced it the other way. 

5. Cut out the pineapples from your vinyl, being as careful as you can. 

6. Cut out a small piece of felt.  Peel the adhesive lining off, put your pineapple top on it, and cut out. 

7. Using a glue gun, glue your pineapple topper to the shoe. Wear and enjoy! 

When it comes to summer shoes, I think the quirkier, the better. That's why I am head over heels in love with these pineapple shoes! Click for the DIY. #pineapple #pineapplediy #summercrafts

Oh, and if you're wearing a brand-spankin new pair of summer shoes, be sure to bring a backup pair in this handy Barbie Shoes Tote Bag

Ahh! Are you LOVING these shoes as much as I am?! What fruit would you want to wear on your feet? I'm thinking strawberry shoes could be another fun one! 

Wedding Planning Update- Just 2 More Months!

Wow guys… I am now at 59 days until my wedding!! I am so so soooo excited about everything and I’m so ready to marry my fiancĆ©. As my wedding day approaches, I can see it more and more vividly as all the moving pieces come together. Here’s a little bit more about what happened recently.

Just 2 more months until the wedding! This month we're talking Bridal Showers, Dress Fittings, and crazy emotions. Click for the full post!

Hair and Makeup Trial- Scheduled! 

In about 2 weeks I’m heading over to my venue, which is about 3 hours away, for my hair and makeup trial. I’m bringing my girls with me and we are spending the weekend there. I’m excited for them to see the venue for the first time! I already have an idea of how I want my hair to look, but I don’t usually wear makeup so I’m a little nervous I’ll look kinda… clowny. I trust the makeup artists, but I know my fiancĆ© likes my au naturale look, so I hope he likes my made up look too. 

Bridal Shower- Amazing! 

I had my surprise bridal shower a few weeks ago, and it was amazing!!! My mom and sister threw it for me, with help from my sister in law and my friends. They did SUCH an amazing job! I need to get some photos back from the ladies so I can do a blog post, but all we have is cell pics. Ha! I wish wish wiiiiish I had brought my camera with me that day. The shower was held at a local sweet shop, which has a really cute backyard garden. The party theme was a Disney Garden Tea Party. I loved the vintage accents my sister in law found at thrift stores, along with the teapot vases she painted. My mom made me a really cute lace umbrella, and I heard she was searching everywhere for the perfect one, which was really really cute. My sister made such cute invitations and signs, and they strung up pictures of me and John everywhere that made me cry! My dad even joined in and made a funny face-hole frame for us to take pics with. My friends got some really cute teacup tea light favors which were just perfect. The party flew by, and I was pouting at the end because I didn’t want it to be over! I can’t image how fast my wedding is going to go, but at least the quick bridal shower taught me to savor every moment.

Dress- Arrived!!!!

I was so excited to find out that my dress arrived about a month early! I went to pick it up and I made an appointment with a seamstress to have it altered. I’m really nervous about getting the alterations done, since it needs quite a few. I’m excited to see it on me nice and fitted, since the ones at the stores were all several sizes too big and had to be clipped like crazy. I’m going to attempt making my own veil, and may even do a blog post about it! And if it doesn’t work out…. then I gotta order one fast!

Suits- Purchased

Since our wedding venue isn’t too fancy, we decided a suit would probably fit the occasion better than a tuxedo. My fiance and his brother purchased their suits from Men’s Warehouse, where they were having a buy one- get one sale. Thank goodness for that, because the suits weren’t cheap!  We also picked up a belt & shoes for my fiancĆ©, as well as a tie. I’m not sure I like the tie, but he does so I’m trying to be open minded. How much does a tie really need to match the theme? We shall see…

Car- Rented 

Since we have a whooooole lotta stuff to carry to our venue, and our car is on its last legs, we decided to rent a larger vehicle for the weekend. We have to take at least 2 people with us too, so we need to have room for them, all our luggage, and my giant wedding dress bag. Even though we didn’t want to spend the extra money, it really seemed like a good investment so we would have the space and peace of mind. 

Just 2 more months until the wedding! This month we're talking Bridal Showers, Dress Fittings, and crazy emotions. Click for the full post!

Emotions- Running High

Um, yea things are just a liiiitle bit emotional lately! I find myself crying over things really easily (mostly happy tears, thank goodness!) and I’m getting a bit overwhelmed about getting everything done in time. Blogging & working & wedding planning all alone is pretty darn stressful. But, planning is something I enjoy so I’m going to get this done! I’m also trying to remember that although the wedding is the end goal, I need to enjoy the last few months of planning, since it’ll (probably) never happen again. At least until someone else gets married, or I decide I want a vow renewal ceremony :p


Need to do:

Follow up on RSVP's- There's only about 10 days left to RSVP and we got about 15 cards back haha! So, we need to follow up with everyone to get their RSVP, and to make sure that they booked their rooms at our special wedding rate. I don't think people realize that the rooms will cost twice as much if they don't book before the deadline, which is in just a couple of weeks! 

Finalize all purchases- We spent this past weekend ordering a whole bunch of things, so I want to go through the list and make sure we ordered everything else we need for the wedding. Amazon Prime has been by BFF through all this, but for anything that isn’t coming from there, we need to order it soon.

Crafting Party- I want to host a crafting party with my besties so we can get some projects done for the wedding. I did a blog post about it, so this time I want to do an actual one! It’ll be fun to get together and get stuff DONE.

Create Day-of Schedules- Since the day before and day of the wedding are going to be hectic, I wanted to create a schedule and a plan for everyone with where they need to be and when, and exactly what’s going on. I tend to get stressed and the thought of everyone texting me for locations or asking me what’s happening when is a bit terrifying. I really want to hand off my phone on the wedding day and know that everything will be taken care of.

Bachelorette Party- WOOHOO! My sister is finalizing the date and plans for my bridal shower, and I’m really excited to see what we do! I can’t believe everything is flying by so quickly and we are already at this point, but at the same time that means the wedding day is nearly here, and that’s the very best part. Y’know, besides the whole happily ever after thing!

If you want to learn more about planning a Pinterest worthy party, be sure to sign up to get your FREE Anatomy of a Pinterest Worthy Party guide! It's full of helpful hints on how to pick a theme, the little details that will make your event unique, and tips to take great photos of your event. And, there's even a checklist so you don't forget anything! So what are you waiting for? Get yours now!

Overall, I think things are moving at a steady pace and going well. But, that could all change very quickly! Do you guys have any tips for making sure nothing falls through the cracks? How did you wrap everything up at the last minute? Anything to add that I might forget until the last minute? Let me know in the comments below!

Bridesmaid Brunch Craft Party Ideas

Let's get real here: wedding planning isn't exactly as glamorous as you imaged it to be. There are a lot of moving parts, tons of decisions to be made, and a whole lot of DIYs you want to try. Planning a wedding kind of becomes a part time job, except you're spending money instead of making it. So, rather than spending your weeknights filled with tears crafting 100+ favors, why not invite your friends or bridesmaids over for a fun crafternoon?! You can pop a bottle of rose, have some finger foods, and take bets on who's going to cry during the ceremony (like your Aunt Bertha, who cries over everything). 

Wedding planning got you down? Take a (short) break and invite your friends over for a crafting brunch party! It's super affordable with Oriental Trading. Click the photo to learn more!

Since you're already spending a ton on wedding related things, I know what you're thinking. You don’t need one extra thing to spend a ton of cash on. Well, fear not my friends! Oriental Trading is your party headquarters, and everything is SO affordable! With their new Marry Me section, you'll find all their wedding-worthy supplies in one place, for a great low price. They've got everything you need for the bridal shower, the ceremony, reception, and more! The options are seriously limitless, and there are tons of ideas under many of their products, showing you how to use them.

*Note: This post is a collaboration with Oriental Trading, but all opinions are my own. My love affair with them started way back when I first got their catalogs as a kid!

Wedding planning got you down? Take a (short) break and invite your friends over for a crafting brunch party! It's super affordable with Oriental Trading. Click the photo to learn more!

Think about how much time you’ll save by having your friends join you in crafting, and how much fun it’ll be! During a time of intense stress and worry, you need a break to hang with your girls and laugh. Plus, it'll be a nice way to say "thank you" if you've been a little bit of a grumpy bridezilla lately. 

Table Setup

Wedding planning got you down? Take a (short) break and invite your friends over for a crafting brunch party! It's super affordable with Oriental Trading. Click the photo to learn more!

To set up the table, I stuck with a simple white (disposable) tablecloth. Since crafting can get messy, I added a table runner using easel paper to catch any spills. I gave each person a place setting for snacking, which was cute and colorful! I started with a square gold dot plastic dessert plate as sort of a charger, topped with a hot pink plate for a pop of color. Each person gets a set of gorgeous gold utensils and a hot pink napkin to keep things tidy, as well as a paint palette for their watercolors.

Wedding planning got you down? Take a (short) break and invite your friends over for a crafting brunch party! It's super affordable with Oriental Trading. Click the photo to learn more!

Everything is more fun with a glass of wine, so each gal gets a really cute purple wine glass for her rose with a gold striped strawClear cupcake stands put the jordan almonds on a pedestal, making it easier for everyone to reach them. 

Wedding planning got you down? Take a (short) break and invite your friends over for a crafting brunch party! It's super affordable with Oriental Trading. Click the photo to learn more!

I kept the rest of the decorations simple by propping up my Pop Fizz Clink sign from my Disney-Themed Backyard Engagement Party. Finger foods and small desserts finish up the fun. P.S.- the white easel paper would be the perfect backdrop for using colorful sharpies to label what's what!

Wedding planning got you down? Take a (short) break and invite your friends over for a crafting brunch party! It's super affordable with Oriental Trading. Click the photo to learn more!

 The Crafts

A few weeks ago, I showed you 3 fun projects you can make using Oriental Trading products to add a pop of color to your wedding. These projects are perfect to make with your besties or bridesmaids!

Jordan Almonds

Place all your almonds in decorative bowls with a spoon for easy scooping. Keep your tulle, ribbon, and charms nearby so that it's easy for everyone to assemble. I also recommend pre-cutting the ribbon to ensure that it's all uniform and to prevent waste. The full DIY is here.

Wedding planning got you down? Take a (short) break and invite your friends over for a crafting brunch party! It's super affordable with Oriental Trading. Click the photo to learn more!


Table Numbers

Have your friends help out by painting the table numbers. I did about 3 coats on each one, so it's definitely time consuming! I recommend enlisting an especially crafty friend for the glitter and/or gold foil. It can get complicated and messy, so you definitely want someone precise to handle it! The full DIY is here.

Wedding planning got you down? Take a (short) break and invite your friends over for a crafting brunch party! It's super affordable with Oriental Trading. Click the photo to learn more!


Watercolor Escort Cards

When you get all your friends together, you've got to do this super fun project! It's seriously easy and best of all, really fun!

Looking for an easy and affordable way to guide people to their seats? This.is.it! The full how-to is on the blog, along with ideas on how to get your bridesmaids to help! Click the photo to learn more.

You will need:

Watercolor Paints (here)
Paintbrushes (similar here)
Paint Palette (here)
White Place Cards (here)
Gold Sharpie (here)

Looking for an easy and affordable way to guide people to their seats? This.is.it! The full how-to is on the blog, along with ideas on how to get your bridesmaids to help! Click the photo to learn more.

Each gal will get a set of watercolor paintbrushes, as well as a paint palette. Grab your watercolor paints and your white place cards and give each card a unique look. I added layers of complimentary colors for variation, but it still looks cohesive.

Looking for an easy and affordable way to guide people to their seats? This.is.it! The full how-to is on the blog, along with ideas on how to get your bridesmaids to help! Click the photo to learn more.

Once they're all dry, use a gold sharpie to add a name and a table number to guide people to their seats in style. Write the names in script, or make it fancy with some faux calligraphy!

Looking for an easy and affordable way to guide people to their seats? This.is.it! The full how-to is on the blog, along with ideas on how to get your bridesmaids to help! Click the photo to learn more.

I did the script freehand, but I think if you either got someone to do calligraphy, picked a friend with fancy handwriting, or printed the names on the cards, it would look even better! Be sure to make some extras, as you're bound to mess up a few of them while writing.

Looking for an easy and affordable way to guide people to their seats? This.is.it! The full how-to is on the blog, along with ideas on how to get your bridesmaids to help! Click the photo to learn more.

Woo! I'm not sure about you guys, but a bridesmaid crafternoon brunch party seems like exactly what I need to get over these pre-wedding blues! A few laughs does everyone a world of good. Be sure to check out Oriental Trading's new Marry Me section for everything you'll need for this party, the bridal shower, the wedding, and beyond! 

What's been the hardest part of wedding planning for you? For me, it's been the fact that my mom, sister, and friends live kinda far away, so I've been doing it (cue Eric Carmen) all by myyyseeelllfff. I wish I had them to help/laugh/decide on things. How about you? Let me know in the comments below!

Adding a Pop of Color to Your Wedding

When you think of weddings, you think of white. While some may see that as very limiting, I see it as a blank canvas to incorporate any color you wish. Often, people add "wedding colors" and it's usually one shade of a color, like a deep purple or emerald green or blush pink. What if, instead of focusing on one color, you added shades of many colors? I think it would be a lot more fun (and a lot less stressful) to fill your wedding with complimentary hues. 

When it comes to adding some color (and fun!) to your wedding, look no further than Oriental Trading. They've got everything you need for weddings, whether you want to do a few crafts projects, get something that's personalized, or something that's ready to go out of the box. Plus, with their new Marry Me page of their website, all the wedding items are in one easy to find place. I call that a win-win.

*Note: This post is a collaboration with Oriental Trading, but all opinions are my own. My love affair with them started way back when I first got their catalogs as a kid!

Let those table numbers stand out! Click to see how I added a modern twist to this traditional wedding element, along with 2 other ideas to add a pop of color to your wedding!

Oriental Trading has everything you need to craft any project for a wedding or a party. Today, I've got 3 fun and easy projects you can make using Oriental Trading products and craft supplies. I've linked all the products I've used, so you've got everything you need in one easy-to-find place! Ok, enough with my blabbing... Let's get crafting!

Jordan Almonds 

Jordan Almonds don’t have to be boring! Click to see how I added a modern twist to this traditional wedding element, along with 2 other ideas to add a pop of color to your wedding!

You will need:

Jordan Almonds in your wedding colors (I used coral, light blue, and pink)
White Tulle (here)
Contrasting Ribbon (here)
Thank You Charms (here)
Spoon (here)

Jordan Almonds don’t have to be boring! Click to see how I added a modern twist to this traditional wedding element, along with 2 other ideas to add a pop of color to your wedding!

In many cultures, it's traditional to give out Jordan Almonds at a wedding. I'm Greek, and I can tell you for a fact that you can't attend a Greek wedding without receiving one of these bombonieres! For more info on Jordan Almonds, check this out.

How To:

Jordan-Almonds-GIF2.gif

1. Pick Jordan almonds in colors that match your theme.

2. Place 5 almonds in the tulle. I started by mixing my colors, but I realized I preferred all one color with a contrasting ribbon.

Jordan Almonds don’t have to be boring! Click to see how I added a modern twist to this traditional wedding element, along with 2 other ideas to add a pop of color to your wedding!

3. If you want the bow in the back, loop your tag onto the ribbon. If you want your tag in the front, add it as you're making the loop of the bow. Oriental Trading also offers personalized ribbon, which would be even better to add! 

4. Once you've decided how you want your bow, slide your almonds into the middle of your tulle, grab the sides, and tie your ribbon around it in a bow.

Jordan Almonds don’t have to be boring! Click to see how I added a modern twist to this traditional wedding element, along with 2 other ideas to add a pop of color to your wedding!

Table Numbers

Let those table numbers stand out! Click to see how I added a modern twist to this traditional wedding element, along with 2 other ideas to add a pop of color to your wedding!

You will need:

White Table Numbers (here)
Paint or Spray Paint (here)
Paint Brushes and Palette (similar here and here)
Gold Foil (here)
Gold Foil Adhesive (I used this one)
Gold Glitter (here)
Mod Podge (here)

Let those table numbers stand out! Click to see how I added a modern twist to this traditional wedding element, along with 2 other ideas to add a pop of color to your wedding!

People need to know where they're sitting, right? Why not lead them there in the brightest, glitziest way possible?!

How To:

1. Paint or spray paint your table numbers, but leave the edges blank. Do 2 coats, or as many as it takes to get smooth coverage, and let dry. (FYI- I used paint).

2. Paint the white edges of your numbers with foil adhesive. Work carefully so that you don't get it off the white edge. It sticks to anything with adhesive, so heed my warning and be careful!

3. Wait about 20 minutes for it to cure and be slightly tacky. Fun fact- this stuff dries sticky, so even if you wait a little too long, it'll still be sticky for the foil.

Let those table numbers stand out! Click to see how I added a modern twist to this traditional wedding element, along with 2 other ideas to add a pop of color to your wedding!

4. Take your foil and cut/rip to size, then attach it to the edges of the numbers. Take your stiff brush and brush off any extra foil. This stuff gets messy, so put a paper or a plate underneath so you don't make a huge mess :)

5. To do the glitter edge, mix gold glitter with mod podge. Using a paintbrush, paint the mixture onto the edges in small sections. Before the mixture dries, sprinkle some glitter onto the wet glue to cover any bald spots. Continue until you've done the whole perimeter, then go back and fill in any bare spots.

6. To travel to the venue, wrap each with white tissue paper to prevent scratches. Do not assemble them until you arrive, as they are fragile and may snap in transit. 

Let those table numbers stand out! Click to see how I added a modern twist to this traditional wedding element, along with 2 other ideas to add a pop of color to your wedding!


Welcome Basket

Your welcome basket doesn’t have to be formal! Click to see how I added a modern twist to this traditional wedding element, along with 2 other ideas to add a pop of color to your wedding!

You will need:

Wooden box (I used this one, but this one is better!)
Acrylic Paints (here)
Paint Brushes and Palette (similar here and here)
Self Adhesive Letters (here)

Your welcome basket doesn’t have to be formal! Click to see how I added a modern twist to this traditional wedding element, along with 2 other ideas to add a pop of color to your wedding!

Show your friends and family that this is bright occasion from the start with this fun welcome basket! You can also re-use it after the wedding to hold mail or greet guests in your entryway!

How To:

1. Take your letters and put your message on the box. I chose to keep it simple and write "Hi!" You can also do the couple's initials or a monogram.

2. Mix up your paints until they are the right color. Use a toothpick or a thin paintbrush to stir. If the paint is too light, it'll make it hard to read the Hi, so be aware of that when painting your box.

Your welcome basket doesn’t have to be formal! Click to see how I added a modern twist to this traditional wedding element, along with 2 other ideas to add a pop of color to your wedding!

3. Carefully paint your basket. I did a different color for each bar to keep it interesting.

4. While your paint is still wet, carefully peel off your stickers using tweezers. If your box is like mine, I recommend you actually don't paint the inside of the box. It got really tricky with all the little rungs. Especially since I made my own colors, because I found that I would run really low and have to try really hard not to run out before I finished. 

5. Place your box on your welcome table and fill it with pashminas, ceremony programs, or bubbles!

Your welcome basket doesn’t have to be formal! Click to see how I added a modern twist to this traditional wedding element, along with 2 other ideas to add a pop of color to your wedding!

With a little bit of crafting, and a whole lot of imagination, you too can make your wedding unique with a fun pop of color. I've got a follow-up post coming with ideas for getting your gals together for a fun crafternoon, so stay tuned!

Be sure to visit Oriental Trading and their Marry Me page to start customizing your own wedding!

So what do you think? Will you be adding a pop of color to your wedding? How do you plan to do it? Let me know in the comments below!

Wedding Planning Update- Just 3 More Months!

Oh my gosh, you guys!!! My wedding is less than 3 months away. 87 days!! I can't wait for it to be here. I feel panicked because I have so much to do, and also feel sad that it'll be over soon. All at the same time. I've basically become an emotional mess lately and even the smallest things make me cry. I'm that person now. Anyway... here's what's been happening. 

Wedding Update- 3 More Months! This month we're chatting about charger plates, choosing suits, favors, and more! Click for the full post.

Invites-Picked and Packed!

Ah, invitations. The bane of my existence for the last 8 months. I really wanted my sister to design some invites for us, and her first draft was really cute! Unfortunately, as with many DIY projects, these were going to cost wayyyy more to print them ourselves than to purchase pre-made ones. And so we sadly had to scrap our idea :( Luckily, we were able to find some nice invitations online from Wedding Paper Divas. With a half off coupon, we were able to purchase them for $422.80, including custom foil, expedited shipping, and addressing the envelopes! Our original quotes were over $1k, and to custom print with foil we were quoted over $1,800 (!!!), so this was an amazing price. They're all packed up and ready to get shipped this week.

Wedding Song- Chosen!

They say when you snooze you lose, but for me it worked out. I was too tired to get up when my alarm went off, so I stayed in bed listening to the radio and heard a song that I thought would be perfect. I looked up the lyrics and started crying. But, I hated the radio version so I found a cover! I like it so much better, and every time it comes in the radio when we drive I get so emotional and excited for our wedding. I can't wait to dance together.

Wedding Update- 3 More Months! This month we're chatting about charger plates, choosing suits, favors, and more! Click for the full post.

Bridal Party Outfits- Done!

Dresses have been purchased! My sister got her dress from RK Bridal in the city (where I got my dress) and my mom got hers from Lord & Taylor. Since my sister is technically my only bridesmaid, this made things a bit easier. We went to a few stores and she tried on a bunch of different styles, but we settled on a lace and chiffon one. My mom has 2 dresses she bought and is trying to narrow it down to see which one she likes better. My dad also found his suit, a black Sean John suit haha.

Suits- Explored

We started looking into a suit for John and his brother. We checked Jos. A Bank, where the salesman was very kind. John has really broad shoulders (which I LOVE) but they make finding a suit difficult. Most suits made for a man with shoulders as large as his are much larger men in general, so the jackets looked giant on him. They suggested making a custom suit, which would only cost slightly more than buying one off the rack. I wasn't entirely sure what I wanted yet, so we paused that. Then, we went to men's warehouse, where we didn't see any colors we liked. The salesman told us that we should come back in early June to see the new colors, so we decided to wait until then before making any decisions. We are going this weekend to see them, and hopefully we can decide on his suit! 

Wedding Shoes- Ordered! 

Since our wedding ceremony will be outside, I wanted a wedge instead of a heel. I also wanted them to be pink and to have some sparkle. Luckily, Badgley Mischka had just what I needed. I got them on Amazon and I saved about $70 on them! The wedge heel has some texture on it which I love, and they actually feel pretty comfortable. 

Wedding Update- 3 More Months! This month we're chatting about charger plates, choosing suits, favors, and more! Click for the full post.

Napkins- Ordered

We ordered some cute custom printed napkins from For Your Party to put out at cocktail hour. I had already wanted to order some, and they had them at a wedding we went to. It was super cute! Luckily, this made convincing John to get them that much easier. I'm sneaking Disney references into my wedding any way I can, and these napkins were no exception ;)

Charger Plates- Ordered

This was a debate from a few months ago when we were wondering how nice we should go with the table settings. We looked into a rental company and there were all sorts of options for chargers. In the end, it didn't seem worth it to me to rent, essentially, a fake decorative plate for $5/piece. I was able to purchase them from Dollar Tree for a fraction of the cost, less than $200! Plus they're mine to keep so I can sell them after the wedding if I want to. I had purchased the same ones for my Dollar Store Easter Decorations post and I think they look pretty good! 

Wedding Update- 3 More Months! This month we're chatting about charger plates, choosing suits, favors, and more! Click for the full post.

Favors- Picked! 

Hooray! Our favors have been ordered! I don't want to give too much away since I know my family likes to read these updates (oh, hey guys!) but we ordered some cute and whimsical favors for everyone. We ordered them from Wedding Favors Unlimited, which offers price matching and $20 off if you find a lower price than theirs! Also, it shipped to us really quickly! From the date we ordered, it took 2 days for them to arrive. We'll also be giving out Jordan almonds since it's traditional and there should at least be some traditional elements, right?! 


Need to do:

Rehearsal dinner- Booking the venue for the rehearsal dinner has been on my list for a long time! Well actually... it was on John's. But somehow it made its way over my list, as it seems everything else has! We still haven't officially booked this and I'm so eager to cross it off. We are so close on this one.

Plan our ceremony- One of our friends is performing the ceremony, so we need to finalize all the little details to make it a great and memorable ceremony.

John's suit- Although we browsed suit options, we need to get his suit ordered since we are thinking of doing a custom suit. 

Centerpieces & decor- We ordered our flowers, but I want to buy any other centerpieces and decor items we need!

Schedule dress fitting- My dress is set to arrive next month, so I need to figure out exactly when and make an appointment for a fitting and alterations. I'm a little anxious about that, since there will be about 6 weeks between receiving my dress and my wedding day. No pressure.

Veil and accessories- Um, yea. I need to get on this! I'm going to attempt to make my own veil since they are SO expensive to buy. I want to try to make it soon, and if it doesn't work out, I'll bite the bullet and buy one. I also need jewelry, undergarments, hair accessories, and a purse I guess? 

Dresses upon dresses- I need to get a dress for the rehearsal dinner, the bridal shower, the bachelorette party, the 2 other weddings I have this year... Here, just take all my money.

Get legally wed- Our wedding ceremony will only be symbolic, so we are going to city hall (or something) to be legally married. We need to do this sorta soon, since some over-eager bozo decided to book a ticket in her new married name, thinking it would be really easy to do a name change. Yeaaaa.

If you want to learn more about planning a Pinterest worthy party, be sure to sign up to get your FREE Anatomy of a Pinterest Worthy Party guide! It's full of helpful hints on how to pick a theme, the little details that will make your event unique, and tips to take great photos of your event. And, there's even a checklist so you don't forget anything! So what are you waiting for? Get yours now!

Although I am pretty overwhelmed with all the stuff I need to do, I like these updates because it shows me that although the To Do List is still reaaaally long, it's actually getting shorter and things are getting done. So, what's your favorite part of weddings? Is there something you saw once that you thought was great, or terrible? Any tips to make a wedding the BEST WEDDING EVER?! Let me know in the comments below!