Party Supplies Haul- Michael's

Can I be honest? Sometimes I just don't have the time or desire to go to every single store in search of the perfect party supplies. There- I said it! To prove that you don't have to go all around town shopping, I've created a new series where I'll be showcasing my favorite party finds with one-stop shopping. And the best part? It doesn't even necessarily have to be a party supplies store to provide you with a complete set of adorable party supplies!

One-stop party shopping? It's possible! Click to find out how. | WellKeptChaos

Party Supplies Haul

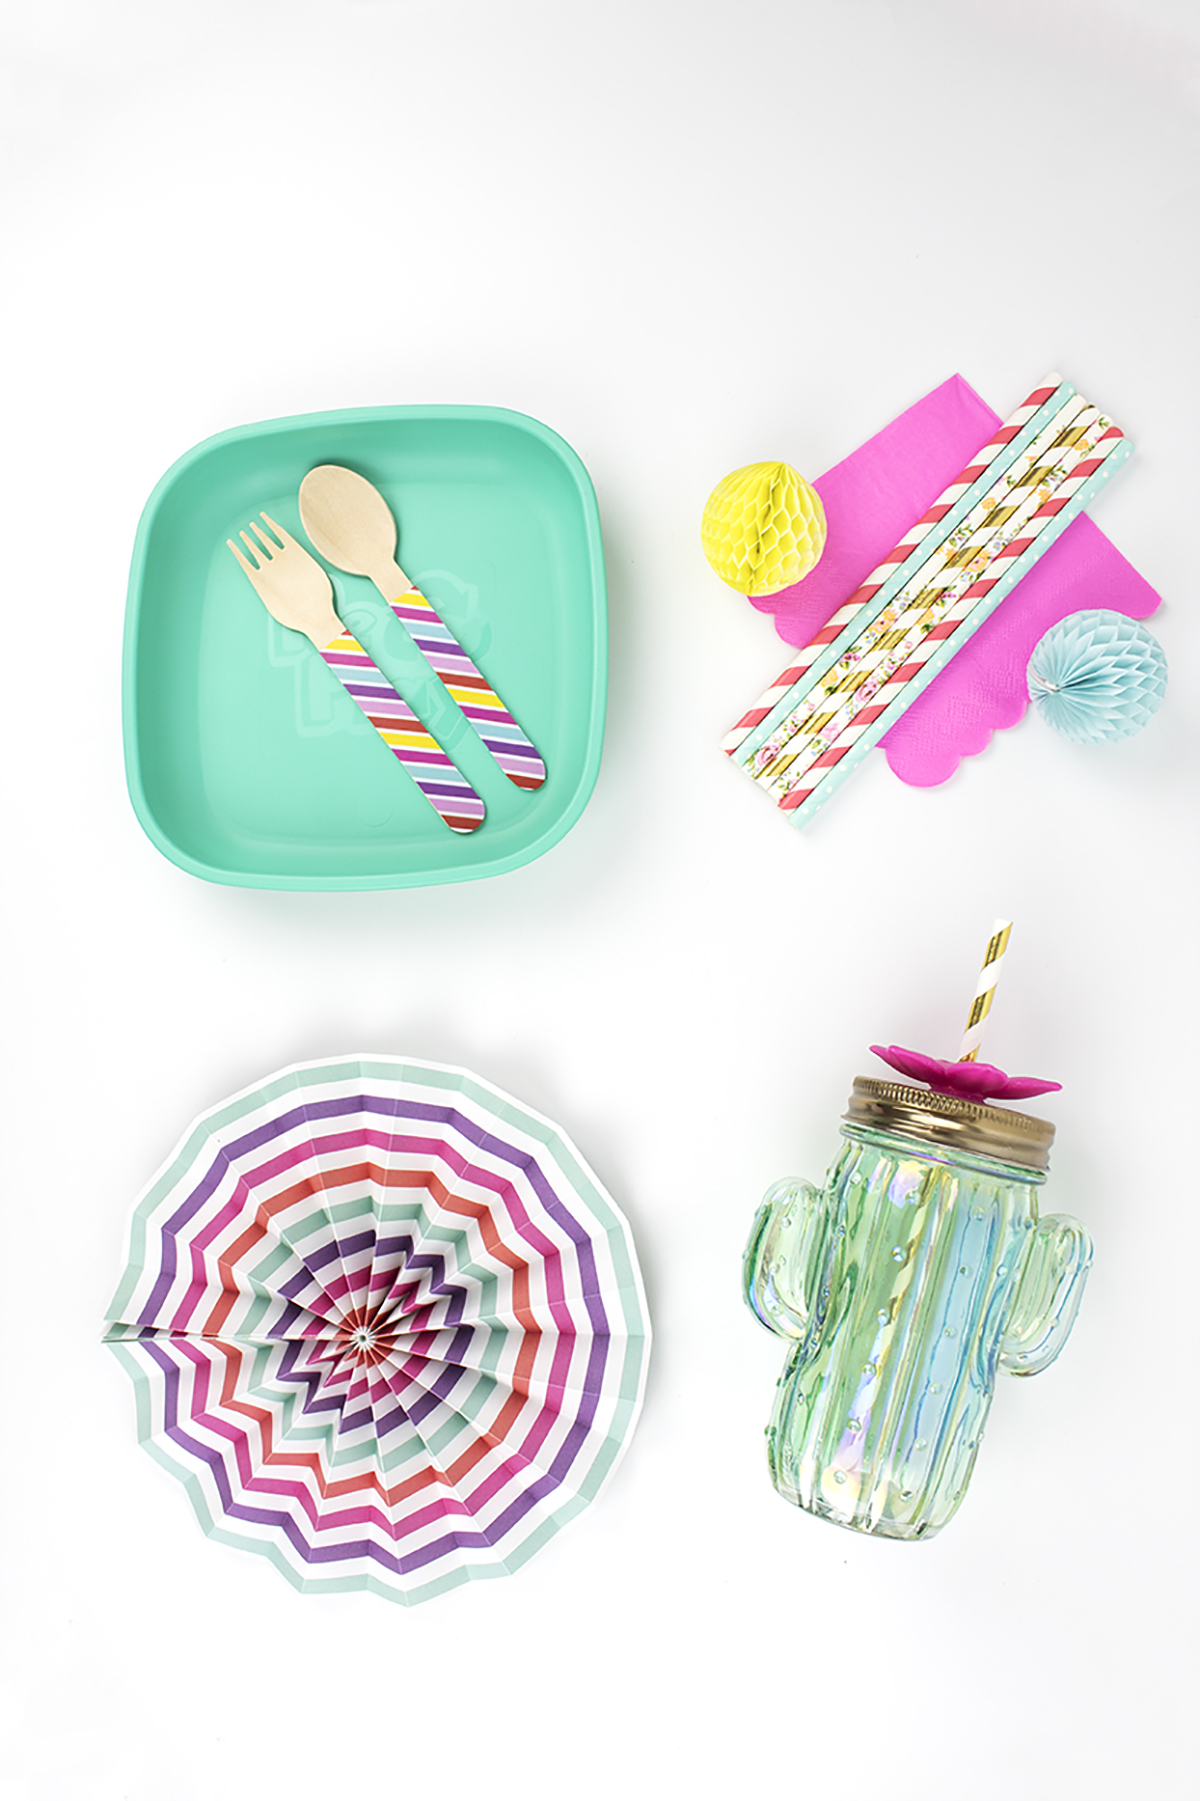
First up in this series is Michaels. For all intents and purposes, Michaels is a craft store. You'd usually go there for craft supplies, seasonal decor, and baking/cake making supplies. Lately, however, they've been branching out and offering much more home decor, party supplies, and even gifts! The bonus of shopping at Michael's is that you can find some easy DIY projects to go along with your theme. 

Scope Out:

Dollar section by the register
Party supplies section
Clearance aisle
Seasonal decor (often has sales!)
Featured collections

The Loot:

Drink napkins
Appetizer plates
Paper fans
Decorative straws
Fancy disposable utensils
Banners
Straw balls
Snow cone cups
Wrapping paper

Dream up a Theme: 

Hawaiian Luau
Ladies' Happy Hour
Tropical Oasis
Mexican Fiesta
Sunny Palm Springs
Tropical Rainforest

Level Up:

Tropical Pineapple Margarita by Whole and Heavenly Oven
Pineapple Boat with Sorbet by The House That Lars Built
Pineapple Honeycombs
Flamingo Pinata 
Pineapple Cups

One-stop party shopping? It's possible! Click to find out how. | WellKeptChaos

Psst! Hosing a Mexican Fiesta? Check out my Pinterest Board for more ideas!

One-stop party shopping? It's possible! Click to find out how. | WellKeptChaos

Be sure to follow my Party Inspiration Pinterest Board for TONS of fun party ideas!

So, what do you think? What's your favorite place for party supplies?

Wedding Wednesdays- Just 14 more months!

Welcome to Wedding Wednesdays! Once a month I'll be doing an update to show where we are in the wedding planning process and hopefully give some advice along the way. 

I have some AMAZING news this week that I can't wait to share!

Welcome to Wedding Wednesdays! Once a month I'll be doing an update to show where we are in the wedding planning process and hopefully give some advice along the way. I have some AMAZING news this week that I can't wait to share!

Date and Location- chosen!

We have chosen a date for our wedding! Ahh! We decided on Labor Day weekend 2017, and will be getting married in Hawley, PA, just a few hours away from home. This is a huge sigh of relief. We decided to do a "weekend away" type of thing so that we could have more time to spend with our family and friends. Weddings seem to fly by, so it'll be great to be able to actually chat with everyone before and after the wedding!

Wedding Website- Started 

I chose Squarespace to create our wedding website.  It's also what I use for my blog site, and I can't recommend it enough! It's so easy to use, even for a tech challenged gal like myself.

Wedding Theme- Formulating

I have narrowed down the wedding theme I think that I want to use and have started pinning some ideas on my secret Wedding Ideas board. I'm super excited about the direction it's going, but I don't want to finalize a theme until I pick my dress.

Engagement Party "Thank You" cards- Sent

This was an outstanding task on my to-do list that I am happy to say I completed. Since my fiance writes like a child (hah!), he didn't want to hand-write any of the cards and so I had to do them all.

Needs to get done:

Save the Dates- Now that we have a date, I'd like to let everyone else know about it! I'm hoping to get these planned out so I can send them by the end of the summer so people can start saving up for the resort.

Wedding Dress- Trying on wedding dresses has been one of the most fun and most terrible things. There are so many gorgeous dresses out there, but I don't feel like any of them speak to me. I've liked 2 so far, but something holds me back from making a decision. I'm thinking that means there's an even greater one out there for me, but it doesn't make the process any less stressful! I want a fancier dress so I look like the bride, but at the same time I'm having trouble envisioning these dresses as anything other than wedding dresses. I feel like I stepped out of a catalog, and I want a dress that doesn't just look nice, but also makes me feel special.

Vendors research- We need to start researching vendors in the area so that we can make decisions on who we would like to use for our photographer, florist, DJ, etc. I'm also hoping that we can afford a videographer so that we can watch our wedding "tape" with our kids for years to come.

Well, this is a pretty short update but I'm sure as time progresses I will have WAY more to say about this stuff.

Be sure to check out my Colorful Wedding Ideas Pinterest board for more wedding ideas and party planning tips!

Are you getting married? What's the #1 thing you're focusing on?

Nautical Notecard Birthday Banner Tutorial

This weekend, I went into Michaels on a mission to find some cute party supplies and projects. When I saw these ADORABLE note cards in their dollar section, I couldn't resist getting them! They're part nautical, part 4th of July, and 100% perfect for summer. I made them into a birthday banner that can also double for Independence Day, and can be kept up all summer long. This is a quick and easy DIY you can make in just minutes, for only $6! Any note cards can be used for this tutorial, but I think you should run on over to Michael's and grab a set of these before they run out!

*Contains affiliate links

Part nautical, part 4th of July, and 100% perfect for summer, this quick and easy DIY can be made in just minutes! Click to find out how we crafted this banner with just $6 and some note cards.

How cute are these cards on their own as well?! Each pack comes with 5 cards of the same design, so even after you've made your banner, you can send some fun notes to your friends or use them as invitations. And the best part? Each pack is only $1.50!

And now, onto the directions!

Part nautical, part 4th of July, and 100% perfect for summer, this quick and easy DIY can be made in just minutes! Click to find out how we crafted this banner with just $6 and some note cards.

For this project, you'll need:
Notecards (similar here)
Paper Cutter (similar here)
Scissors (here)
Ribbon or Twine (here)
3-Hole Punch (here)
Shaped Paper Punches (similar here)
Tape

Part nautical, part 4th of July, and 100% perfect for summer, this quick and easy DIY can be made in just minutes! Click to find out how we crafted this banner with just $6 and some note cards.

Step 1: Unfold your note card and cut off the back, making sure to cut before the fold to create a nice smooth surface. I prefer to use a paper cutter for this instead of scissors to ensure a straight line.

Part nautical, part 4th of July, and 100% perfect for summer, this quick and easy DIY can be made in just minutes! Click to find out how we crafted this banner with just $6 and some note cards.

Step 2: Take the back of the card and cut off the excess paper around the drawing, making sure to leave enough of a border to create an even circle.

Part nautical, part 4th of July, and 100% perfect for summer, this quick and easy DIY can be made in just minutes! Click to find out how we crafted this banner with just $6 and some note cards.

Step 3: Using your round paper punch, center the drawing and cut it out. I used a 2-inch circle punch for this.

Part nautical, part 4th of July, and 100% perfect for summer, this quick and easy DIY can be made in just minutes! Click to find out how we crafted this banner with just $6 and some note cards.

Step 4: Using a handheld hole punch, make a small hole at the top of your circular drawings. If you don't have a handheld one, use your 3-hole punch. Just be sure to remove the hole "catcher" if yours has one so that you can flip it over to center the hole.

Part nautical, part 4th of July, and 100% perfect for summer, this quick and easy DIY can be made in just minutes! Click to find out how we crafted this banner with just $6 and some note cards.

Step 5: Let's get back to the front of the card. Using your 3-hole punch, line up the card to make two even holes. Repeat for all the cards.

Part nautical, part 4th of July, and 100% perfect for summer, this quick and easy DIY can be made in just minutes! Click to find out how we crafted this banner with just $6 and some note cards.

Step 6: Weave the notecards onto the ribbon, passing the string through the back to create a clean design in the front. Alternate between the circular drawings and the notecards in an appealing pattern.

Part nautical, part 4th of July, and 100% perfect for summer, this quick and easy DIY can be made in just minutes! Click to find out how we crafted this banner with just $6 and some note cards.

BONUS: If you want to get even more fun out of your cards, punch some small circles and stars out of the back of the cards and tape them onto twine for a playful garland!

Part nautical, part 4th of July, and 100% perfect for summer, this quick and easy DIY can be made in just minutes! Click to find out how we crafted this banner with just $6 and some note cards.

And that, mateys, is how you make an awesome nautical birthday banner for only $6!

Part nautical, part 4th of July, and 100% perfect for summer, this quick and easy DIY can be made in just minutes! Click to find out how we crafted this banner with just $6 and some note cards.

Hung up on the need for more banner tutorials? Be sure to check out my Garlands and Banners board on Pinterest!

How do you plan to use your banner? Tag me in your Instagram photos!

Fourth of July on a Budget

I am so excited that it's officially summer! The hot weather, longer days, and endless BBQ's are making me a happy gal! Now that we (finally) have a yard, I have been doing a lot of hosting. This can get super expensive, especially when you factor in all the decorations and food. I decided to do 4th of July on a budget so I could avoid a red white and boohoo, if you know what I mean!

You can still have a lot of style without spending big bucks! Almost everything here came from the Dollar Tree and Target's dollar section.

2016 Posts.png
An EASY and affordable Fourth of July table featuring items from Target and the dollar tree! Check out the post for all the details.

This table runner is actually a scarf from the dollar section! I added a sequin table runner underneath for a little extra sparkle.

An EASY and affordable Fourth of July table featuring items from Target and the dollar tree! Check out the post for all the details.

I purchased the chevron jar from Target as well ($3) and filled it with paper straws (8 for $1). The glittery star picks are from A.C. Moore.

An EASY and affordable Fourth of July table featuring items from Target and the dollar tree! Check out the post for all the details.

I purchased my striped plates and star napkins from Target's dollar section, and the blue foil star napkins are from the Christmas Tree Shop. I gave each place setting a fun pen, which was only a dollar each!

An EASY and affordable Fourth of July table featuring items from Target and the dollar tree! Check out the post for all the details.

These foil star plates came 8 for $1- a great deal! And how cute are those octopus beer mugs?! They're from the Christmas Tree Shop and only cost a couple of dollars.

An EASY and affordable Fourth of July table featuring items from Target and the dollar tree! Check out the post for all the details.

For snacks, I got Mike and Ike candies in red, white and blue for only $1. I added nautical cupcake picks I got from the Christmas tree shop ($3 for 24) and put them in these cute shooter glasses (4 for $1)

An EASY and affordable Fourth of July table featuring items from Target and the dollar tree! Check out the post for all the details.

These red, white and blue cupcakes from Target are so cute and tasty! They're perfectly patriotic.

An EASY and affordable Fourth of July table featuring items from Target and the dollar tree! Check out the post for all the details.

These pail votive holders from the Dollar Tree made adorable vases.  Just put a small cup of water inside so your flowers don't wilt in the heat.

An EASY and affordable Fourth of July table featuring items from Target and the dollar tree! Check out the post for all the details.

I got these paper fans from the dollar tree as well, 2 for $1! 

An EASY and affordable Fourth of July table featuring items from Target and the dollar tree! Check out the post for all the details.

All in all, this July 4th tablescape cost about $50. Not too shabby!

Breakdown:
Sweets & Treats: $15
Flowers/Decor: $20
Tableware: $15

Want more ideas? Check out my Fourth of July Pinterest board!ο»Ώ

Starting a Blog- How to Avoid Feeling Overwhelmed by Blogging Advice

When I was starting my blog, I was blown away by all the free advice out there on how to be successful as a blogger. I read the articles on my commute and I was so excited to get to the next one. There was so so much to learn, but in a good way. I wished I could read faster as I read article after article, completely engrossed in the content. After reading a lot, I felt confident that I could start this blogging thing. It was always something I wanted to try, but now I felt ready to make it something I did professionally. 3 months later, I don't feel the same way about all that information out there for bloggers. Instead of feeling empowered by it, I feel discouraged. Seeing those headlines makes me feel like they're shouting at me. All those "What you're doing wrong on Pinterest" or "Mistakes Bloggers Make" type articles make me want to shut off my phone and hide! I've decided I WILL be successful at this, so I won't allow myself to hide from it. Here's my advice for staying sane in the sea of advice out there when starting a blog. 

When I was starting my blog, I was blown away by all the free advice out there on how to be successful as a blogger. 3 months later, I don't feel the same way about all that information out there for bloggers. Instead of feeling empowered by it…

Be conscious of what you pin and who you follow. A lot of the content I was seeing was based off my pins and the people I was following. To prevent becoming completely overwhelmed with content, only follow the boards and users you want to be inspired by, not pressured into. This will whittle down the content you see and shield you from the flurry of articles that might make you feel like you're not doing enough. 

Find a tribe leader. There's tons of articles out there about finding a tribe, but I think the most important thing you can do at first is find the right tribe leader(s). Find one or two people whose writing style you like and whose content is informative, and focus on learning from them. You can always search for advice on specific topics from others, but for general guidance, I recommend finding a leader and following their advice until you're comfortable branching out. 

Focus on creating great content. Yes, other things are definitely important. But your #1 priority should always be cranking out great content. If you start to feel overwhelmed by all the articles and advice out there, close your social media, ignore your inbox, and just write. Whether it's a blog post, a list of ideas, or your newsletter, doing these things will be useful for the success of your blog and leave you feeling empowered. 

Create a to do list, an editorial calendar, etc., and stick to it. I find that feeling overwhelmed leads to not knowing where to start, which leads to giving up. Don't let that happen! Write a short daily to-do list, weekly goals, an editorial calendar, or whatever you prefer that lets you know exactly what needs to get accomplished. This will silence all those other tasks nagging at you and allow you to get something done. If you find yourself obsessing over another task, schedule it in somewhere and let go of that nagging feeling. 

Focus on your own goals and not the ones everyone else throws at you. If you listened to every piece of advice, you'd be making daily blog posts, a weekly newsletter, growing your subscriber list, offering tons of freebies, have an active social media presence (and more) every day. That's a lot of work for one person to do, and it doesn't even include your other daily tasks! Are all these things great to have? Yes. In an ideal world you'd be Super Blogger, getting it all done, and more, all in time for dinner. But in the real world, you might be too busy for all that. Focus on a few things at a time and I guarantee that eventually you'll have it all down. A little bit of progress is better than getting burned out and stopping altogether. Starting a blog is a marathon, not a race.  Doing too much too quickly could leave you abandoning the idea altogether.

Stop comparing yourself to others. A lot of bloggers have been doing this stuff for years. They've perfected their systems and are reaping the benefits of their hard work. If you're just starting out, it can be really easy to burn out. Don't let someone's else's "end" sabotage your middle. Learn from people, read their advice, and be inspired, but don't let their success discourage you. 

Be a dreamer. If all else fails, just think about your dreams and what you want to achieve. Write down those goals and see if you can find the steps to achieve them. Sometimes just reminding ourselves why we are doing something is enough to get us out of our funk!

Phew! I know it's a lot to handle, but I thought it was important to let people know that you don't have to do everything all at once. I feel better now that I'm not overwhelmed with feelings of inadequacy, and I hope you do too.

What's the part of blogging that leaves you the most overwhelmed? How do you overcome it?

Related: 10 Easy Ways to Get Motivated