DIY Donut Party Platter with Sprinkles

Updated: December 22, 2018

I had no idea when I made this post (my second DIY blog post, ever!) that it would become as popular as it did. I’ve since updated some of the photos, and will soon be re-creating the DIY for you so that you can have much better images to work with! Thank you for loving the post so much. Please be sure to tag me when posting on social media, or adding your photo to the “tried it” section on Pinterest!

If you’re looking for a fun way to update a plain old party platter, try this DIY Donut Party Platter with Sprinkles! All you need is some acrylic paint to give it a new look. #donutbirthdayparty #partyplatter #sprinkles

For my birthday, I had a Sugar Sweet birthday party. I had so much fun planning and setting up for this party. It had everything you need for a sugar coma, including cotton candy champagne and a DIY candy bar. To add to the ambiance, I decided to make a fun donut platter! The great news is that the platter is food safe and reusable. So what are you waiting for? Go grab your supplies and lets get started!

DIY Donut Party Platter with Sprinkles

You'll need:
Clear Round Platter (I got mine from Party City, similar here)
Acrylic Paint (similar here)
Foam Brushes (here)
Paintbrushes (similar here)
Mod Podge (here)
Qtips for cleanup
 

1. Thoroughly wash and dry your platter.  We'll be painting the underside.  This is to make sure it's food safe!

2. Place the platter food-side down. Using the acrylic paint and a thin paintbrush, draw the sprinkles on first. I found that thicker, more opaque sprinkles showed better.  Turn the plate over and make sure you're happy with the placement and quantity.  Let dry according to directions.

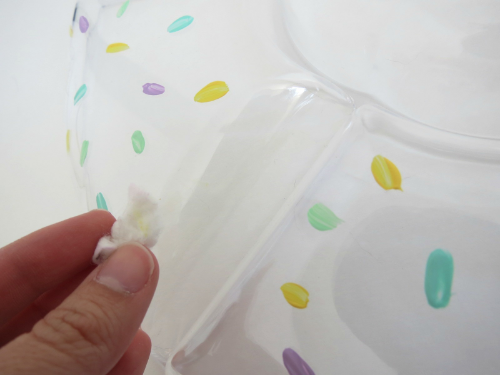
Did you make a sprinkle that's too fat or in the wrong place? Just wipe it off with water!

Paint on those sprinkles!

Paint on those sprinkles!

Let dry according to directions. Then it's time for frosting!

3. If you're using a divided platter, fill in the gaps carefully first. You can be sloppy about it and wipe it off with a q-tip like I did, but that's much harder- learn from my mistake!

Messy messy middle!

Messy messy middle!

Paint the frosting on in a zigzag shape. Let dry and add another coat to make sure it's thick. Be sure to turn it over and check for any gaps in the paint. Note: At this point, the paint is really delicate and scratches easily. Use caution when flipping it and maneuvering it.

4. Once your frosting is dry, paint the rim of the tray as your base donut color. If it's sheer, do another coat and let dry several hours or overnight if possible.

5. Put on a coat or two of mod podge.  This will seal the design and make it waterproof.  I did two coats, one going vertically and one going horizontally.

DIY Donut Party Platter with Sprinkles

And that's all folks!  I think this would look adorable in a little girls' room holding their hair clips or for tea parties.  How do you plan to use your new platter?  Let me know in the comments below!

How to Organize... when you weren't planning to!

So, you went into your junk drawer to grab a set of spare keys for your mother. You found birthday candles, 7 expired coupons, and that gift card you needed last month. Soon enough, you've emptied the entire contents of the drawer onto the counter and you're going through everything, trying to get rid of the junk lurking beneath the surface. You certainly didn't intend to organize the junk drawer- you were only looking for a key! Before you know it, you've taken everything out and won't rest until you've put everything back in its place.

If you're anything like me, this happens all. the. time. I didn't want to clean out the junk drawer, but somehow I'm elbows deep in junk. When you don't plan to organize, it can be hard to get the project done, and done right. Here are some suggestions to finish up the task you didn't mean to start!

8.png

*This post contains affiliate links.

1. Start a shopping list. This is oh-so-important. As you go along, you'll say, "Wow I wish I had a small box for xyz." By the end of your purge, you'll forget what you needed- and probably be ready to just flop on the couch in exhaustion and forget all about that J-U-N-K drawer. I recommend quickly jotting down what you want/need to get this space organized once-and-for-all as you go along. This way, you can hop on Amazon or head to the store when you're finished and know exactly what you need. 

2.  Grab a ruler. Creating a list is great, but having measurements for the items on your list is just as important. Otherwise, you'll end up with a box that just about fits, but doesn't. I never (always) do this.

3. Be descriptive. When you set out to purchase the items on your list, you may be left wondering what they're for. Why did I need 3 over-the-door organizers again?! When you're making your list, write down what you plan to put in each box, how many you need, or what color you want it to be. It's better to have more information than not enough when you go shopping to avoid making another trip- and buying more junk you didn't need but had to have.

4. Go dumpster diving. When you've started a project you didn't intend to, sometimes you have to improvise. Grab a cardboard box, shipping envelope, yogurt container, etc. These can be a great and affordable way to corral your items, even just temporarily. Don't worry about decoupaging your container right now. That's a task for another day!

5.  Think outside the (pretty) box. Sure, we all want our drawers and cabinets to look as gorgeous as they do in magazines. But sometimes, making it organized doesn't necessarily mean it's picture-worthy. Don't worry about having expensive containers or purchasing all new boxes for them to match perfectly. Make use of what you have. As long as you can get in and out without a headache, you're golden!

6. Label everything. Sometimes, labeling can be overkill- no need to label your label maker (unless you want to!). As a rule of thumb, anything you can't see should definitely be labeled. This prevents having to open all those pretty boxes to find what you need. Think of it this way- if you can't remember where it goes, there's a good chance it will end up somewhere else (probably in a pile).  So, invest in a label maker! I have this one and love it.

7.  Keep a few extra containers on hand. Notice I said a few containers- don't hoard them! When I'm at a store and see something I love for organization, I might grab one even if I don't know the perfect size or what will go in it. As you're re-organizing, it's great to have at least a few options for where to put your items. If the containers don't end up working, no big deal. You can always return them or try them in another room.  

8. Don't stop halfway. This one is super important- don't make what was a hidden nightmare a public menace. Put as much away as possible. For everything left, make sure you either put it in its new home or throw it away. I'm sure your husband/wife/cat won't be pleased when he/she discovers your brand-new tabletop landfill. And opening the drawer to show them how neat it is when there's a new pile of junk in plain sight won't impress them. Trust me on this one.

Want more great tips on how to be an organizing superstar? Be sure to follow my organization board on Pinterest!

I hope you found these suggestions to be helpful!  What are your tips for impromptu organizing?

5 Easy Steps for Party Setup

This is part three of my party planning series.  Be sure to check out part one and two!

The day has come- it's party time! Hopefully you've checked out my other articles, and are fully prepared for the party that's about to happen ;) Before everyone comes over, here are a few tips to get your party started on the right foot!

3.png

 Photo Sources: Find the items here

Budget your time. Plan out how long you think it will take you to set up, and add an hour. It always takes me so much longer to set up than I think! Save yourself the stress, and budget at least an extra hour for your prep time. This way you won't have to be getting dressed or doing your hair as your guests arrive.

Label all your food. Unless you want to spend the entire party listing out each item on your table, I recommend creating simple labels to let your guests know what's being served. You can find lots of printables online, or use items related to your theme. For example, I used heart shaped doilies to label the food at my Valentine's Day Party. This prevented me from having to explain and looked much cuter than keeping everything in its jar. If someone has a food allergy or dietary restrictions, it can be helpful to label that as well. Make small toothpick flags that say "gluten free", "vegetarian", or "nut safe" and place them in the appropriate dishes.

Prep your plates. Clear off all your surfaces and put on your tablecloths and table runners. Place all platters onto your table and take some time to arrange them in a way that is visually appealing. It's better to do this before the food comes because you can play around with the layout and decide what looks best where. Then, you can grab each plate and put the food items on it- bonus points if your labels are placed next to each plate beforehand as well!

Start early. If possible, start decorating the night before. Put up wall hangings and lanterns, set up the photo booth, or string up the lights. The less you have to do on the day of the event, the better! You never know if something will come up and leave you scrambling at the last minute.

Be helpful to those helping you. If you're lucky enough to have assistance prepping for your party, take a little time to plan out what exactly you'll need them to do. Are they heating up the food? Make a list of the items in the order they need to be cooked, and at which temperature.  Are they doing decor? Draw a quick diagram of how you want things to go and where basic supplies are located. This way, you don't spend the whole time delegating tasks and can instead focus on what you need to finish up!

What if you didn't plan ahead and don't have enough time- now what?! The first step is to relax. Even though you're out of time, take a minute to take some deep breaths. Make your exhales longer than your inhales. If you haven't showered, do that. It will give you some time to relax and make a game plan. Then, start to eliminate unnecessary tasks. Maybe you don't need to make that super complicated drink you were planning. Or, only do the things you can't do after guests arrive, like cleaning the house or decorating. If your food won't be ready in time, put out some simple appetizers and encourage conversations between guests so you can focus on finishing. Accept help if someone offers, but avoid putting everyone to work- you want them feeling like a guest, not restaurant staff.

Be sure to follow my Party Inspiration Pinterest Board for TONS of fun party ideas!

27 Wishes

I can't believe I'm turning 27 already!  It feels like just yesterday I was 17 and in high school, wishing to be an adult already.  My parents always said time goes faster as you get older and they weren't kidding!  In honor of my 27th birthday, I decided to create 27 wishes for this year.  Some are goals, some are reminders, and some are lofty aspirations.

1.       Try to look on the bright side

2.       Improve my friendships and make new ones

3.       Spend less money but do more

4.       See my family more often

5.       Learn to swim

6.       Smile more often

7.       Improve focus and accomplish goals

8.      Vend at Blythecon successfully

9.     Post weekly & gain readers

10.   Explore my neighborhood

11.   Create a relaxing master bedroom

12.   Keep my home clean and organized

13.   Make my house feel like a home

14.    Create an outdoor oasis

15.   Find a stellar wedding venue

16.   Plan more parties and barbeques

17.    Learn to cook

18.    Be more self-sufficient

19.   Have more face-to-face interaction

20.   Watch less tv and put down my phone

21.   Do yoga and meditate

22.   Get more sleep

23.   Improve health and eat better

24.   Try to eat more vegetarian/vegan meals

25.   Exercise and get out more

26.   Wake up earlier & feel less rushed

27.   Learn to enjoy the little things!

What do you hope to accomplish this year?

Related: My Sugar Sweet 27th Birthday Party

Wedding Wednesdays: 5 Tips for Getting Started (Plus Free Budget Printable!)

Last week, I shared my first Wedding Wednesday post. After trying out a designated day for wedding planning, I realized it was a great way to get the wedding ball rolling. It really helped to get my fiance involved without having to nag him. Want to try it out? Here are my 5 tips to make your first meeting a success- plus a free printable to get you started!

After trying out a designated day for wedding planning, I realized it was a great way to get the wedding ball rolling. It really helped to get my fiance involved without having to nag him. Want to try it out? Here are my 5 tips to make your first me…

 1. Make it fun. For some people, wedding planning isn't exactly how they imagine spending their Wednesday evenings. Crazy, right?! To make it fun, I ordered a tasty dinner from my fiance's favorite Italian restaurant- my treat. Since this was the first week I was doing it, I wanted to make it as pleasant an experience as possible so we could continue it without him dreading it. You can also try creating a fun playlist or making it into a friendly game or competition (who can find the most affordable venues, person who found the band gets a dinner date of their choice, etc.)

2. Encourage participation. For my fiance, "wedding planning" meant listening to me babble on and on about locations and venues while he looked up from his phone every once in a while and nodded. Instead of grumping at him to get off his phone, or complaining that he's ALWAYS on it, I decided to be friendly instead. I suggested he grab his laptop and set it up next to me so we could research together. If we both search, we spend half as long looking. Or that's what I told him, anyway!

3. Come prepared. Choose a topic or two that you think is important to discuss and work on creating a solution. For us, it was location and budget. I created a worksheet that stated how much money I had set aside for the wedding, how much my fiance had, and how much each of us would save up over the next year or so.  Then, I added any contributions from family and tallied it all up. This will be our estimated budget. This first step really helped us to eliminate options that were not affordable. 

4. Keep it positive. It's really easy to be defensive, especially if you have your heart set on what your wedding should be. Throughout the process, remind yourself that responding with an attitude never helped anyone. It's perfectly fine to assert yourself, but don't resort to insults or extreme statements, like "you always...." or "you never....". Instead, explain your side and ask lots of questions to understand their feelings. Do they really dislike the venue, or do they think it costs too much? Can you compromise on something that is important to them?

5. Summarize and plan ahead. At the end of your meeting, take a minute to go over everything you discussed to make sure everyone is on the same page. Create an agenda for the next week or an assignment that will be discussed at the next meeting.

Working on figuring out your overall budget?  Download my free printable to get started!

What are your tips for making wedding planning more enjoyable?