DIY Animal Sweater Ornaments (Perfect for Mini-Trees!)

It's beginning to look a lot like Christmas! While I usually decorated in traditional red and green growing up, my dad got us a little 3-foot PINK tree one year. It was the cutest thing! We decorated it with a few small ornaments, and basked in its pretty pink glow. 

Although I don't think I could EVER get my husband to agree to a pink tree in our living room (unless I have 7 daughters, and we all take a vote!) I did get myself a tiny pink mini-tree for the attic. And this mini-tree needed some fun ornaments to go with it. I had stumbled upon this puppy ornament from Neiman Marcus while browsing Pinterest, and knew I needed to make my own version! A few days, 2 coats of paint, and some glitter later, I was ready with an army of festive little animals! The best part (aside from how adorably colorful they are) is that they're not breakable! Plus, you can make them in any color scheme you'd like. So, pop on a Christmas movie, grab your supplies, and get crafting!

You need these festive friends on your tree! The best part (aside from how adorably colorful they are) is that they're not breakable! Plus, you can make them in any color scheme you'd like. So, pop on a Christmas movie, grab your supplies, and get c…

You will need:

Plastic animals (here and here)
Acrylic paint (here)
Felt (similar here)
Screw eyes (similar here)
Glitter (here)
Toothpicks
Gluegun
Scissors
Pliers
Embroidery floss (similar here)

Directions:

You need these festive friends on your tree! The best part (aside from how adorably colorful they are) is that they're not breakable! Plus, you can make them in any color scheme you'd like. So, pop on a Christmas movie, grab your supplies, and get c…

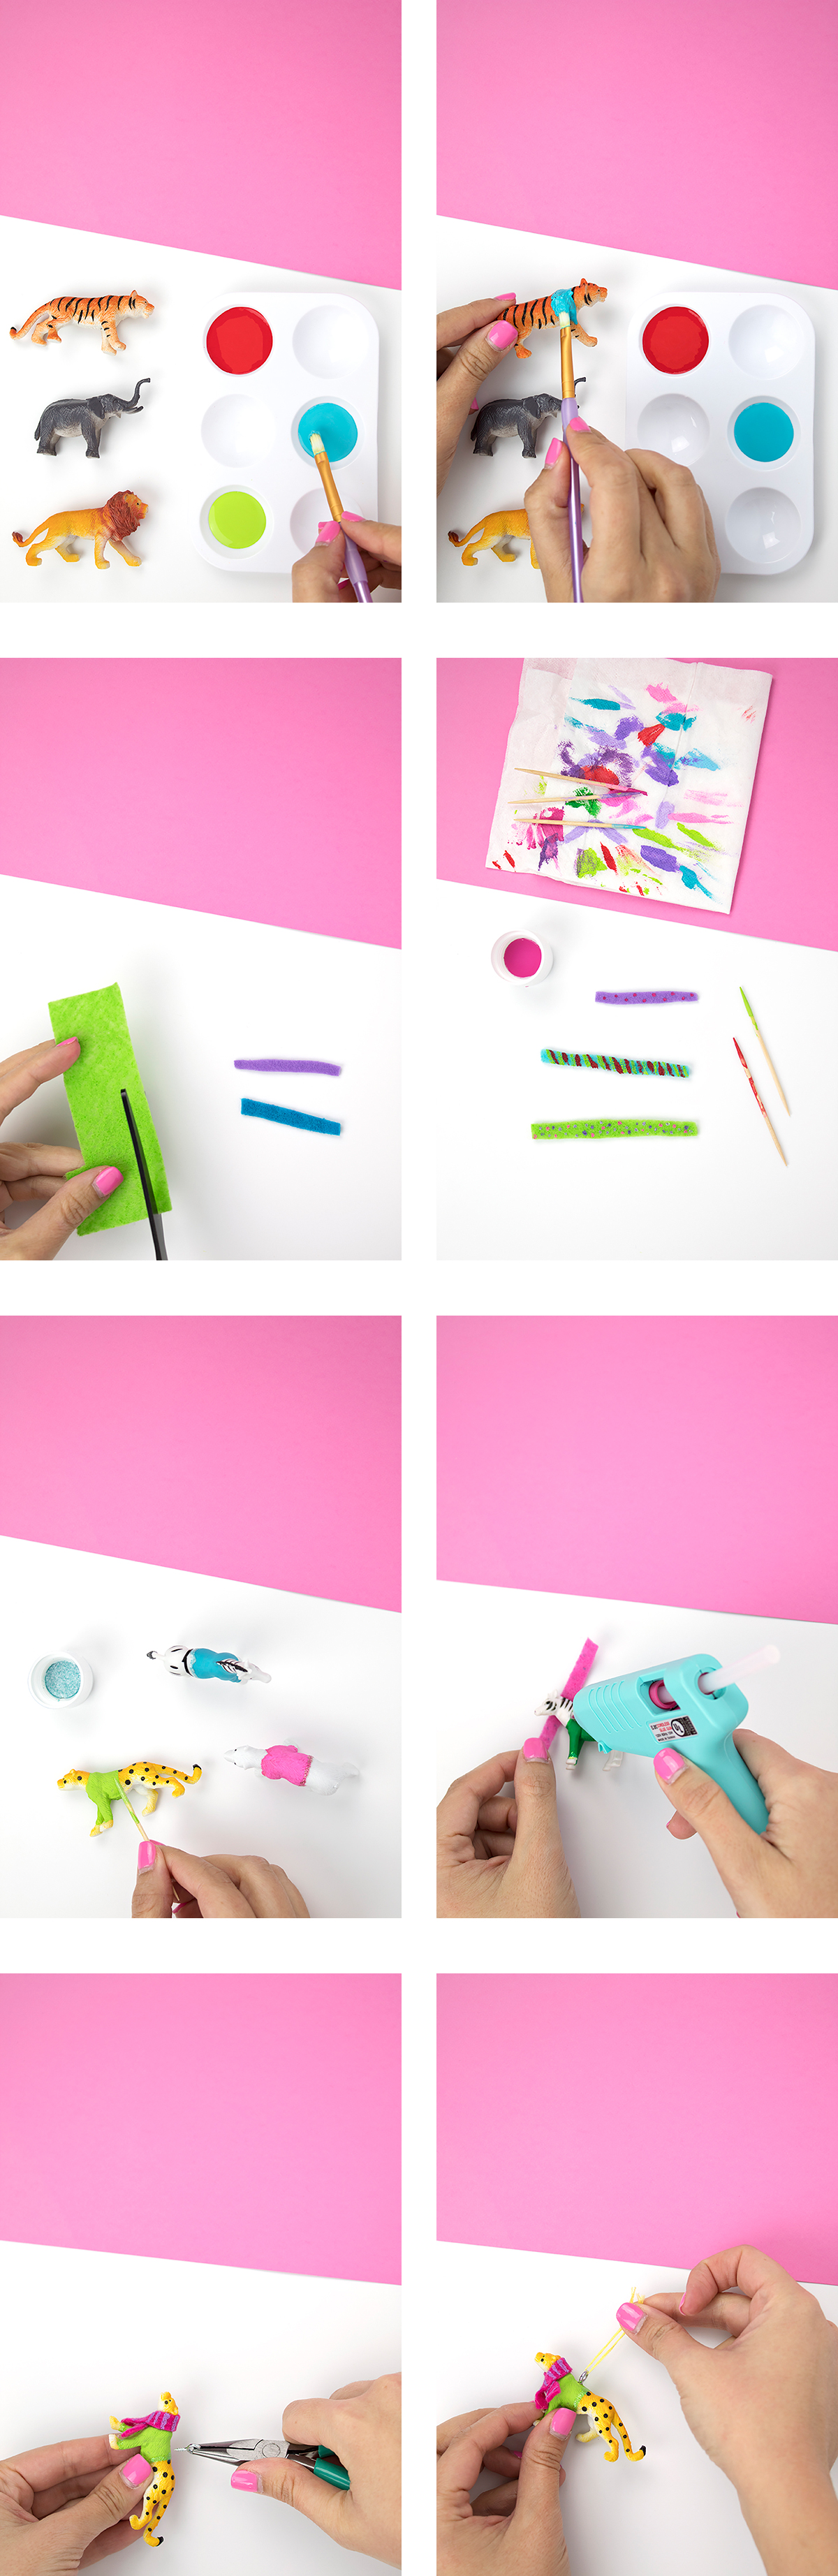
1. Paint a sweater onto your animals using your acrylic paint. I did it freehand, but you can always use some artist's tape if you don't have a steady hand. I did 2 coats.

2. While they dry, cut a few thin strips of felt for the scarf. Try to be mindful of how large the animals' necks are in comparison to the length and width of the scarf.

3. Paint your scarves with either a thin paint brush or a toothpick. I used the pointy side for the polka dots, and the edge for stripes. I used a paintbrush for the thicker stripes, but overall I mostly used toothpicks.

4. Once the animals are dry, add glitter to the edge of the sweater to jazz it up and provide a clean edge. I used glitter paint, but you can achieve a similar look by using a small amount of equal parts glue and glitter to create your own paste/paint. I found that a toothpick was the perfect tool to get the glitter paint on in a thin line.

5. Glue your scarf in place. I used a small dab of hot glue on the scarf to shut it. If it moved around too much, I added a small dab of glue on the animal to secure it in place.

6. Using your pliers, screw the screw eye into place. I first took the pointy screw side and twisted in to make a small hole, then I used my pliers to twist the screw eye into place. When it gets to a point that it's mostly in, I recommend using your hand to twist it all the way in, so that your pliers don't scratch the paint.

7. Add a small piece of embroidery floss to hang.

You need these festive friends on your tree! The best part (aside from how adorably colorful they are) is that they're not breakable! Plus, you can make them in any color scheme you'd like. So, pop on a Christmas movie, grab your supplies, and get c…

Dinosaur ornaments!! I mean, how stinking cute are these?! I know that dinosaurs could never exist among the other animals, but maybe a sweater and a cute scarf could have saved them from extinction.

You need these festive friends on your tree! The best part (aside from how adorably colorful they are) is that they're not breakable! Plus, you can make them in any color scheme you'd like. So, pop on a Christmas movie, grab your supplies, and get c…

How cute are these ornaments?! This has become one of my favorite and most fun projects to make on the blog! I really love re-purposing little animal toys, as exhibited by my Circus Animal Drink Stirrers and Zebra Party Tray. You can also use larger toys for a regular-sized tree, but these were perfect for my tiny pink mini-tree! Oh, and did I mention that they make a great necklace? Because they do!

You need these festive friends on your tree! The best part (aside from how adorably colorful they are) is that they're not breakable! Plus, you can make them in any color scheme you'd like. So, pop on a Christmas movie, grab your supplies, and get c…

Will these ornaments be joining your tree this year? Or, perhaps your kids' tree?! Let me know what you plan to make in the comments below!

DIY Holographic Ornament Tags

Every year at Christmas, I always think back to Christmas when I was a kid. There was something magical about the holiday season back then. I distinctly remember Christmas feeling different. There was an anticipation in the air, like anything could happen. The magic of Santa, the warmth of your home, the mystery surrounding the gifts you would receive… it was exhilarating. This year, I wanted to make something that commemorate the amazing childhood Christmases that I had. The iridescent effect on these ornaments is super 90’s, while also being modern. Holographic items are coming back! These are relatively cheap to make in bulk, so you can make them for all your gift tags, to decorate a tree, or to create a Christmas banner. Give them to all your friends who love the 90’s as much as you do!

The iridescent effect on these ornaments is super 90’s, while also being modern. Holographic items are coming back! Give them to all your friends who love the 90’s as much as you do! Click for the DIY. #diychristmasornaments #diygifttags#diychristma…

You will need:

Colored cardstock (similar here)
2.5 inch circle punch (similar here)
Holographic paper (similar here)
Scissors (here)
Embroidery floss (similar here)
Glue Stick
Glue gun

Directions:

The iridescent effect on these ornaments is super 90’s, while also being modern. Holographic items are coming back! Give them to all your friends who love the 90’s as much as you do! Click for the DIY. #diychristmasornaments #diygifttags#diychristma…

1.     Cut out circles with your circle punch.

2.     Cut a trapezoid shape out of your holographic paper and a white or light colored backdrop. You’ll need one for each ornament you make.

3.     Cut a “shine” shape out of the holographic paper (not the backdrop paper). I made an L shape with a curve to finish off the triangle.

4.     Using your glue stick, glue the large edge of the trapezoid onto the top of your ornament. Add glue to the holographic trapezoid, and glue it on top. Finally, add glue to your shine and put it with the flat edge facing down.

5.     Using your glue gun, secure your hanging ribbon or embroidery floss. I made mine short and cute, but you can make it any length you need!

6.     Hang on your tree, a gift, or make a garland and you’re ready to go!

The iridescent effect on these ornaments is super 90’s, while also being modern. Holographic items are coming back! Give them to all your friends who love the 90’s as much as you do! Click for the DIY. #diychristmasornaments #diygifttags#diychristma…

You can add names to the front or the back of your tag if you wish, or you can add a simple monogram using a sticker. I kept the front of mine plain because I thought they looked so cute! I love tilting mine back and forth to see the iridescent effect!

The iridescent effect on these ornaments is super 90’s, while also being modern. Holographic items are coming back! Give them to all your friends who love the 90’s as much as you do! Click for the DIY. #diychristmasornaments #diygifttags#diychristma…

How do you plan to use your holographic ornaments? Let me know in the comments below!

DIY No Sew Embellished T-Shirt

Happy fall, y'all! Ok, being from NY I don't say normally say "y'all", but this seemed like the perfect time to try it out. Fall is my favorite season. I love the leaves changing colors, the weather getting slightly cooler, and the amazing roundup of holidays in such a short timeframe!

With the busy hustle and bustle of the holiday season, I don't have time to construct a perfect outfit. I've gotta be comfy and ready for anything! T-shirts are my go-to fashion choice, because of how easy and versatile they are. You can wear them to work, to dinner & drinks, and to go shopping. But wouldn't it be nice if you could give your t-shirt an upgrade so you're not wearing the same thing over and over again, without having to bust out a sewing machine? Well friends, look no further! This no-sew embellished t-shirt features some of our favorite things- tees, tassels, and pom pom trim! Plus, two of my fave colors- pink and turquoise! And, it's all thanks to this Peel n Stick Fabric Fuse.

T-shirts are my go-to fashion choice, because of how easy and versatile they are. You can wear them to work, to dinner & drinks, and to go shopping. But wouldn't it be nice if you could give your t-shirt an upgrade so you're not wearing the same…
T-shirts are my go-to fashion choice, because of how easy and versatile they are. This no-sew embellished t-shirt features some of our favorite things- tees, tassels, and pom pom trim! #diytshirtideas #diytshirtnosew #tshirtmakeover
 

You will need:

T-shirts are my go-to fashion choice, because of how easy and versatile they are. This no-sew embellished t-shirt features some of our favorite things- tees, tassels, and pom pom trim! #diytshirtideas #diytshirtnosew #tshirtmakeover

T-shirt (here)
Peel N Stick Fabric Fuse (here
Fringe Trim (here or similar here)
Pink Pom Pom Trim (here or similar here)
Scissors (here)

Directions:

T-shirts are my go-to fashion choice, because of how easy and versatile they are. This no-sew embellished t-shirt features some of our favorite things- tees, tassels, and pom pom trim!
  • Measure your fringe trim so that it goes along the entire collar of your shirt

  • Add a little extra and cut the trim. I found that I had just enough to go around with the extra, so I guess the collar somehow got smaller being laid down!

  • Measure your Pom Pom trim to the same length, and cut.

  • Roll out some small pieces of the adhesive, and cut it into narrower strips. I cut each strip into thirds vertically.

  • Place it along your tassel trim. I didn't put it along the entire length, but every inch or so I stuck a piece down.

T-shirts are my go-to fashion choice, because of how easy and versatile they are. This no-sew embellished t-shirt features some of our favorite things- tees, tassels, and pom pom trim! #diytshirtideas #diytshirtnosew #tshirtmakeover
  • Once all your adhesive has been placed down, go piece by piece, removing the wax liner and pressing down the Pom Pom trim to adhere the two trims together.

  • Cut pieces of adhesive in half lengthwise and place them end to end along the collar of your shirt. I didn't leave any gaps here so that the trim wouldn't fall off the shirt.

  • Once all your adhesive has been placed down, starting at the front, peel off the wax liner and start pressing down your trim. Repeat until the whole collar is covered. (Note: for a v-neck, I started front and center, since that's where the seam is. For a crew neck, you can probably start in the back and wrap around to create a smooth, seam free "necklace" of trim).

T-shirts are my go-to fashion choice, because of how easy and versatile they are. This no-sew embellished t-shirt features some of our favorite things- tees, tassels, and pom pom trim! #diytshirtideas #diytshirtnosew #tshirtmakeover

Sources: Cactus Cup

And that's all there is to it! It's seriously fun to spruce up any article of clothing, and then you get to proudly tell people "I made it!" when they ask where it's from. I think these would also make a great gift for a friend- matching BFF tees! Or, it would be perfect for a craft night. If the whole collar is a bit much for you, try getting a pocket tee and adding the trim along the top of the pocket for a little bit of POP. 

What's your favorite item to spruce up? Tees? Jeans? Shoes? Let me know in the comments below!

DIY Christmas Drink Stirrers

ok, I know I'm a little ahead of the game here, but I'm just too dang excited. IT'S ALMOST CHRISTMASSSSSSSS. I've been waiting all year for the holiday season to roll around again, partly because I have all these great Christmas DIY projects I've been wanting to show you. I figured we'd start it off easy with these Christmas drink stirrers so that we can start swizzling those Christmas cocktails and get in the holiday spirit, amiright? 

These Christmas stirrers are super easy and super affordable. You can make them in your choice of colors, but I'm always a fan of pink so I chose a more modern color palette. I had actually made these last year for the blog, but the photos came out SO BAD that I couldn't bring myself to post them (see them here). So, I knew they had to be my first project this year. I gave them a slight makeover and a new color scheme, and voila! Ready to go.

Want to get into the Ho-Ho-Holiday spirit? Grab these drink stirrers for your Christmas spirits (hah, see what I did there?!) They’re really easy to make for your Christmas party or cookie exchange. Click to make your own right now! #drinkstirrers #…

You will need:

Want to get into the Ho-Ho-Holiday spirit? Grab these drink stirrers for your Christmas spirits (hah, see what I did there?!) They’re really easy to make for your Christmas party or cookie exchange. Click to make your own right now! #drinkstirrers #…

Wooden stirrers (here)
Assorted rhinestones (similar here and here)
Assorted sparkly pom poms (from Michaels, similar here)
Glue gun (similar here)
Toothpick


Rhinestone Stirrers:

Want to get into the Ho-Ho-Holiday spirit? Grab these drink stirrers for your Christmas spirits (hah, see what I did there?!) They’re really easy to make for your Christmas party or cookie exchange. Click to make your own right now! #drinkstirrers #…

Directions: Take your wooden stirrer and put a dab of glue on the end. If your glue gun puts out a thick dollop, use a toothpick to put a small amount of glue on the back of the rhinestone or onto the stirrer. Place your large rhinestone at the top. Then, put 2 more of the small rhinestones underneath it. If you want it to look less home made, flip it over and repeat for the other side.

Want to get into the Ho-Ho-Holiday spirit? Grab these drink stirrers for your Christmas spirits (hah, see what I did there?!) They’re really easy to make for your Christmas party or cookie exchange. Click to make your own right now! #drinkstirrers #…
 

Mini PomPom Stirrers:

Want to get into the Ho-Ho-Holiday spirit? Grab these drink stirrers for your Christmas spirits (hah, see what I did there?!) They’re really easy to make for your Christmas party or cookie exchange. Click to make your own right now! #drinkstirrers #…

Directions: Put a dab of glue on one end of the stirrer, and pop on your pompom. Hold in place until it dries, then repeat for the other 2 pom poms. Easy peasy!

Want to get into the Ho-Ho-Holiday spirit? Grab these drink stirrers for your Christmas spirits (hah, see what I did there?!) They’re really easy to make for your Christmas party or cookie exchange. Click to make your own right now! #drinkstirrers #…
 

Snowman Stirrers:

Want to get into the Ho-Ho-Holiday spirit? Grab these drink stirrers for your Christmas spirits (hah, see what I did there?!) They’re really easy to make for your Christmas party or cookie exchange. Click to make your own right now! #drinkstirrers #…

Directions: Glue the pompoms onto the stirrer in size order from smallest to largest. You can also glue your pompoms in the other direction if you want it to be festive instead of snowman.

Want to get into the Ho-Ho-Holiday spirit? Grab these drink stirrers for your Christmas spirits (hah, see what I did there?!) They’re really easy to make for your Christmas party or cookie exchange. Click to make your own right now! #drinkstirrers #…

And there you have it! 3 easy ways to get festive with your drink stirrers for coffee, hot cocoa, and cocktails. These are perfect for any age, and they're disposable! You could even use them as drink markers, depending on how many people you have since each one can be different. And, since you can mix and match the colors, you can make these to match any holiday or event.

Want to get into the Ho-Ho-Holiday spirit? Grab these drink stirrers for your Christmas spirits (hah, see what I did there?!) They’re really easy to make for your Christmas party or cookie exchange. Click to make your own right now! #drinkstirrers #…

I'm SO excited for all the posts coming to the blog in the next few weeks. There are some really good ones headed your way!!

So, which drink stirrer would you grab for your drink? And what drink would it be? Let me know in the comments below!

Easy Striped Halloween Art

It's FALL!!! Halloween is almost here!!! YAYYYY!

Ok, I think I'm a little bit too excited about Halloween, but I just can't help it. Halloween is one of my favorite holidays, and fall is my favorite season! This week, I whipped out my Halloween decorations, and started to decorate. While I love the traditional black and orange, I wanted something with a little more color to add a pop to my usual Halloween decor. Lucky for me, I knew just what to do! And lucky for you, I made a DIY for ya ;)

While I love the traditional black and orange, I wanted something with a little more color to add a pop to my usual Halloween decor. Click to check out the easy DIY! #halloweenart #diyhalloween #halloweencrafts

You will need:

While I love the traditional black and orange, I wanted something with a little more color to add a pop to my usual Halloween decor. Click to check out the easy DIY! #halloweenart #diyhalloween #halloweencrafts

Square canvas (here)
Glitter Paper (from the craft store, similar here)
X-Acto Knife (here)
1" Painter's Tape (here)
T-Square or Ruler (here)
Neon Paint (similar here)
Scissors (here)
Pencil
Paint Brush

How to:

While I love the traditional black and orange, I wanted something with a little more color to add a pop to my usual Halloween decor. Click to check out the easy DIY! #halloweenart #diyhalloween #halloweencrafts

1. Using your T-Square or ruler, make lines going across the sides of your canvas at every inch. Flip it, and make lines on the other side. We are doing this so that we know where our tape needs to go without making lines on the front. We want our lines to be as straight as possible!

2. Add your tape, starting at one end, wrapping across the front, and lining up on the other side. Press it down so the paint doesn't sneak in like mine did ;)

3. Paint your canvas, making sure to get the sides too. I found the neon paint to be a bit thin, so I did a few coats. 

4. When your paint is dry, peel off the tape .

4. Create large letters on your computer and print. I did EEK because it would be easier to cut out, but you can do anything! I cut out my printed letters, traced them onto the glitter paper (BACKWARDS!) and then cut them out using scissors, and an X-Acto knife for the smaller parts. I use this cutting mat to protect my work surface and love it! 

While I love the traditional black and orange, I wanted something with a little more color to add a pop to my usual Halloween decor. Click to check out the easy DIY! #halloweenart #diyhalloween #halloweencrafts

5. Hot glue your letters onto your canvas. You'll want to make marks so it's centered, by making a very faint line on the canvas and then gluing the letter right on top.

While I love the traditional black and orange, I wanted something with a little more color to add a pop to my usual Halloween decor. Click to check out the easy DIY! #halloweenart #diyhalloween #halloweencrafts

"Eye" hope you liked this post! If you're not into the whole neon Halloween thing, you can definitely change it up to the classic black and orange. Or, if Halloween isn't your thing at all, you can make one of these and use it as a monogram decor in your home! The possibilities are endless. You can make these for every holiday! Especially if you get the canvases on sale with a coupon from Michael's (which is what I did!)

While I love the traditional black and orange, I wanted something with a little more color to add a pop to my usual Halloween decor. Click to check out the easy DIY! #halloweenart #diyhalloween #halloweencrafts

What's your favorite color combo for Halloween? Do you like to keep it classic? Try new things? Hate Halloween in general? Let me know in the comments below!